Step 3: Turn on the monitor and computer

First turn on the monitor, then turn on the computer.

The installation of your monitor is complete.

If necessary, use the monitor’s controls to adjust the picture.

If no picture appears on your screen

Check that the monitor is correctly connected to the computer.

If NO INPUT SIGNAL appears on the screen, confirm that the video signal cable is properly connected and all plugs are firmly seated in their sockets.

If MONITOR IS IN POWER SAVE MODE appeared on the screen, try pressing any key on the computer keyboard.

If you are replacing an old monitor with this model and OUT OF SCAN RANGE appears on the screen, reconnect the old monitor. Then adjust the computer’s graphic board so that the horizontal frequency is between 30 – 96 kHz, and the vertical frequency is between 48 – 120 Hz.

For more information about the on-screen messages, see “Trouble symptoms and remedies” on page 14.

For customers using Windows 95/98

To maximize the potential of your monitor, install the new model information file from the supplied Windows Monitor Information Disk onto your PC.

This monitor complies with the “VESA DDC” Plug & Play standard. If your PC/graphics board complies with DDC, select “Plug & Play Monitor (VESA DDC)” or this monitor’s model name as the monitor type in the “Control Panel” of Windows 95/98. If your PC/graphics board has difficulty communicating with this monitor, load the Windows Monitor Information Disk and select this monitor’s model name as the monitor type.

For customers using Windows NT4.0

Monitor setup in Windows NT4.0 is different from Windows 95/98 and does not involve the selection of monitor type. Refer to the Windows NT4.0 instruction manual for further details on adjusting the resolution, refresh rate, and number of colors.

Adjusting the monitor’s resolution and color number

Adjust the monitor’s resolution and color number by referring to your computer’s instruction manual. The color number may vary according to your computer or video board. The color palette setting and the actual number of colors are as follows:

High Color (16 bit) t 65,536 colors

True Color (24 bit) t about 16.77 million colors In true color mode (24 bit), speed may be slower.

Selecting the on-screen menu language (LANG)

English, French, German, Spanish, Italian, Dutch, Swedish, Russian and Japanese versions of the on-screen menus are available. The default setting is English.

1Press the center of the control button.

See page 9 for more information on using the control button.

MENU


OK

MENU

MENU


COLOR

CENTER

CONV

GEOM

EXIT

HELP

LANG

SIZE

OPTION

2Move the control button to highlight LANG and press the center of the control button again.

MENU

L ANGUAGE

ENGL I SH

FRANÇA I S

DEUT SCH

ESPAÑOL

I T A L I ANO

NEDER L ANDS

SVENSKA

3Move the control button m/M to select a language.

ENGLISH

FRANÇAIS: French

DEUTSCH: German

ESPAÑOL: Spanish

ITALIANO: Italian

NEDERLANDS: Dutch

SVENSKA: Swedish

: Russian

: Japanese

To close the menu

Press the center of the control button once to return to the main MENU, and twice to return to normal viewing. If no buttons are pressed, the menu closes automatically after about 30 seconds.

To reset to English

Press the RESET button while the LANGUAGE menu is displayed on the screen.

US

7

Page 7
Image 7
Sony CPD-G200 manual Turn on the monitor and computer, Selecting the on-screen menu language Lang

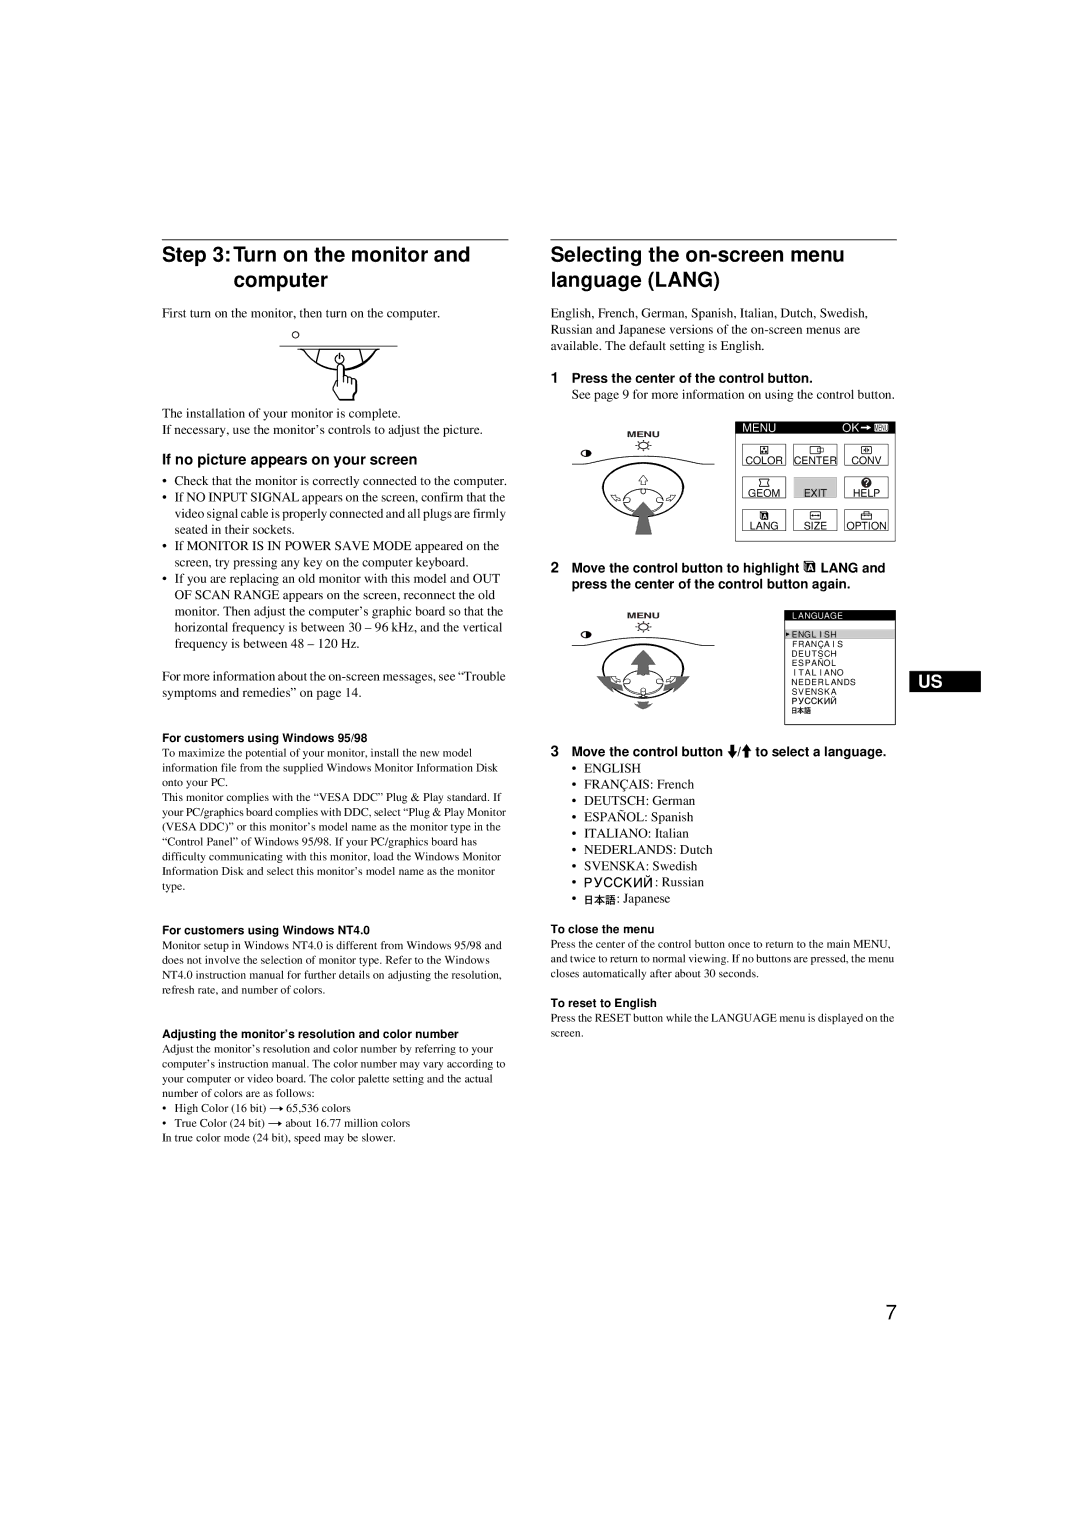
CPD-G200 specifications

The Sony CPD-G200 is a notable model in the realm of CRT (cathode ray tube) monitors, recognized for its commitment to image quality and design reliability. Released in the late 1990s, this model quickly became popular among professional graphic designers, gamers, and everyday consumers who appreciated high-resolution displays. One of the standout features of the CPD-G200 is its impressive resolution capability, with support for various resolutions, including 1600 x 1200 at a refresh rate of 85Hz. This quality allows users to experience sharp, detailed images, making it suitable for graphic-intensive applications.

Its 20-inch (51 cm) display size strikes a balance between providing ample screen real estate while maintaining a compact desk footprint. The monitor utilizes Sony's Trinitron technology, which utilizes an aperture grille instead of the shadow mask found in traditional CRT designs. This leads to superior brightness, color accuracy, and overall picture clarity. With a vertical refresh rate range of 48 Hz to 120 Hz, the CPD-G200 is adept at handling both standard desktop tasks and fast-moving video content, ensuring smooth visuals during use.

Another remarkable aspect of the CPD-G200 is its ergonomic design. The user-friendly on-screen display (OSD) allows for easy adjustments of brightness, contrast, and other picture settings, facilitating an optimal viewing experience tailored to individual preferences. The monitor also features tilt and swivel capabilities to enhance user comfort, reducing strain during prolonged usage.

To further enhance its capabilities, the CPD-G200 is equipped with various input options, including standard VGA input, making it compatible with a wide range of computers and devices from the time of its release. Additionally, the monitor was designed with a focus on reduced electromagnetic interference, ensuring a cleaner, flicker-free display that is pleasant on the eyes, crucial for long work sessions.

Overall, the Sony CPD-G200 appeals to users who prioritize exceptional image quality and reliable performance in a CRT monitor. Its combination of advanced technologies and thoughtful design features makes it a noteworthy option for anyone needing a robust display solution in the transitional period before the widespread adoption of LCD technology. Although today’s market has shifted towards flat-screen monitors, the legacy of the CPD-G200 remains significant in the history of display innovation.