124-308-111
2009 Sony Corporation
Owner’s Record
Risk of electric shock to persons
Important Safety Instructions
Countries/regions Voltage Frequency Hz Plug type
Countries/regions Voltage Frequency Hz
Central America
Countries/regions Voltage
Read this before operating your camcorder
Lithium-Ion batteries are
Regulatory Information
Operating Guide This manual
Using the camcorder
Supplied items
About this manual
About changing the language setting
On recording
Operation flow
Recording movies and photos p
Table of contents
Making good use of your camcorder
Charging the battery pack
Turn off your camcorder by closing the LCD screen
To use a wall outlet wall socket as a power source
Charging the battery pack abroad
To remove the battery pack
Make the same connections as Charging the battery pack
Set DST SET or SUMMERTIME, date and time, then touch
Turning the power on, and setting the date and time
Open the LCD screen of your camcorder
Your camcorder is turned on
Power button
Changing the language setting
To turn off the power
Open the LCD screen of your camcorder
Recording movies
Fasten the grip belt Open the lens cover
Recording
To stop recording, press START/STOP again
Power zoom lever
Press START/STOP to start recording
Shooting photos
Press Mode to turn on the Photo lamp
Default setting, photos are recorded on the hard disk p
Appears during Easy Handycam operation mode
Press View Images
Playing movies
Open the LCD screen of your camcorder
Touch the Movie tab a desired movie
Viewing photos
To adjust the sound volume of movies
While playing back movies, touch adjust with /
Your camcorder starts playing the selected movie
Your camcorder displays the selected photo
Index screen
Playing images on a TV
A/V connecting cable supplied
A/V connecting cable with S Video sold separately
Play back movies and photos on your camcorder p
Preparing a computer
When using a Macintosh
Installing the supplied software PMB
Checking the computer system
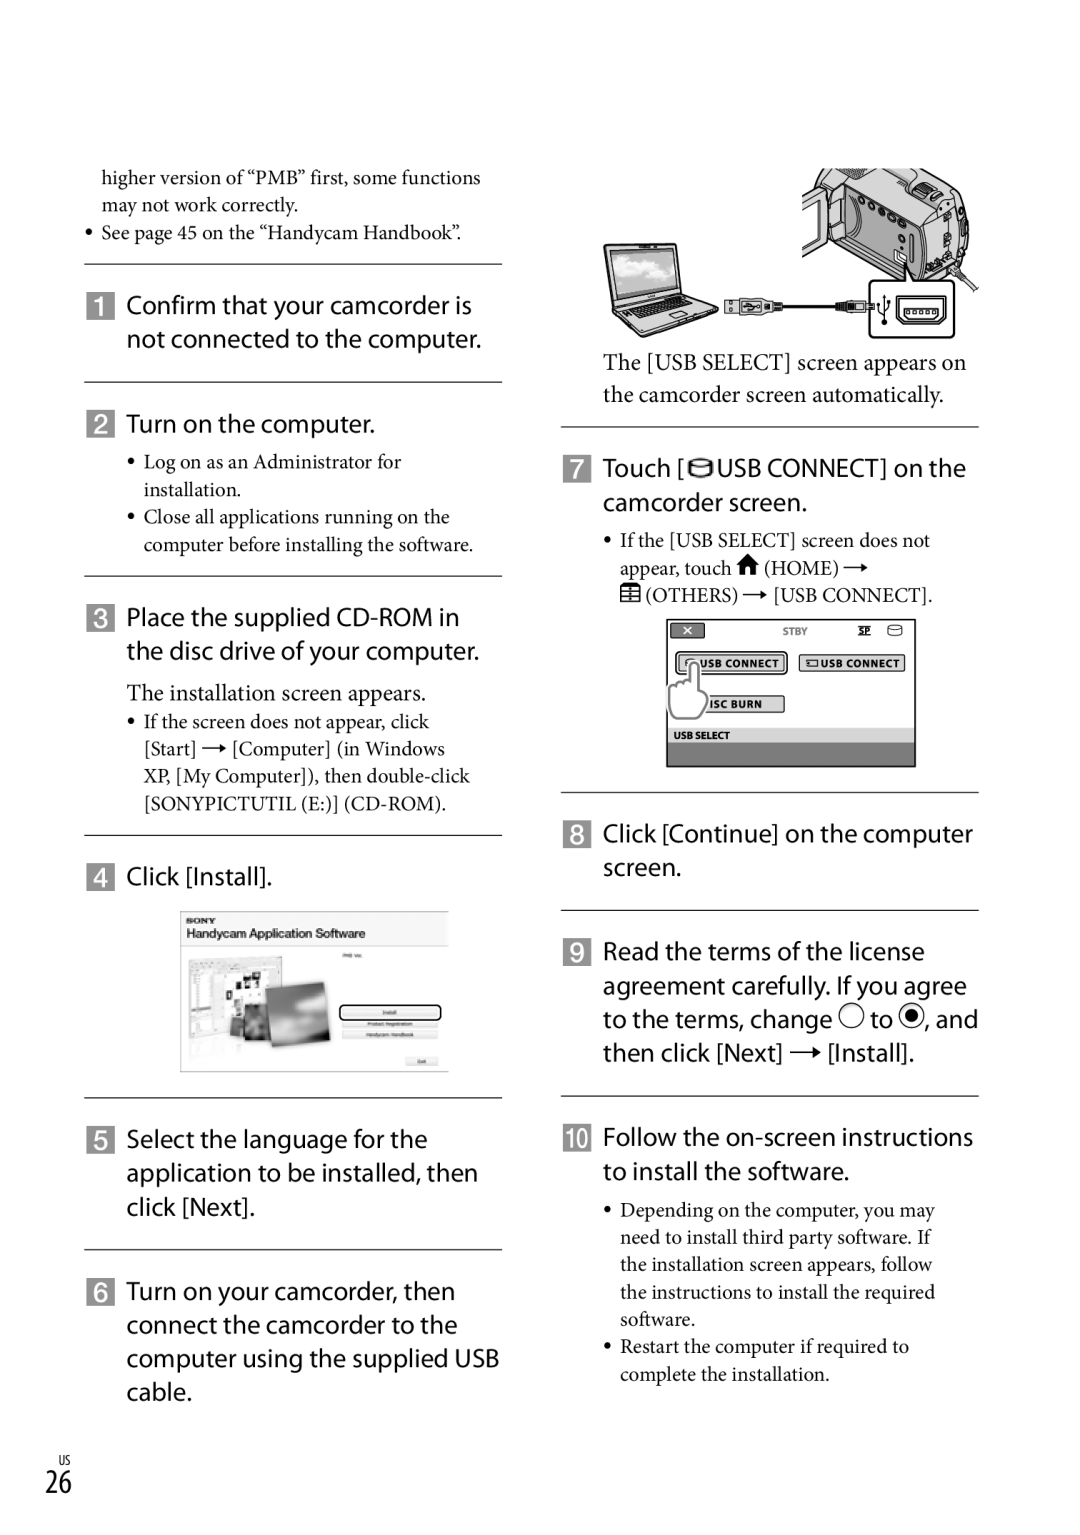
Touch USB Connect on the camcorder screen
Installation screen appears
Turn on the computer
Click Continue on the computer screen
To disconnect your camcorder from the computer
Creating a disc with one touch
Remove the CD-ROM from your computer
Importing movies and photos to a computer
USB Select screen appears on the camcorder screen
On the computer screen, click Easy PC Back-up Import
Starting PMB Picture
Reading PMB Guide
Double-click the PMB short-cut icon on the computer screen
Copying a disc
Creating a disc
Follow the instructions on the screen to create a disc
Editing movies
Saving images with a DVD writer, recorder
Press Disc Burn on the DVD writer
Disc Burn screen appears on the camcorder screen
To create a disc with the selected images
To play back a disc on the DVD writer
Saving images with a DVD writer, recorder
Record movies on the connected device
Disconnect the USB cable
Creating a disc with a recorder, etc
To delete movies, touch
Deleting movies and photos
Touch Home Others
Formatting the recording media
Coping with shooting conditions
Adjusting the exposure for backlit subjects Backlight
Using a tripod
Changing the recording medium
Touch Home Manage Media PHOTO Media SET
To check the recording media settings
Selecting the media for photos
Touch the desired recording medium Touch YES
Touch YES
To eject the Memory Stick PRO Duo media
Using the Home Menu
Using the Option Menu
View Images category
List
Camera category
Others category
Settings category
Movie Settings
Tab
List of the Option Menu
Following items are available on the Option Menu only
Tab depends on the situation/no tab
Getting detailed information from the Handycam Handbook
Click Exit Exit, then remove the CD-ROM from your computer
Troubleshooting
Self-diagnosis display/Warning indicators
The recording media is full. Delete unnecessary images p
Precautions
On charging the pre-installed rechargeable battery
About care and storage of the lens
System
Specifications
Input/Output connectors
General
Expected recording time of movies in the internal hard disk
Rechargeable battery pack
AC Adaptor AC-L200C/AC-L200D
NP-FH50 DCR-SR87
Recording time
On trademarks
Center
Screen indicators
Upper left
Upper right
Parts and controls
Speaker
USB jack 25, 27, 28, 31 Additional information
Access lamp Memory Stick PRO Duo media
Backlight button Reset button
Index
Computer system Operation beeps Zoom
Page
Lea este apartado antes de utilizar la videocámara
Advertencia
Guía de operaciones este manual
Elementos suministrados
Notas sobre el uso
Uso de la videocámara
Acerca de este manual
Grabación
Acerca del cambio del ajuste de idioma
Flujo de funcionamiento
Grabación de películas y fotografías pág
Tabla de contenido
Grabación y reproducción sencilla de películas y fotografías
Utilización correcta de la videocámara
Tabla de contenido
Batería
Paso 1 Carga de la batería
Carga
De ca
Notas sobre la batería y el adaptador de alimentación de ca
Carga de la batería en el extranjero
Para extraer la batería
Procedimientos iniciales
El reloj empezará a funcionar
Abra la pantalla de cristal líquido de la videocámara
La videocámara se enciende
Para apagar la videocámara
Botón Power
Cambio del ajuste de idioma
Grabación
Grabación de películas
Palanca del zoom Motorizado
Presione START/STOP para iniciar la grabación
Para detener la grabación, presione de nuevo START/STOP
Grabación
Presione Mode para encender el indicador Fotografía
Captura de fotografías
Aparece durante el funcionamiento en modo Easy Handycam
Presione Visualizar Imágenes
Reproducción de películas
Abra la pantalla de cristal líquido de la videocámara
Toque la ficha película la película deseada
Reproducción
Para ajustar el volumen del sonido de las películas
Visualización de fotografías
La videocámara muestra la fotografía seleccionada
Visual Index
Cable de conexión de A/V suministrado
Reproducción de imágenes en un televisor
Video , se vende por separado
Reproduzca películas y fotografías en la videocámara pág
Al usar un Macintosh
Preparación de una computadora
Paso 1 Comprobación del sistema de la computadora
No regrabable
Aparecerá la pantalla de instalación
Paso 2 Instalación del software suministrado PMB
Encienda la computadora
Toque Conexión USB en la pantalla de la videocámara
Retire el CD-ROM de la computadora
Presione Disc Burn
Siga las instrucciones de la pantalla de la computadora
Cambio de la unidad o carpeta
De destino para las películas y Fotografías
Inicio de PMB Picture
Lectura de la Guía de PMB
Copia de un disco
Creación de un disco
Creación de DVD-Video SD
En la parte superior de la ventana, haga clic en Manipular
Clic
Edición de películas
Captura de fotografías desde una película
Presione Disc Burn en la grabadora de DVD
Para crear un disco con las imágenes seleccionadas
Para reproducir un disco en la grabadora de DVD
Almacenamiento de imágenes con una grabadora de DVD
Cuando finalice la operación, toque FIN SÍ en la pantalla
Conector Remoto de A/V Entrada
Creación de un disco con una grabadora, etc
Cable de conexión de A/V suministrado
se vende por separado
Ajustes Ajustes Salida
Toque Home
Toque Home Otros
Formateo de los soportes de grabación
Toque SÍ
Uso de un trípode
Cambio del soporte de grabación
Ajuste de la exposición de motivos a contraluz Contraluz
Selección del soporte de grabación de películas
Para comprobar los ajustes del soporte de grabación
Selección del soporte para las fotografías
Toque el soporte de grabación deseado Toque SÍ
Inserción del Memory Stick PRO Duo
Utilización de Home Menu
Personalización de la videocámara mediante los menús
Toque SÍ
Para expulsar el Memory Stick PRO Duo
Utilización de Option Menu
Cuando finalice el ajuste, toque
Uso de la función Help
Cuando finalice el ajuste, toque
Lista del
Categoría
Gestionar Soporte
AJ.REL./IDIOM
La ficha depende de la situación/sin ficha
Lista del Option Menu
Ficha
Page
La videocámara se calienta
Solución de problemas
La videocámara no se enciende
La alimentación se desconecta repentinamente
PMB no funciona correctamente
La grabación se detiene
No se puede instalar PMB
La computadora no reconoce la videocámara
No se insertó ningún Memory Stick PRO Duo pág
Información complementaria
Pantalla de cristal líquido
Precauciones
Uso y cuidados
Cuidado y almacenamiento del objetivo
Para limpiar la pantalla de cristal líquido
Manipulación de la unidad
Carga de la batería recargable preinstalada
Conectores de entrada/salida
Especificaciones
Sistema
Generales
Adaptador de alimentación de ca AC- L200C/AC-L200D
NP-FH30
Ajustes Ajustes PEL.CÁM Modo Audio
Marcas comerciales
Parte central
Indicadores de la pantalla
Parte superior izquierda
Parte superior derecha
Altavoz Micrófono incorporado
Piezas y controles
Los números entre corresponden a las páginas de referencia
Botón contraluz Botón Reset
Indicador Access disco duro
Botón Mode
Pantalla de cristal líquido/panel táctil
Índice
Tipo TV
US/ES
 USB CONNECT] on the camcorder screen.