MZ-S1

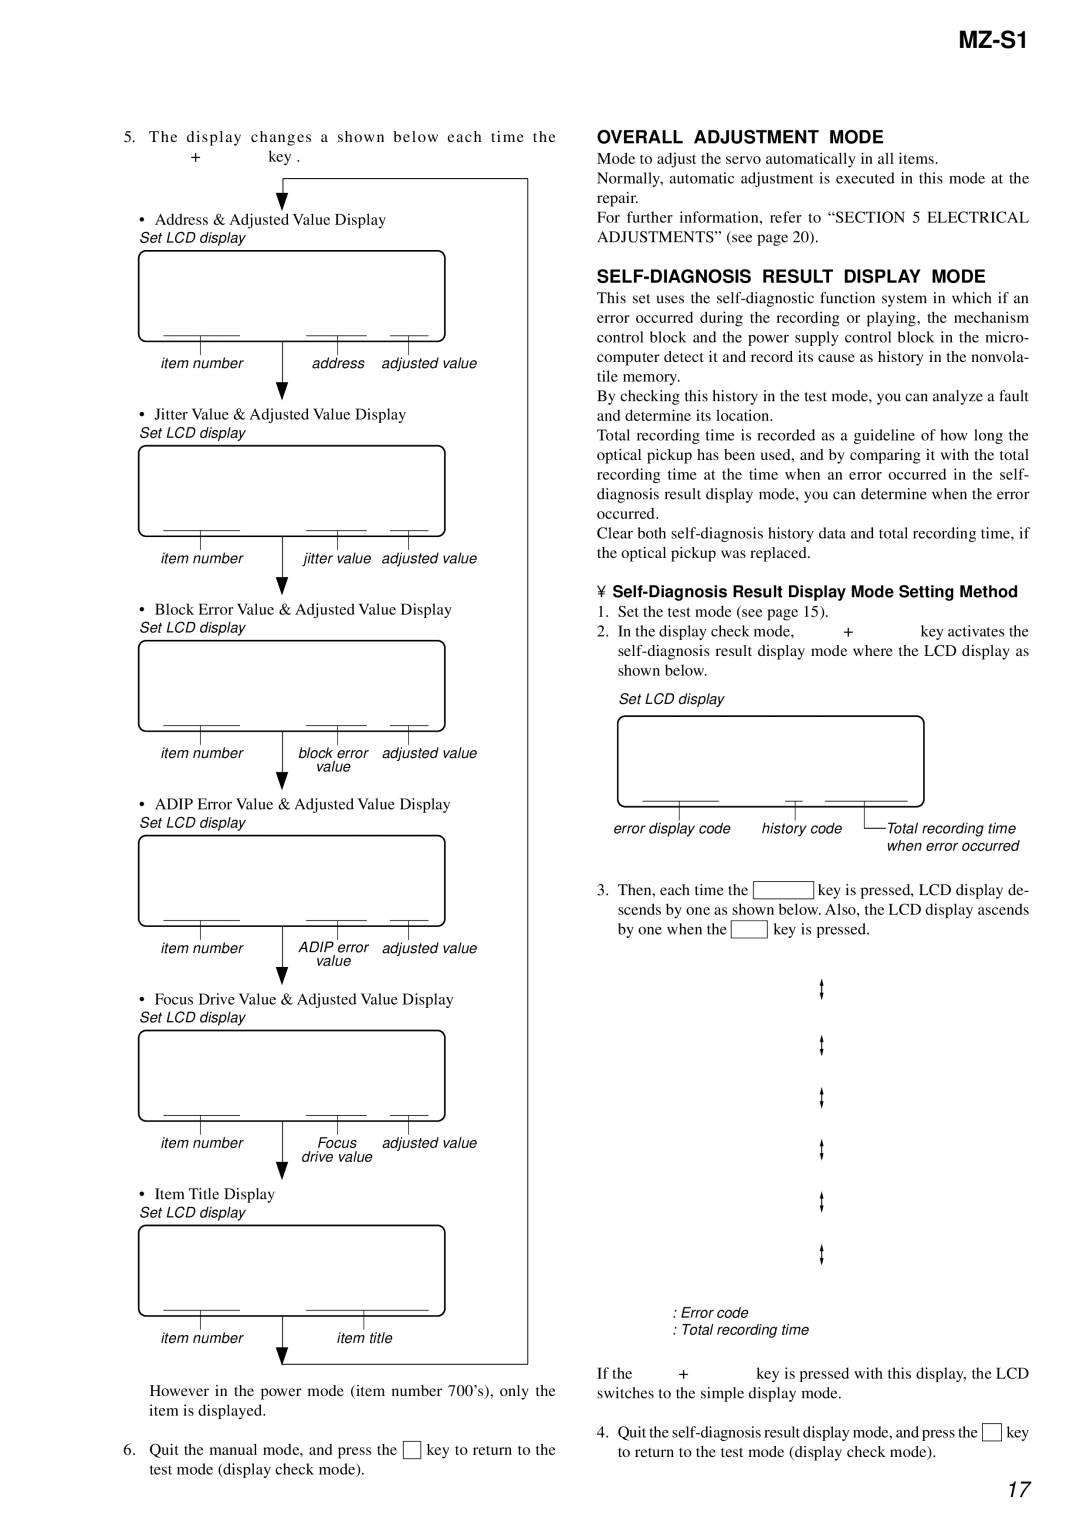
5.The display changes a shown below each time the

[MENU/ENTER] key .

Address & Adjusted Value Display

Set LCD display

000C68SCC


item number


address adjusted value


Jitter Value & Adjusted Value Display

Set LCD display

0000FEJCC


item number

jitter value adjusted value


Block Error Value & Adjusted Value Display

Set LCD display

000063BCC


item number

block error adjusted value


value

ADIP Error Value & Adjusted Value Display

Set LCD display

000025ACC


item number

ADIP error adjusted value


value

Focus Drive Value & Adjusted Value Display

Set LCD display

000000FCC


item number


Focus

adjusted value


drive value


Item Title Display

Set LCD display

000LrefPw


item number


item title


However in the power mode (item number 700’s), only the item is displayed.

6.Quit the manual mode, and press the x key to return to the test mode (display check mode).

OVERALL ADJUSTMENT MODE

Mode to adjust the servo automatically in all items.

Normally, automatic adjustment is executed in this mode at the repair.

For further information, refer to “SECTION 5 ELECTRICAL ADJUSTMENTS” (see page 20).

SELF-DIAGNOSIS RESULT DISPLAY MODE

This set uses the self-diagnostic function system in which if an error occurred during the recording or playing, the mechanism control block and the power supply control block in the micro- computer detect it and record its cause as history in the nonvola- tile memory.

By checking this history in the test mode, you can analyze a fault and determine its location.

Total recording time is recorded as a guideline of how long the optical pickup has been used, and by comparing it with the total recording time at the time when an error occurred in the self- diagnosis result display mode, you can determine when the error occurred.

Clear both self-diagnosis history data and total recording time, if the optical pickup was replaced.

Self-Diagnosis Result Display Mode Setting Method

1. Set the test mode (see page 15).

2. In the display check mode, [MENU/ENTER] key activates the self-diagnosis result display mode where the LCD display as shown below.

Set LCD display


0XX

1 0000


error display code

history code


Total recording time


when error occurred

3.Then, each time the N > key is pressed, LCD display de- scends by one as shown below. Also, the LCD display ascends by one when the . key is pressed.

1

0XX 1 ****

0XX N ****

0XX N1****

0XX N2****

0XX R_****

1

XX: Error code

** * * : Total recording time

If the [MENU/ENTER] key is pressed with this display, the LCD switches to the simple display mode.

4.Quit the self-diagnosis result display mode, and press the x key to return to the test mode (display check mode).

17

Page 17
Image 17
Sony MZ-S1 service manual 000 C68SCC, 000 0FEJCC, 000 063BCC, 000 025ACC, 000 000FCC, LrefPw

MZ-S1 specifications

The Sony MZ-S1 is a portable MiniDisc recorder that reflects Sony's commitment to innovation in the realm of digital audio technology. Launched in the early 2000s, this model stood out for its sophisticated design and advanced features, catering to audiophiles and casual listeners alike. The MZ-S1 was particularly popular for its ability to record audio in a compact format, making it an attractive option for those who desired high-quality sound in a portable package.

One of the defining characteristics of the MZ-S1 is its use of MiniDisc technology, which allowed users to record and store audio with impressive sound quality. It leveraged Sony’s ATRAC (Adaptive Transform Acoustic Coding) compression, ensuring that recordings maintained clarity while efficiently utilizing disk space. The MZ-S1 supported various recording modes, including SP (Standard Play) and LP (Long Play), providing flexibility in terms of sound quality and recording duration. This capability made the MZ-S1 an ideal choice for musicians looking to record rehearsals, as well as for consumers wanting to create custom playlists.

The MZ-S1 features a sleek, compact design that embodies the portability and aesthetics of early 2000s electronics. Its user-friendly interface is complemented by an LCD display that provides essential information such as track numbers, remaining recording time, and battery life. Additionally, the MZ-S1 was equipped with various connectivity options, including a line-in for direct recording from external sources and a headphone jack with volume control for private listening.

Powering the device was a rechargeable battery, which allowed for extended use without the need for constant replacements. The MZ-S1 also featured a durable construction, appealing to users who needed a reliable audio recorder for travel or outdoor use. This model proved particularly popular among students, journalists, and music enthusiasts, as its compact size and high-quality output made it an indispensable tool for capturing audio on the go.

Moreover, the MZ-S1 allowed users to edit tracks directly on the device, facilitating seamless transitions between recordings. With its blend of innovative features, robust technology, and portable design, the Sony MZ-S1 remains a noteworthy piece of audio equipment, encapsulating an era of digital audio evolution that paved the way for modern music consumption.