1-12

Projecting

5

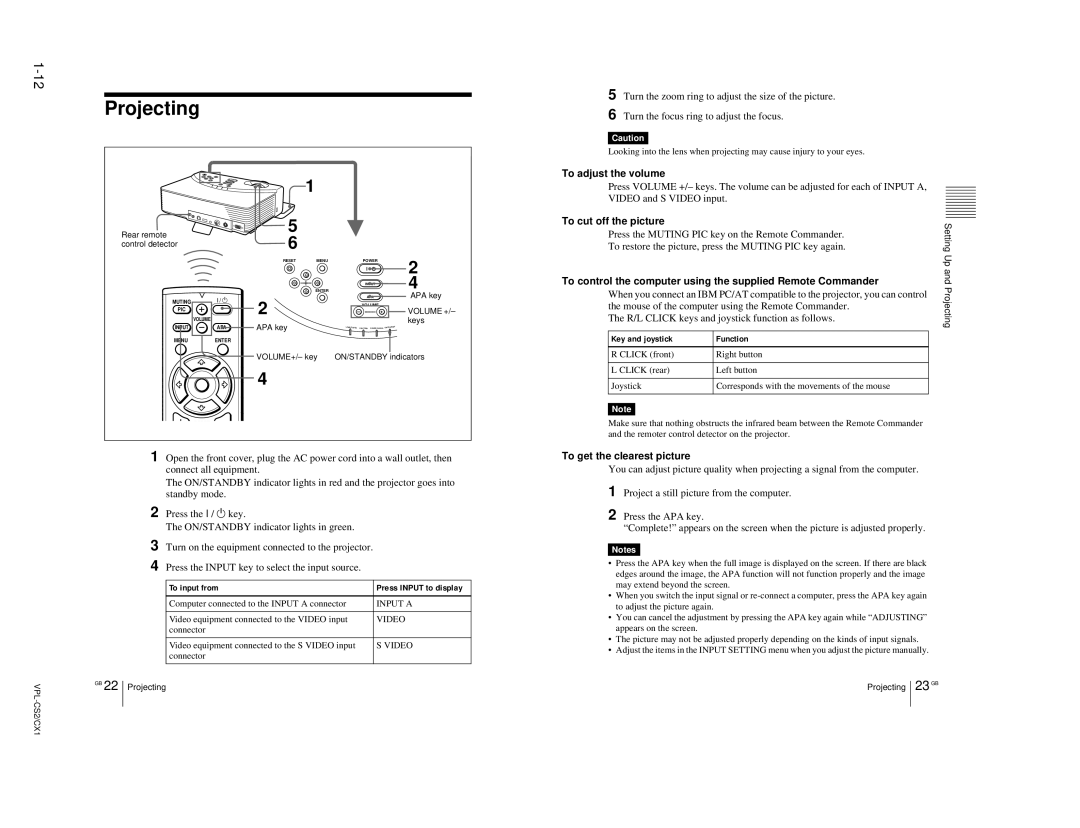
Turn the zoom ring to adjust the size of the picture.

6

Turn the focus ring to adjust the focus.


Caution


Looking into the lens when projecting may cause injury to your eyes.

To adjust the volume

Rear remote control detector

MUTING

+

I / 1

PIC


VOLUME


INPUT

APA

MENU


ENTER

1

5 6

RESET

MENU

POWER


INPUT


ENTER


2


APA


VOLUME


APA key

LAMP/COVER

FAN/TEMP

POWER SAVING

ON/STANDBY


2 4 APA key

VOLUME +/– keys

Press VOLUME +/– keys. The volume can be adjusted for each of INPUT A,


VIDEO and S VIDEO input.


To cut off the picture


SettingUpand

Press the MUTING PIC key on the Remote Commander.

To restore the picture, press the MUTING PIC key again.

To control the computer using the supplied Remote Commander

When you connect an IBM PC/AT compatible to the projector, you can control

Projecting

the mouse of the computer using the Remote Commander.

The R/L CLICK keys and joystick function as follows.


Key and joystick

Function


VOLUME+/– key

ON/STANDBY indicators

4


1

Open the front cover, plug the AC power cord into a wall outlet, then


connect all equipment.


The ON/STANDBY indicator lights in red and the projector goes into


standby mode.


2

Press the I / 1 key.


The ON/STANDBY indicator lights in green.


3

Turn on the equipment connected to the projector.


4

Press the INPUT key to select the input source.


To input from

Press INPUT to display


Computer connected to the INPUT A connector

INPUT A


Video equipment connected to the VIDEO input

VIDEO


connector


Video equipment connected to the S VIDEO input

S VIDEO


connector


GB

Projecting

VPL-CS2/CX1

22


R CLICK (front)

Right button


L CLICK (rear)

Left button


Joystick

Corresponds with the movements of the mouse


Note


Make sure that nothing obstructs the infrared beam between the Remote Commander


and the remoter control detector on the projector.


To get the clearest picture


You can adjust picture quality when projecting a signal from the computer.


1

Project a still picture from the computer.


2

Press the APA key.


“Complete!” appears on the screen when the picture is adjusted properly.


Notes


Press the APA key when the full image is displayed on the screen. If there are black


edges around the image, the APA function will not function properly and the image


may extend beyond the screen.


When you switch the input signal or re-connect a computer, press the APA key again


to adjust the picture again.


You can cancel the adjustment by pressing the APA key again while “ADJUSTING”


appears on the screen.


The picture may not be adjusted properly depending on the kinds of input signals.


Adjust the items in the INPUT SETTING menu when you adjust the picture manually.


Projecting


23

GB


Page 18
Image 18
Sony RM-PJM10, VPL-CX1 service manual Projecting, To adjust the volume, To cut off the picture, To get the clearest picture

RM-PJM10, VPL-CX1 specifications

The Sony VPL-CX1 is a compact and lightweight portable projector designed to deliver high-quality performance in various settings, including business presentations, educational environments, and home entertainment. Its versatility combined with a user-friendly interface makes it an excellent choice for professionals on the go or institutions looking to enhance their audiovisual presentations.

One of the standout features of the VPL-CX1 is its impressive brightness, boasting 3000 ANSI lumens. This level of brightness ensures that images remain vivid and clear even in well-lit environments, minimizing the need to dim lights during presentations. The projector utilizes a native XGA resolution of 1024 x 768 pixels, providing sharp images that enhance the viewing experience.

The VPL-CX1 incorporates advanced 3LCD technology, which provides excellent color reproduction and reduces the risk of color degradation over time. This technology ensures that colors are accurate and vibrant, making it ideal for displaying rich images, detailed graphics, and dynamic video content.

Another key characteristic is its connectivity options. The VPL-CX1 comes equipped with multiple inputs, including VGA, HDMI, and RCA, allowing for easy connection to a variety of devices such as laptops, DVD players, and even smartphones. This level of flexibility ensures seamless transitions between different sources during presentations.

Portability is a significant aspect of the VPL-CX1's design. Weighing just over 4.5 pounds and featuring a compact form factor, it is easy to transport and set up in various locations. The inclusion of a carrying case allows users to protect the device while on the move.

The RM-PJM10 remote control enhances the user experience by providing convenient access to essential functions from a distance. Users can easily navigate through settings, control volume, and switch input sources without needing to approach the projector.

In summary, the Sony VPL-CX1, supported by the RM-PJM10 remote, is a powerful, portable projector that combines brightness, color accuracy, and versatile connectivity. Its lightweight design makes it ideal for on-the-go professionals, educators, and home users alike. With its advanced technologies and user-friendly features, the VPL-CX1 is well-suited for delivering impactful presentations and enjoyable visual experiences.