Sony VPL-CX1, RM-PJM10 service manual REGLAGE. Instal

Models: RM-PJM10 VPL-CX1

1 118
Download 118 pages 29.38 Kb
Page 31
Image 31

VPL-CS2/CX1

/ Basic Operation / Opé ration de base / Operació n bá sica / Grundfunktion / Operazione di base

English

Españ ol

Italiano

1-25


1


4

2


RESET

MENU

POWER


INPUT

3


ENTER


APA


APA


VOLUME


LAMP/COVER FAN/TEMP POWER SAVING ON/STANDBY


MUTING

+

I / 1

2


PIC


VOLUME


INPUT

APA

APA


MENU


ENTER


3


1

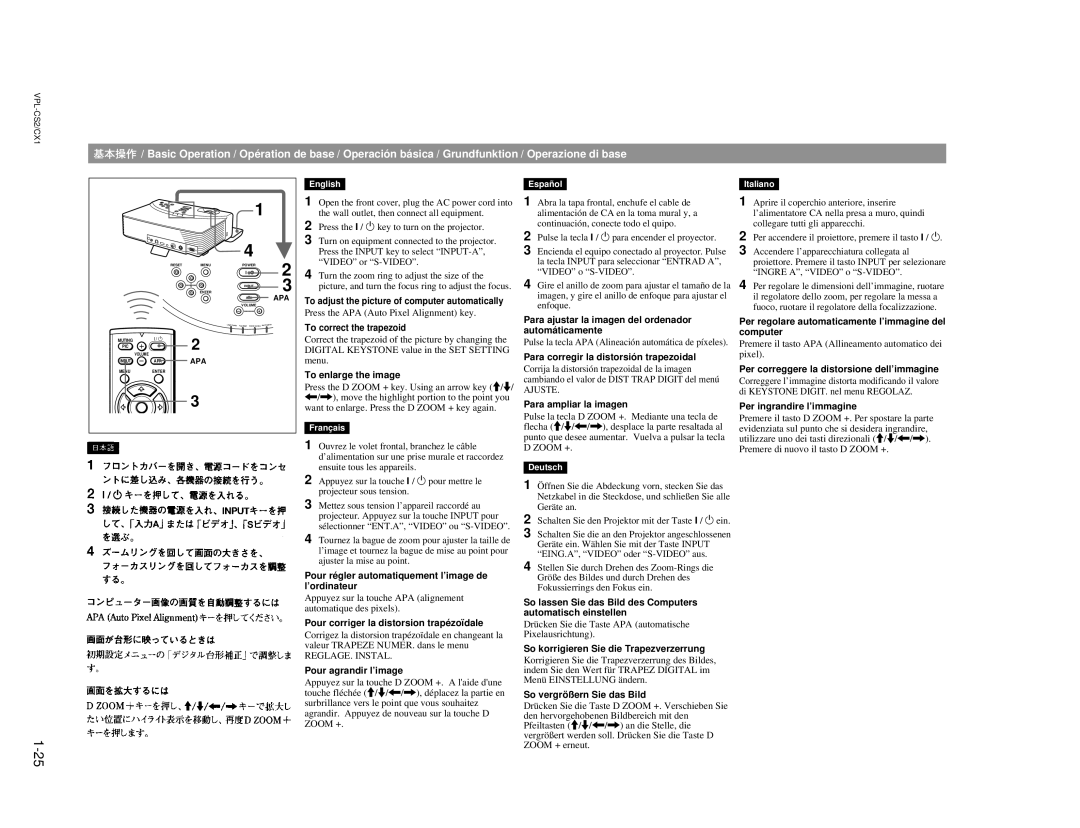
Open the front cover, plug the AC power cord into

2

the wall outlet, then connect all equipment.

Press the ? / 1 key to turn on the projector.

3

Turn on equipment connected to the projector.


Press the INPUT key to select “INPUT-A”,

4

“VIDEO” or “S-VIDEO”.

Turn the zoom ring to adjust the size of the


picture, and turn the focus ring to adjust the focus.

To adjust the picture of computer automatically

Press the APA (Auto Pixel Alignment) key.

To correct the trapezoid

Correct the trapezoid of the picture by changing the

DIGITAL KEYSTONE value in the SET SETTING

menu.

To enlarge the image

Press the D ZOOM + key. Using an arrow key (M/m/

</,), move the highlight portion to the point you

want to enlarge. Press the D ZOOM + key again.


Franç ais


1

Ouvrez le volet frontal, branchez le câble


d’alimentation sur une prise murale et raccordez

2

ensuite tous les appareils.

Appuyez sur la touche ? / 1 pour mettre le

3

projecteur sous tension.

Mettez sous tension l’appareil raccordé au


projecteur. Appuyez sur la touche INPUT pour

4

sélectionner “ENT.A”, “VIDEO” ou “S-VIDEO”.

Tournez la bague de zoom pour ajuster la taille de


l’image et tournez la bague de mise au point pour


ajuster la mise au point.

Pour ré gler automatiquement l’image de

l’ordinateur

Appuyez sur la touche APA (alignement

automatique des pixels).

Pour corriger la distorsion trapé zoïdale

Corrigez la distorsion trapézoïdale en changeant la

valeur TRAPEZE NUMER. dans le menu

REGLAGE. INSTAL.

Pour agrandir l’image

Appuyez sur la touche D ZOOM +. A l'aide d'une

touche fléchée (M/m/</,), déplacez la partie en

surbrillance vers le point que vous souhaitez

agrandir. Appuyez de nouveau sur la touche D

ZOOM +.

1

Abra la tapa frontal, enchufe el cable de


alimentació n de CA en la toma mural y, a

2

continuació n, conecte todo el quipo.

Pulse la tecla ? / 1 para encender el proyector.

3

Encienda el equipo conectado al proyector. Pulse


la tecla INPUT para seleccionar “ENTRAD A”,

4

“VIDEO” o “S-VIDEO”.

Gire el anillo de zoom para ajustar el tamañ o de la


imagen, y gire el anillo de enfoque para ajustar el


enfoque.

Para ajustar la imagen del ordenador

automá ticamente

Pulse la tecla APA (Alineació n automática de píxeles).

Para corregir la distorsió n trapezoidal

Corrija la distorsió n trapezoidal de la imagen

cambiando el valor de DIST TRAP DIGIT del menú

AJUSTE.

Para ampliar la imagen

Pulse la tecla D ZOOM +. Mediante una tecla de

flecha (M/m/</,), desplace la parte resaltada al

punto que desee aumentar. Vuelva a pulsar la tecla

D ZOOM +.

Deutsch

1

Ö ffnen Sie die Abdeckung vorn, stecken Sie das


Netzkabel in die Steckdose, und schließen Sie alle

2

Geräte an.

Schalten Sie den Projektor mit der Taste ? / 1 ein.

3

Schalten Sie die an den Projektor angeschlossenen


Geräte ein. Wählen Sie mit der Taste INPUT

4

“EING.A”, “VIDEO” oder “S-VIDEO” aus.

Stellen Sie durch Drehen des Zoom-Rings die


Größ e des Bildes und durch Drehen des


Fokussierrings den Fokus ein.

So lassen Sie das Bild des Computers

automatisch einstellen

Drü cken Sie die Taste APA (automatische

Pixelausrichtung).

So korrigieren Sie die Trapezverzerrung

Korrigieren Sie die Trapezverzerrung des Bildes,

indem Sie den Wert fü r TRAPEZ DIGITAL im

Menü EINSTELLUNG ändern.

So vergröß ern Sie das Bild

Drü cken Sie die Taste D ZOOM +. Verschieben Sie

den hervorgehobenen Bildbereich mit den

Pfeiltasten (M/m/</,) an die Stelle, die

vergröß ert werden soll. Drü cken Sie die Taste D

ZOOM + erneut.

1

Aprire il coperchio anteriore, inserire


l’alimentatore CA nella presa a muro, quindi

2

collegare tutti gli apparecchi.

Per accendere il proiettore, premere il tasto ? / 1.

3

Accendere l’apparecchiatura collegata al


proiettore. Premere il tasto INPUT per selezionare

4

“INGRE A”, “VIDEO” o “S-VIDEO”.

Per regolare le dimensioni dell’immagine, ruotare


il regolatore dello zoom, per regolare la messa a


fuoco, ruotare il regolatore della focalizzazione.

Per regolare automaticamente l’immagine del

computer

Premere il tasto APA (Allineamento automatico dei

pixel).

Per correggere la distorsione dell’immagine

Correggere l’immagine distorta modificando il valore

di KEYSTONE DIGIT. nel menu REGOLAZ.

Per ingrandire l’immagine

Premere il tasto D ZOOM +. Per spostare la parte

evidenziata sul punto che si desidera ingrandire,

utilizzare uno dei tasti direzionali (M/m/</,).

Premere di nuovo il tasto D ZOOM +.

Page 31
Image 31
Sony VPL-CX1, RM-PJM10 service manual REGLAGE. Instal

RM-PJM10, VPL-CX1 specifications

The Sony VPL-CX1 is a compact and lightweight portable projector designed to deliver high-quality performance in various settings, including business presentations, educational environments, and home entertainment. Its versatility combined with a user-friendly interface makes it an excellent choice for professionals on the go or institutions looking to enhance their audiovisual presentations.

One of the standout features of the VPL-CX1 is its impressive brightness, boasting 3000 ANSI lumens. This level of brightness ensures that images remain vivid and clear even in well-lit environments, minimizing the need to dim lights during presentations. The projector utilizes a native XGA resolution of 1024 x 768 pixels, providing sharp images that enhance the viewing experience.

The VPL-CX1 incorporates advanced 3LCD technology, which provides excellent color reproduction and reduces the risk of color degradation over time. This technology ensures that colors are accurate and vibrant, making it ideal for displaying rich images, detailed graphics, and dynamic video content.

Another key characteristic is its connectivity options. The VPL-CX1 comes equipped with multiple inputs, including VGA, HDMI, and RCA, allowing for easy connection to a variety of devices such as laptops, DVD players, and even smartphones. This level of flexibility ensures seamless transitions between different sources during presentations.

Portability is a significant aspect of the VPL-CX1's design. Weighing just over 4.5 pounds and featuring a compact form factor, it is easy to transport and set up in various locations. The inclusion of a carrying case allows users to protect the device while on the move.

The RM-PJM10 remote control enhances the user experience by providing convenient access to essential functions from a distance. Users can easily navigate through settings, control volume, and switch input sources without needing to approach the projector.

In summary, the Sony VPL-CX1, supported by the RM-PJM10 remote, is a powerful, portable projector that combines brightness, color accuracy, and versatile connectivity. Its lightweight design makes it ideal for on-the-go professionals, educators, and home users alike. With its advanced technologies and user-friendly features, the VPL-CX1 is well-suited for delivering impactful presentations and enjoyable visual experiences.