Installation Instructions
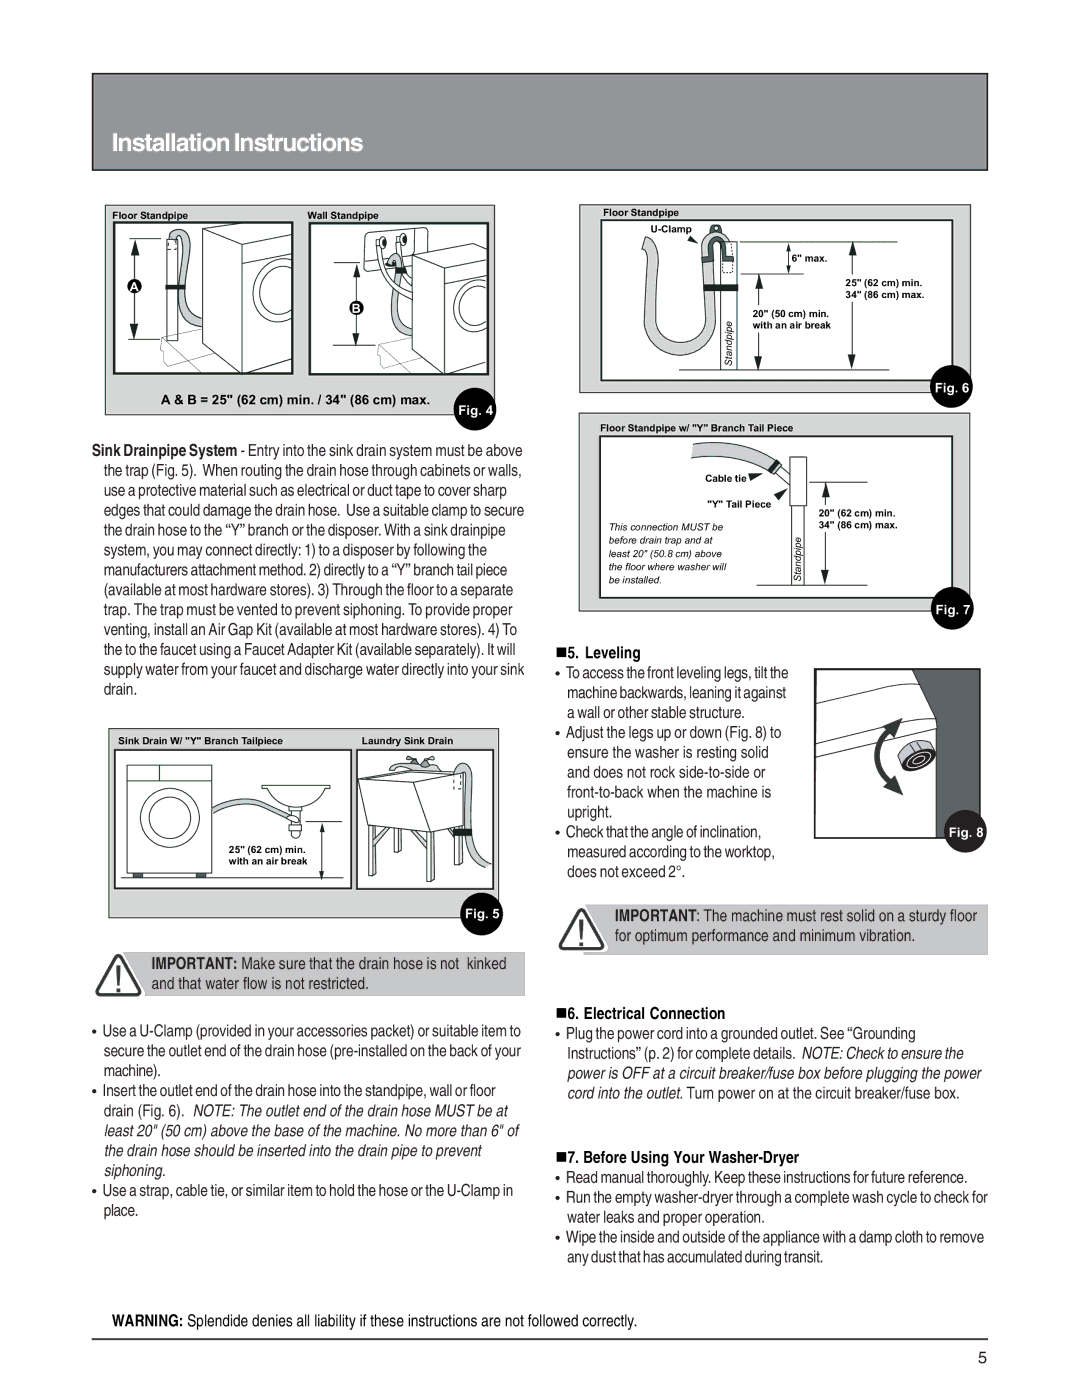
Floor Standpipe | Wall Standpipe |
A |
|
| B |
A & B = 25" (62 cm) min. / 34" (86 cm) max. | |
| Fig. 4 |
Sink Drainpipe System - Entry into the sink drain system must be above the trap (Fig. 5). When routing the drain hose through cabinets or walls, use a protective material such as electrical or duct tape to cover sharp edges that could damage the drain hose. Use a suitable clamp to secure the drain hose to the “Y” branch or the disposer. With a sink drainpipe system, you may connect directly: 1) to a disposer by following the manufacturers attachment method. 2) directly to a “Y” branch tail piece (available at most hardware stores). 3) Through the floor to a separate trap. The trap must be vented to prevent siphoning. To provide proper venting, install an Air Gap Kit (available at most hardware stores). 4) To the to the faucet using a Faucet Adapter Kit (available separately). It will supply water from your faucet and discharge water directly into your sink drain.
Sink Drain W/ "Y" Branch Tailpiece | Laundry Sink Drain |
25" (62 cm) min. |
|
with an air break |
|
| Fig. 5 |
IMPORTANT: Make sure that the drain hose is not kinked
!and that water flow is not restricted.
•Use a
•Insert the outlet end of the drain hose into the standpipe, wall or floor drain (Fig. 6). NOTE: The outlet end of the drain hose MUST be at least 20" (50 cm) above the base of the machine. No more than 6" of the drain hose should be inserted into the drain pipe to prevent siphoning.
•Use a strap, cable tie, or similar item to hold the hose or the
Floor Standpipe
| 6" max. | |
| 25" (62 cm) min. | |
| 34" (86 cm) max. | |
Standpipe | 20" (50 cm) min. | |
with an air break | ||
|
Fig. 6
Floor Standpipe w/ "Y" Branch Tail Piece
Cable tie |
|
|
|
|
|
| |
|
|
|
|
|
| ||
"Y" Tail Piece |
|
|
|
|
|
| |
|
| 20" | (62 cm) min. | ||||
|
|
|
| ||||
This connection MUST be |
|
| 34" | (86 cm) max. | |||
before drain trap and at | Standpipe |
|
|
|
|
| |
least 20" (50.8 cm) above |
|
|
| ||||
the floor where washer will |
|
|
|
|
|
| |
be installed. |
|
|
|
|
|
| |
|
|
|
|
|
|
|
|
Fig. 7
n5. Leveling
•To access the front leveling legs, tilt the machine backwards, leaning it against a wall or other stable structure.
•Adjust the legs up or down (Fig. 8) to ensure the washer is resting solid and does not rock
upright.
• Check that the angle of inclination,Fig. 8 measured according to the worktop,
does not exceed 2°.
IMPORTANT: The machine must rest solid on a sturdy floor
!for optimum performance and minimum vibration.
n6. Electrical Connection
•Plug the power cord into a grounded outlet. See “Grounding Instructions” (p. 2) for complete details. NOTE: Check to ensure the power is OFF at a circuit breaker/fuse box before plugging the power cord into the outlet. Turn power on at the circuit breaker/fuse box.
n7. Before Using Your Washer-Dryer
•Read manual thoroughly. Keep these instructions for future reference.
•Run the empty
•Wipe the inside and outside of the appliance with a damp cloth to remove any dust that has accumulated during transit.
WARNING: Splendide denies all liability if these instructions are not followed correctly.
5