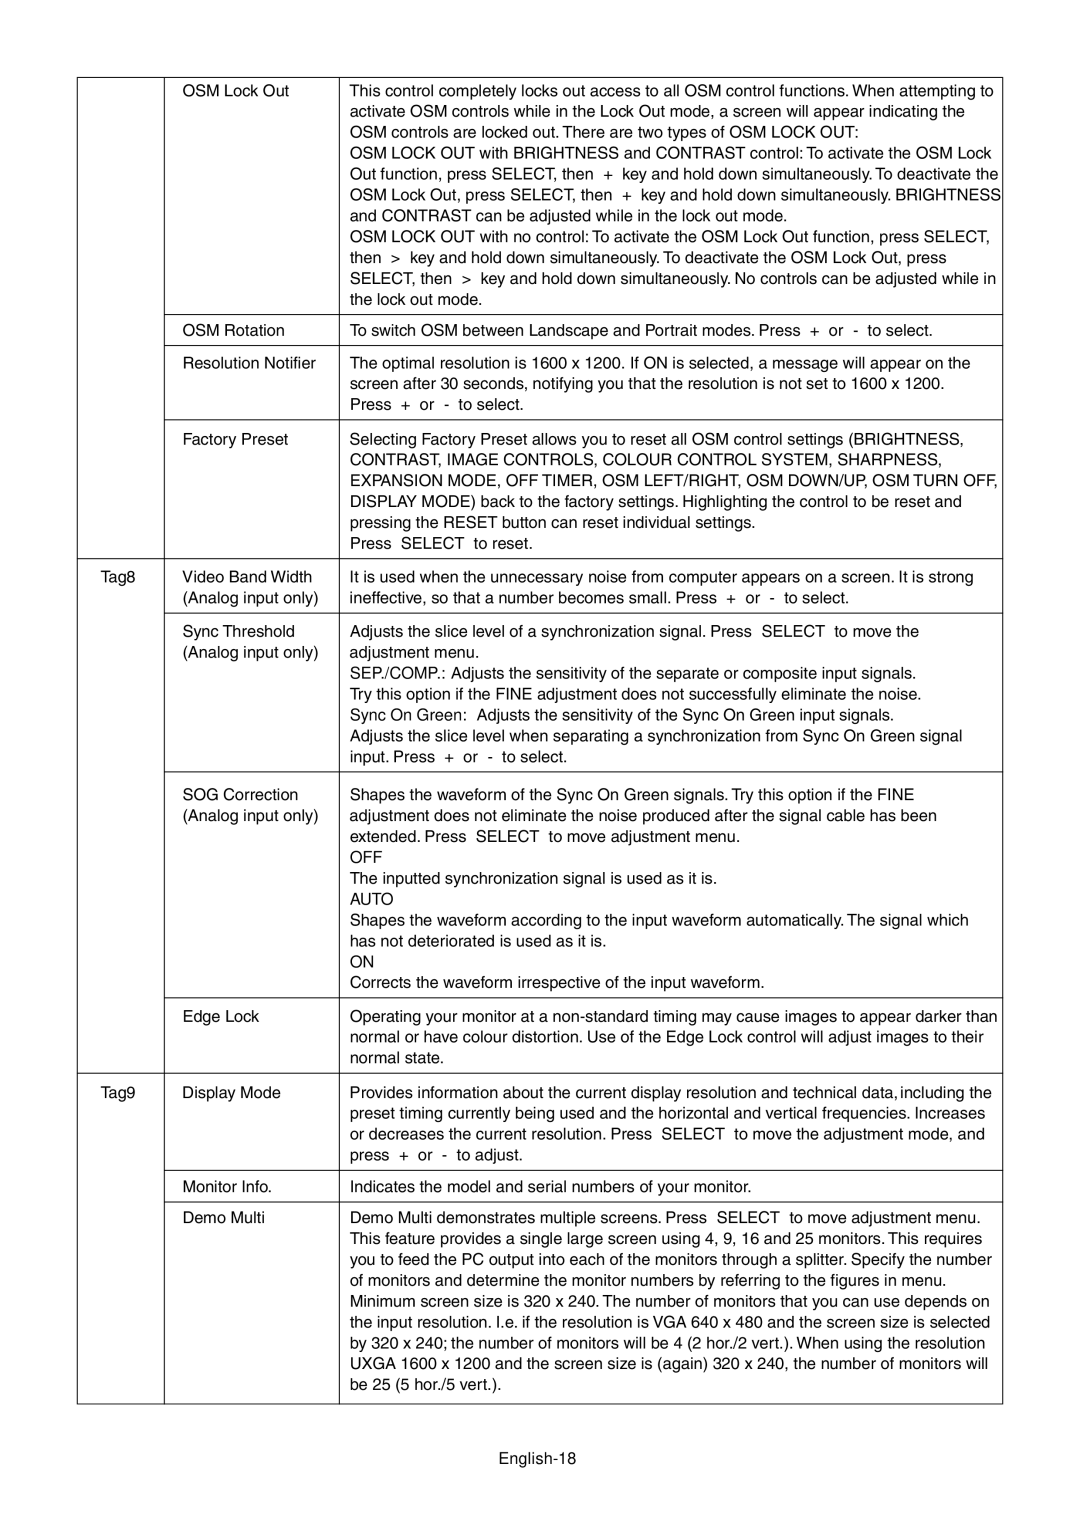
| OSM Lock Out | This control completely locks out access to all OSM control functions. When attempting to |
|
| activate OSM controls while in the Lock Out mode, a screen will appear indicating the |
|
| OSM controls are locked out. There are two types of OSM LOCK OUT: |
|
| OSM LOCK OUT with BRIGHTNESS and CONTRAST control: To activate the OSM Lock |
|
| Out function, press SELECT, then “+” key and hold down simultaneously. To deactivate the |
|
| OSM Lock Out, press SELECT, then “+” key and hold down simultaneously. BRIGHTNESS |
|
| and CONTRAST can be adjusted while in the lock out mode. |
|
| OSM LOCK OUT with no control: To activate the OSM Lock Out function, press SELECT, |
|
| then “>” key and hold down simultaneously. To deactivate the OSM Lock Out, press |
|
| SELECT, then “>” key and hold down simultaneously. No controls can be adjusted while in |
|
| the lock out mode. |
|
|
|
| OSM Rotation | To switch OSM between Landscape and Portrait modes. Press “+” or |
|
|
|
| Resolution Notifier | The optimal resolution is 1600 x 1200. If ON is selected, a message will appear on the |
|
| screen after 30 seconds, notifying you that the resolution is not set to 1600 x 1200. |
|
| Press “+” or |
|
|
|
| Factory Preset | Selecting Factory Preset allows you to reset all OSM control settings (BRIGHTNESS, |
|
| CONTRAST, IMAGE CONTROLS, COLOUR CONTROL SYSTEM, SHARPNESS, |
|
| EXPANSION MODE, OFF TIMER, OSM LEFT/RIGHT, OSM DOWN/UP, OSM TURN OFF, |
|
| DISPLAY MODE) back to the factory settings. Highlighting the control to be reset and |
|
| pressing the RESET button can reset individual settings. |
|
| Press “SELECT” to reset. |
|
|
|
Tag8 | Video Band Width | It is used when the unnecessary noise from computer appears on a screen. It is strong |
| (Analog input only) | ineffective, so that a number becomes small. Press “+” or |
|
|
|
| Sync Threshold | Adjusts the slice level of a synchronization signal. Press “SELECT” to move the |
| (Analog input only) | adjustment menu. |
|
| SEP./COMP.: Adjusts the sensitivity of the separate or composite input signals. |
|
| Try this option if the FINE adjustment does not successfully eliminate the noise. |
|
| Sync On Green: Adjusts the sensitivity of the Sync On Green input signals. |
|
| Adjusts the slice level when separating a synchronization from Sync On Green signal |
|
| input. Press “+” or |
|
|
|
| SOG Correction | Shapes the waveform of the Sync On Green signals. Try this option if the FINE |
| (Analog input only) | adjustment does not eliminate the noise produced after the signal cable has been |
|
| extended. Press “SELECT” to move adjustment menu. |
|
| OFF |
|
| The inputted synchronization signal is used as it is. |
|
| AUTO |
|
| Shapes the waveform according to the input waveform automatically. The signal which |
|
| has not deteriorated is used as it is. |
|
| ON |
|
| Corrects the waveform irrespective of the input waveform. |
|
|
|
| Edge Lock | Operating your monitor at a |
|
| normal or have colour distortion. Use of the Edge Lock control will adjust images to their |
|
| normal state. |
|
|
|
Tag9 | Display Mode | Provides information about the current display resolution and technical data, including the |
|
| preset timing currently being used and the horizontal and vertical frequencies. Increases |
|
| or decreases the current resolution. Press “SELECT” to move the adjustment mode, and |
|
| press “+” or |
|
|
|
| Monitor Info. | Indicates the model and serial numbers of your monitor. |
|
|
|
| Demo Multi | Demo Multi demonstrates multiple screens. Press “SELECT” to move adjustment menu. |
|
| This feature provides a single large screen using 4, 9, 16 and 25 monitors. This requires |
|
| you to feed the PC output into each of the monitors through a splitter. Specify the number |
|
| of monitors and determine the monitor numbers by referring to the figures in menu. |
|
| Minimum screen size is 320 x 240. The number of monitors that you can use depends on |
|
| the input resolution. I.e. if the resolution is VGA 640 x 480 and the screen size is selected |
|
| by 320 x 240; the number of monitors will be 4 (2 hor./2 vert.). When using the resolution |
|
| UXGA 1600 x 1200 and the screen size is (again) 320 x 240, the number of monitors will |
|
| be 25 (5 hor./5 vert.). |
|
|
|
Page 20
Image 20
