6
Horizontal/Vertical Scaling
The VGA2NTSCPRO allows horizontal and vertical scaling so that an image can be scaled to meet the visible part of your TV screen. If you are in Zoom mode, vertical scaling is disabled.
1. | Press the Menu button to call up the OSD menu. |
2. | Use the +/- buttons to scroll to the H/V Scaling icon. Press the Select button to view |
| the scaling settings. |
3. | A pair of small arrows will indicate whether you are in Vertical or Horizontal scale |
| mode. Use the Select button to toggle between Vertical and Horizontal mode. |
4. | The + button will spread your screen out towards the edges. The - button will |
| “tighten” or shrink the screen. |
Installation
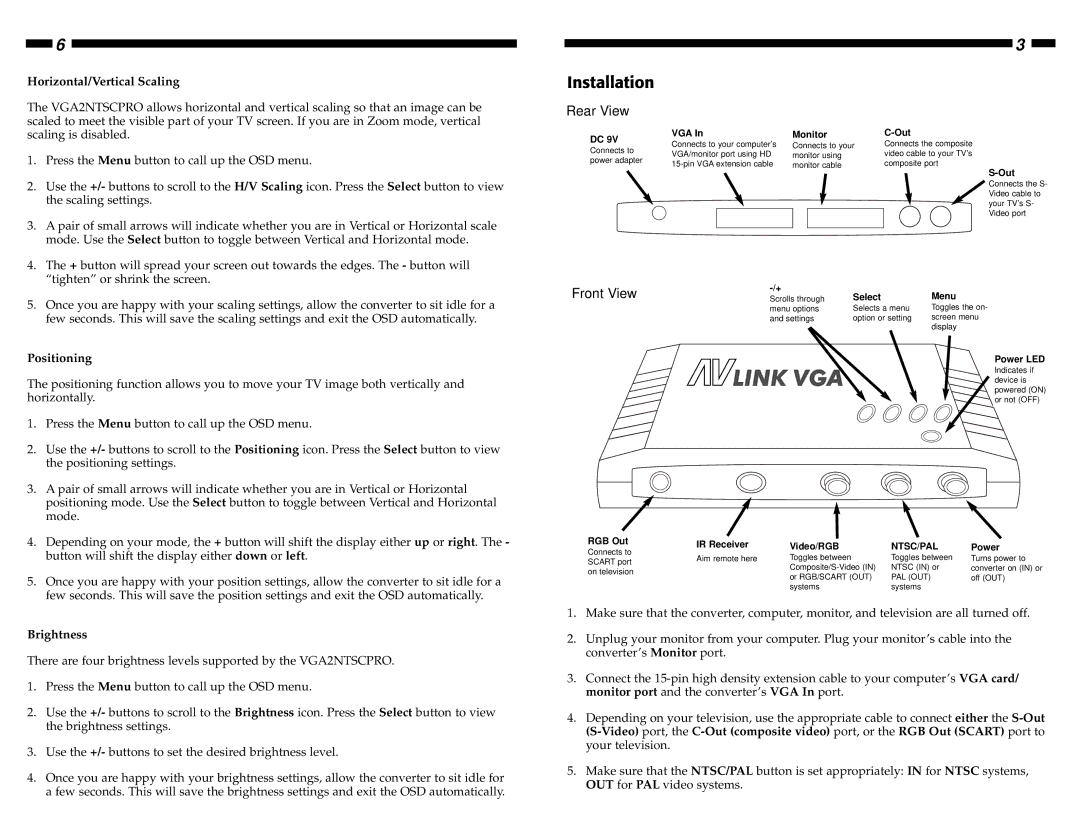
Rear View
DC 9V | VGA In |
| Monitor |
| |||
Connects to your computer’s |
| Connects to your |
| ||||
Connects to |
|
| |||||
VGA/monitor port using HD |
| monitor using |
| ||||
power adapter |
|
| |||||
| monitor cable |
| |||||
|
|
| |||||
|
|
|
|
|
|
|
|
|
|
|
|
|
|
|
|
|
|
|
|
|
|
|
|
3
Connects the composite video cable to your TV’s composite port
Connects the S- Video cable to your TV’s S- Video port
5. Once you are happy with your scaling settings, allow the converter to sit idle for a |
few seconds. This will save the scaling settings and exit the OSD automatically. |
Front View |
| Menu | |
Scrolls through | Select | ||
| menu options | Selects a menu | Toggles the on- |
| and settings | option or setting | screen menu |
|
|
| display |
|
|
|
Positioning
The positioning function allows you to move your TV image both vertically and horizontally.
1.Press the Menu button to call up the OSD menu.
2.Use the +/- buttons to scroll to the Positioning icon. Press the Select button to view the positioning settings.
3.A pair of small arrows will indicate whether you are in Vertical or Horizontal positioning mode. Use the Select button to toggle between Vertical and Horizontal mode.
4.Depending on your mode, the + button will shift the display either up or right. The - button will shift the display either down or left.
5.Once you are happy with your position settings, allow the converter to sit idle for a few seconds. This will save the position settings and exit the OSD automatically.
RGB Out | IR Receiver | |
Connects to | ||
Aim remote here | ||
SCART port | ||
| ||
on television |
|
Power LED
Indicates if device is powered (ON) or not (OFF)
Video/RGB | NTSC/PAL | Power |
Toggles between | Toggles between | Turns power to |
NTSC (IN) or | converter on (IN) or | |
or RGB/SCART (OUT) | PAL (OUT) | off (OUT) |
systems | systems |
|
|
|
|
Brightness
There are four brightness levels supported by the VGA2NTSCPRO.
1.Press the Menu button to call up the OSD menu.
2.Use the +/- buttons to scroll to the Brightness icon. Press the Select button to view the brightness settings.
3.Use the +/- buttons to set the desired brightness level.
4.Once you are happy with your brightness settings, allow the converter to sit idle for a few seconds. This will save the brightness settings and exit the OSD automatically.
1.Make sure that the converter, computer, monitor, and television are all turned off.
2.Unplug your monitor from your computer. Plug your monitor’s cable into the converter’s Monitor port.
3.Connect the
4.Depending on your television, use the appropriate cable to connect either the
5.Make sure that the NTSC/PAL button is set appropriately: IN for NTSC systems, OUT for PAL video systems.
