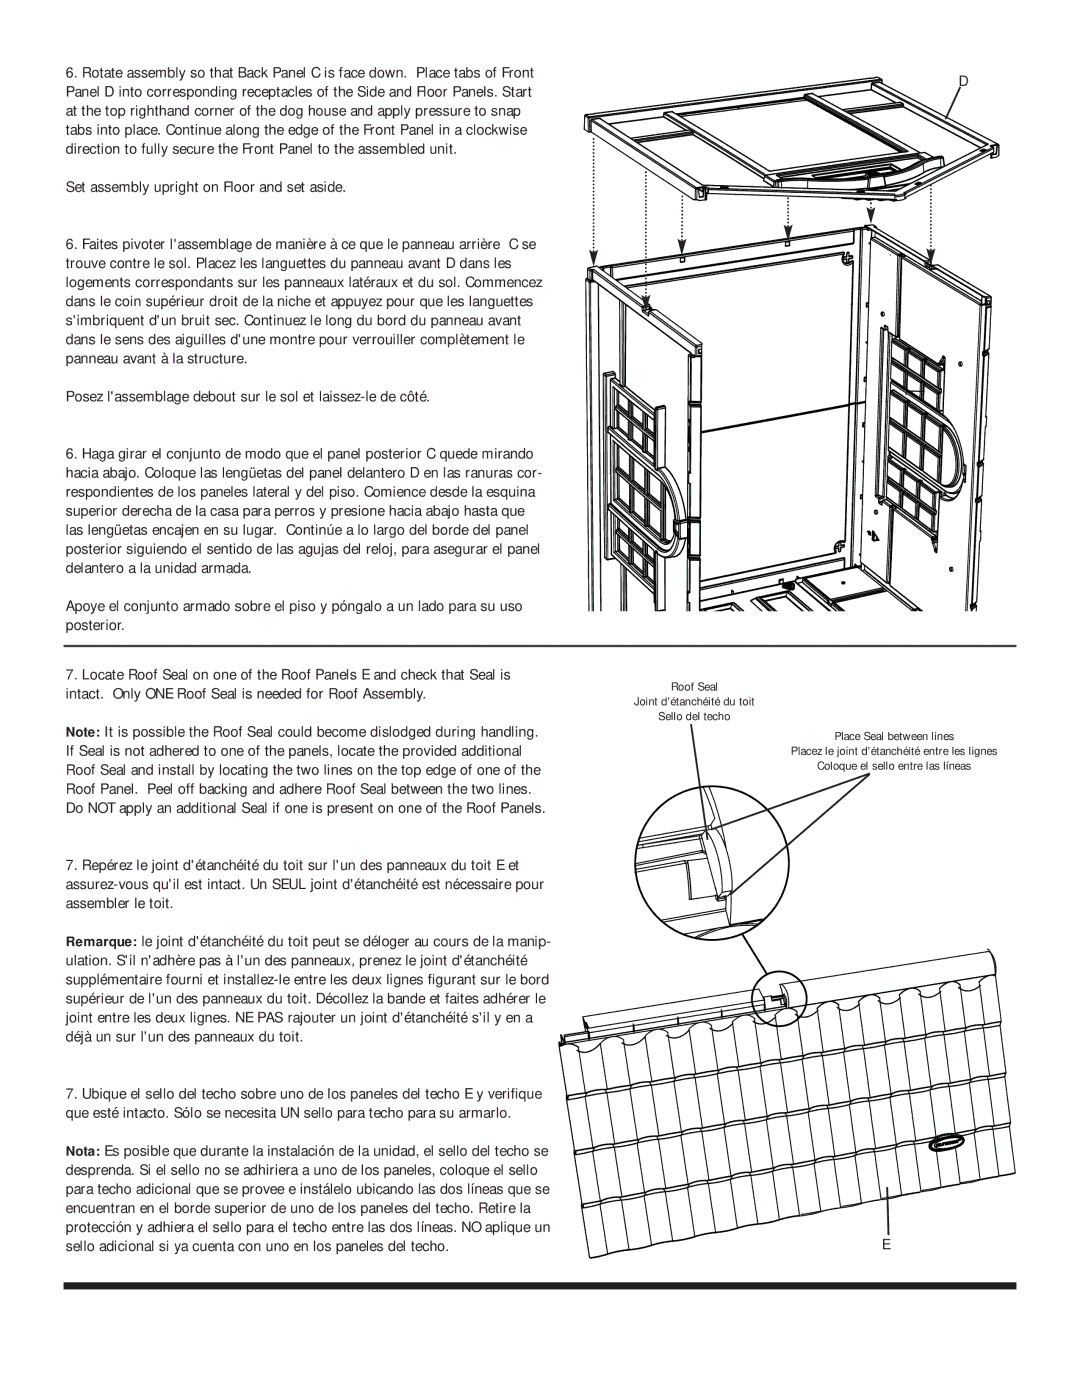
6. Rotate assembly so that Back Panel C is face down. Place tabs of Front

D

Panel D into corresponding receptacles of the Side and Floor Panels. Start


at the top righthand corner of the dog house and apply pressure to snap


tabs into place. Continue along the edge of the Front Panel in a clockwise


direction to fully secure the Front Panel to the assembled unit.


Set assembly upright on Floor and set aside.

6. Faites pivoter l'assemblage de manière à ce que le panneau arrière C se trouve contre le sol. Placez les languettes du panneau avant D dans les logements correspondants sur les panneaux latéraux et du sol. Commencez dans le coin supérieur droit de la niche et appuyez pour que les languettes s'imbriquent d'un bruit sec. Continuez le long du bord du panneau avant dans le sens des aiguilles d'une montre pour verrouiller complètement le panneau avant à la structure.

Posez l'assemblage debout sur le sol et laissez-le de côté.

6. Haga girar el conjunto de modo que el panel posterior C quede mirando hacia abajo. Coloque las lengüetas del panel delantero D en las ranuras cor- respondientes de los paneles lateral y del piso. Comience desde la esquina superior derecha de la casa para perros y presione hacia abajo hasta que las lengüetas encajen en su lugar. Continúe a lo largo del borde del panel posterior siguiendo el sentido de las agujas del reloj, para asegurar el panel delantero a la unidad armada.

Apoye el conjunto armado sobre el piso y póngalo a un lado para su uso posterior.

7.Locate Roof Seal on one of the Roof Panels E and check that Seal is intact. Only ONE Roof Seal is needed for Roof Assembly.

Roof Seal

Joint d'étanchéité du toit

Sello del techo

Note: It is possible the Roof Seal could become dislodged during handling.

If Seal is not adhered to one of the panels, locate the provided additional

Roof Seal and install by locating the two lines on the top edge of one of the

Roof Panel. Peel off backing and adhere Roof Seal between the two lines.

Do NOT apply an additional Seal if one is present on one of the Roof Panels.

7. Repérez le joint d'étanchéité du toit sur l'un des panneaux du toit E et assurez-vous qu'il est intact. Un SEUL joint d'étanchéité est nécessaire pour assembler le toit.

Remarque: le joint d'étanchéité du toit peut se déloger au cours de la manip- ulation. S'il n'adhère pas à l'un des panneaux, prenez le joint d'étanchéité supplémentaire fourni et installez-le entre les deux lignes figurant sur le bord supérieur de l'un des panneaux du toit. Décollez la bande et faites adhérer le joint entre les deux lignes. NE PAS rajouter un joint d'étanchéité s'il y en a déjà un sur l'un des panneaux du toit.

7. Ubique el sello del techo sobre uno de los paneles del techo E y verifique que esté intacto. Sólo se necesita UN sello para techo para su armarlo.

Nota: Es posible que durante la instalación de la unidad, el sello del techo se desprenda. Si el sello no se adhiriera a uno de los paneles, coloque el sello para techo adicional que se provee e instálelo ubicando las dos líneas que se encuentran en el borde superior de uno de los paneles del techo. Retire la protección y adhiera el sello para el techo entre las dos líneas. NO aplique un sello adicional si ya cuenta con uno en los paneles del techo.

Place Seal between lines

Placez le joint d'étanchéité entre les lignes

Coloque el sello entre las líneas

E

Page 4
Image 4
Suncast dh350 owner manual Posez lassemblage debout sur le sol et laissez-le de côté

dh350 specifications

The Suncast DH350 is an innovative addition to the world of outdoor storage solutions, designed to cater to various needs while enhancing the aesthetic of any backyard or patio. With its stylish appearance, durable construction, and practical features, it stands out as a reliable choice for homeowners seeking efficient outdoor organization.

One of the most notable features of the Suncast DH350 is its spacious storage capacity. With dimensions that allow for ample room, it can easily accommodate garden tools, patio cushions, pool supplies, and other outdoor essentials. The large opening lid ensures easy access, while the internal organization capabilities, such as hooks and compartments, enable users to keep items neatly arranged and within reach.

Durability is a key characteristic of the Suncast DH350. Constructed from high-quality resin, it is resistant to fading, cracking, and peeling, ensuring longevity even in harsh weather conditions. The material not only provides strength but also requires minimal maintenance, allowing users to spend more time enjoying their outdoor space rather than worrying about upkeep.

In terms of design, the Suncast DH350 features a contemporary look that complements various architectural styles. The attractive, neutral-toned finish harmonizes with a range of color schemes, making it an ideal addition to any backyard or garden. Furthermore, its efficient space-saving design ensures that it can fit seamlessly into limited areas without compromising on storage capacity.

Another impressive aspect of the Suncast DH350 is its easy assembly process. Detailed instructions and pre-drilled holes streamline the setup, allowing users to have their storage solution up and running in no time. Additionally, the lightweight material facilitates effortless movement, so it can be relocated as needed without heavy lifting.

Safety is also a priority with the design of the Suncast DH350. The lid is equipped with a stay-open feature, preventing accidental closure during use. This ensures both convenience and security when accessing stored items.

In summary, the Suncast DH350 combines style, durability, and functionality, making it a smart investment for any outdoor space. With its generous storage capacity, weather-resistant materials, and contemporary design, it stands as a testament to the quality and innovation in outdoor storage solutions.