26

X . S e t - U p & A d j u s t m e n t s

A.

WHEELS


1.

Installation


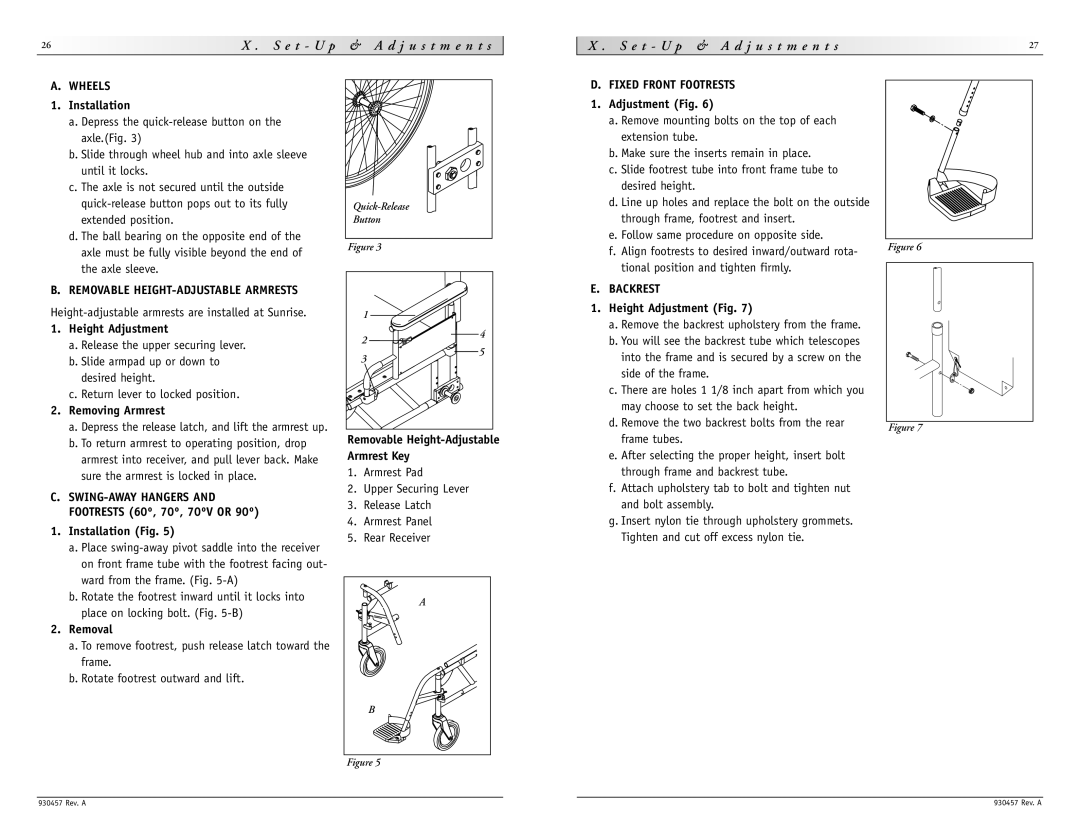
a. Depress the quick-release button on the


axle.(Fig. 3)


b. Slide through wheel hub and into axle sleeve


until it locks.


c. The axle is not secured until the outside


quick-release button pops out to its fully

Quick-Release


extended position.

Button


d. The ball bearing on the opposite end of the

Figure 3


axle must be fully visible beyond the end of


the axle sleeve.


B. REMOVABLE HEIGHT-ADJUSTABLE ARMRESTS


Height-adjustable armrests are installed at Sunrise.

1


1.

Height Adjustment

2

4


a. Release the upper securing lever.


5


b. Slide armpad up or down to

3


desired height.


c. Return lever to locked position.


2.

Removing Armrest


a. Depress the release latch, and lift the armrest up.


b. To return armrest to operating position, drop

Removable Height-Adjustable

Armrest Key

armrest into receiver, and pull lever back. Make

1.

Armrest Pad

sure the armrest is locked in place.

2.

Upper Securing Lever

C. SWING-AWAY HANGERS AND

3.

Release Latch

FOOTRESTS (60º, 70º, 70ºV OR 90º)

4.

Armrest Panel

1. Installation (Fig. 5)

5.

Rear Receiver


a. Place swing-away pivot saddle into the receiver


on front frame tube with the footrest facing out-


ward from the frame. (Fig. 5-A)


b. Rotate the footrest inward until it locks into

A


place on locking bolt. (Fig. 5-B)


2.

Removal


a. To remove footrest, push release latch toward the


frame.


b. Rotate footrest outward and lift.


B


Figure 5

X . S e t - U p & A d j u s t m e n t s

27

D. FIXED FRONT FOOTRESTS


1. Adjustment (Fig. 6)


a. Remove mounting bolts on the top of each


extension tube.


b. Make sure the inserts remain in place.


c. Slide footrest tube into front frame tube to


desired height.


d. Line up holes and replace the bolt on the outside


through frame, footrest and insert.


e. Follow same procedure on opposite side.

Figure 6

f. Align footrests to desired inward/outward rota-


tional position and tighten firmly.


E. BACKREST

1.Height Adjustment (Fig. 7)

a.Remove the backrest upholstery from the frame.

b.You will see the backrest tube which telescopes

into the frame and is secured by a screw on the side of the frame.

c. There are holes 1 1/8 inch apart from which you may choose to set the back height.

d. Remove the two backrest bolts from the rear Figure 7 frame tubes.

e. After selecting the proper height, insert bolt through frame and backrest tube.

f. Attach upholstery tab to bolt and tighten nut and bolt assembly.

g. Insert nylon tie through upholstery grommets. Tighten and cut off excess nylon tie.

930457 Rev. A

930457 Rev. A

Page 14
Image 14
Sunrise Medical M6 instruction manual E t U p & a d j u s t m e n t s

M6 specifications

Sunrise Medical M6 has emerged as one of the leading models in the realm of powered wheelchairs, combining advanced technologies, user-centric design, and superior functionality. It caters to individuals with diverse mobility needs, offering a blend of comfort and performance that enhances the user experience.

One of the standout features of the M6 is its exceptional maneuverability. Equipped with a tight turning radius and responsive controls, the M6 can navigate through narrow spaces effortlessly. This is particularly beneficial for users who require a wheelchair that performs well in both indoor and outdoor environments. Its compact design ensures easy movement in homes, shops, and public spaces.

The M6 utilizes state-of-the-art suspension systems, which contribute to a smooth and comfortable ride over various terrains. This feature is essential for users who often traverse uneven surfaces, as it minimizes jolts and vibrations. Coupled with solid tires, the suspension system ensures traction and stability, allowing users to engage in daily activities without discomfort.

Another vital aspect of the M6 is its customizable seating and positioning options. Users can adjust the seat depth, width, backrest angle, and height, catering to individual preferences and needs. This customization promotes better posture and comfort, essential for prolonged use. Moreover, the option for additional supportive cushions can further enhance the user’s overall well-being.

The M6 is also integrated with cutting-edge technology to improve user interactivity. The joystick control system is designed for ease of use, allowing for intuitive navigation of differing settings. Additionally, the M6 features programmable seating positions, making it easier for users to transition between various configurations with a simple touch of a button.

Durability is another hallmark of the M6. Built with high-quality materials, it is designed to withstand the rigors of daily use while providing longevity. This robustness, combined with aesthetic design choices, ensures that the M6 is not only functional but visually appealing.

In summary, the Sunrise Medical M6 is more than just a powered wheelchair; it is a testament to innovative design and user-focused technology. Its excellent maneuverability, customizable seating options, advanced suspension, and durable construction make it an ideal choice for individuals seeking independence and comfort in their mobility solutions.