26 V I I I . | W a r n i n g s : C o m p o n e n t s & O p t i o n s |
M. MODIFIED SEAT SYSTEMS
Use of a seat system not approved by Sunrise may alter the center of balance of this chair. This may cause the chair to tip over.
1.Do not change the seat system of your chair UNLESS you consult your authorized supplier first.
2.Use of a seat system not approved by Sunrise may affect the folding mechanism of this chair.
3.Use of a seating system not provided by Sunrise is prohibited for transit use.
If you fail to heed these warnings damage to your chair, a fall,
N. UPHOLSTERY FABRIC
1.Replace worn or torn fabric of seat and seat back as soon as you can. If you fail to do so, the seat may fail.
2.Sling fabric will weaken with age and use. Look for fraying or thin spots, or stretching of fabrics at rivet holes.
3.“Dropping down” into your chair will weaken fabric and result in the need to inspect and replace the seat more often.
4.Be aware that laundering or excess moisture will reduce flame retardation of the fabric.
If you fail to heed these warnings damage to your chair, a fall,
I X . S e t - U p & A d j u s t m e n t |
| 27 | |
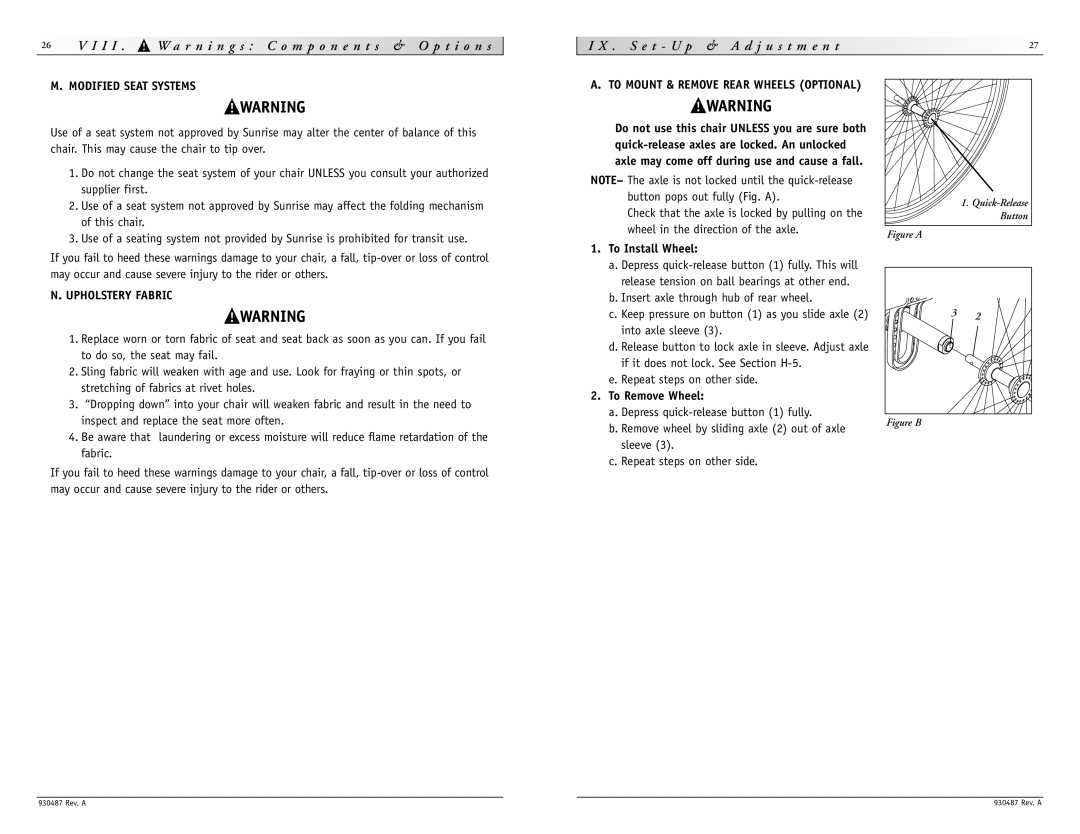
A. TO MOUNT & REMOVE REAR WHEELS (OPTIONAL) |
|
| |
| Do not use this chair UNLESS you are sure both |
|
|
|
|
| |
| axle may come off during use and cause a fall. |
|
|
NOTE– The axle is not locked until the |
|
| |
| button pops out fully (Fig. A). |
| 1. |
| Check that the axle is locked by pulling on the |
| |
|
| Button | |
| wheel in the direction of the axle. | Figure A |
|
|
|
| |
1. | To Install Wheel: |
|
|
| a. Depress |
|
|
| release tension on ball bearings at other end. |
|
|
| b. Insert axle through hub of rear wheel. |
|
|
| c. Keep pressure on button (1) as you slide axle (2) | 3 | 2 |
| into axle sleeve (3). |
|
|
| d. Release button to lock axle in sleeve. Adjust axle |
|
|
| if it does not lock. See Section |
|
|
| e. Repeat steps on other side. |
|
|
2. | To Remove Wheel: |
|
|
| a. Depress |
|
|
b. Remove wheel by sliding axle (2) out of axle | Figure B |
| |
sleeve (3). |
|
c. Repeat steps on other side. |
|
930487 Rev. A | 930487 Rev. A |