Manuals
/
SUPER MICRO Computer
/
Computer Equipment
/
Server
SUPER MICRO Computer
6025B-UR 5-4 I/O Ports, Installing Memory, DIMM Installation See Figure
Models:
6025B-UR
1
41
122
122
Download
122 pages
59.88 Kb
38
39
40
41
42
43
44
45
Install
Alarm Reset JAR
Password
POST Errors
Latency Timer
Onboard Indicators
Connecting Data Cables
Reset Button
Accessing the drive bays
Preparing for Setup
Page 41
Image 41
Page 40
Page 42
Page 41
Image 41
Page 40
Page 42
Contents
SUPER
1.0b
SUPERSERVER 6025B-UR
USER’S MANUAL
Printed in the United States of America
Manual Revision 1.0b Release Date June 6
Chapter 4 System Safety
Chapter 2 Server Installation
Preface
About This Manual
Chapter 6 Advanced Chassis Setup
Chapter 5 Advanced Serverboard Setup
Chapter 7 BIOS
Appendix A BIOS POST Messages Appendix B BIOS POST Codes
Preface
Chapter 2 Server Installation
Table of Contents
Chapter 4 System Safety
Chapter 5 Advanced Serverboard Setup
Connecting Data Cables
Chapter 7 BIOS
Chapter 6 Advanced Chassis Setup
Appendix C Software Installation Appendix D System Specifi cations
Appendices
Appendix A BIOS POST Messages Appendix B BIOS POST Codes
SUPERSERVER 6025B-UR Users Manual
1-1 Overview
Chapter Introduction
Processors
1-2 Serverboard Features
Memory
Serial ATA
Figure 1-1. Intel 5000P/ESB2 Chipset System Block Diagram
Other Features
ATI Graphics Controller
System Power
1-3 Server Chassis Features
Serial ATA Subsystem
PCI Expansion Slots
Cooling System
I/O Backplane
Headquarters
1-4 Contacting Supermicro
Europe
Asia-Pacific
2-3 Preparing for Setup
Chapter Server Installation
2-1 Overview
2-2 Unpacking the System
Choosing a Setup Location
Warnings and Precautions
Rack Precautions
Server Precautions
Ambient Operating Temperature
Rack Mounting Considerations
Reduced Airflow
Mechanical Loading
Identifying the Sections of the Rack Rails
2-4 Installing the System into a Rack
Installing the Chassis Rails
Figure 2-1. Installing Chassis Rails
Installing the Server into a Telco Rack
Installing the Rack Rails
Installing the Server into the Rack
Figure 2-2. Installing the Server into a Rack
1. Accessing the inside of the System see Figure
2-5 Checking the Serverboard Setup
4. Installing add-on cards
2. Check the CPUs processors
Figure 2-3. Accessing the Inside of the System
1. Accessing the drive bays
2-6 Checking the Drive Bay Setup
5. Supplying power to the system
2. DVD-ROM and floppy disk drives
3-2 Control Panel Buttons
Chapter System Interface
3-1 Overview
3-3 Control Panel LEDs
SAS/SATA Drives
3-4 Drive Carrier LEDs
SUPERSERVER 6025B-UR Users Manual
4-1 Electrical Safety Precautions
Chapter System Safety
4-2 General Safety Precautions
4-3 ESD Precautions
BATTERY HOLDER
4-4 Operating Precautions
Figure 4-1. Installing the Onboard Battery
Precautions
Chapter Advanced Serverboard Setup
5-1 Handling the Serverboard
Unpacking
Installing the Processor
5-2 Processor and Heatsink Installation
Gold dot Socket key CPU key Notched corner CPU pin Load lever
CPU installed in socket PnP cap released from load plate
Removing the Heatsink
Installing the Heatsink
Connecting Power Cables
5-3 Connecting Cables
Connecting Data Cables
Figure 5-1. Front Control Panel Header Pins JF1
Connecting the Control Panel
DIMM Installation See Figure
5-5 Installing Memory
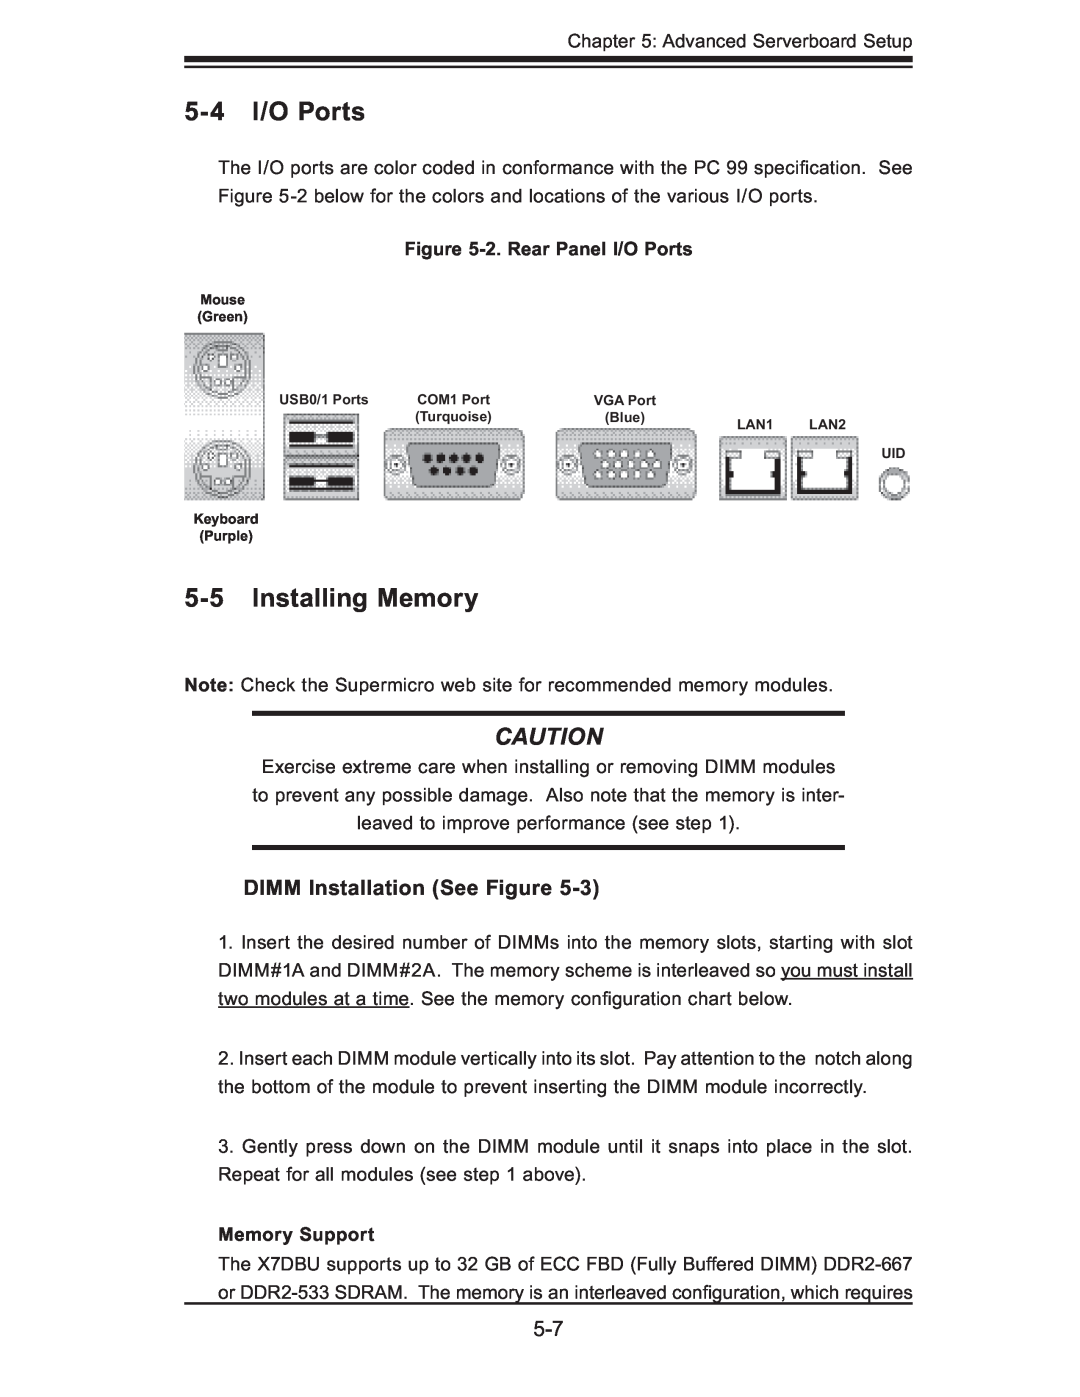
5-4 I/O Ports
Figure 5-2. Rear Panel I/O Ports
Possible System Memory Allocation & Availability
Figure 5-3. Installing DIMM into Slot
5-6 Adding PCI Cards
2. PCI card installation
1. PCI Expansion Slots
Figure 5-4. SUPER X7DBU Layout
5-7 Serverboard Details
SUPER X7DBU
North Bridge 5000P
Connector
Default Setting
X7DBU Quick Reference
Jumper
ATX Power Connector
5-8 Connector Definitions
Auxiliary Power Connector
Processor Power Connector
HDD LED
Overheat/Fan Fail/Power Fail/UID LED
NIC1 LED
NIC2 LED
Reset Button
Power Fail LED
Power Button
Universal Serial Bus USB0/1
Serial Ports
Universal Serial Bus Headers
Fan Headers
Universal Serial Bus Headers Pin Definitions USB2, USB3, USB4
Chassis Intrusion
Power LED/Speaker
ATX PS/2 Keyboard and PS/2 Mouse Ports
Overheat LED
Wake-On-Ring
Wake-On-LAN
SMBUSPS
Wake-On-LAN Pin Definitions JWOL
LAN1/2 Ethernet Ports
Alarm Reset JAR
SGPIO
Alarm Reset Pin Definitions JAR
VGA Enable/Disable
5-9 Jumper Settings
Explanation of Jumpers
CMOS Clear
Watch Dog Enable/Disable
LAN Enable/Disable
I2C Enable/Disable
LAN Enable/Disable Jumper Settings JPL1, JPL2
LAN1/LAN2 LEDs
5-10 Onboard Indicators
5-11 Floppy, IDE and SATA Drive Connections
Floppy Connector
SATA Ports
IDE Connector
IDE Drive Connector Pin Definitions IDE#1
SATA Port Pin Definitions SATA0 ~ SATA5
SUPERSERVER 6025B-UR Users Manual
6-1 Static-Sensitive Devices
Chapter Advanced Chassis Setup
Unpacking
Tools Required
Figure 6-1. Front and Rear Chassis Views
6-2 Control Panel
System Fan Failure
6-3 System Fans
Replacing System Fans
2. Installing a new fan
Figure 6-2. Removing System Cooling Fans
6-4 Drive Bay Installation/Removal
Accessing the Drive Bays
Figure 6-3. Mounting a SAS/SATA Drive in a Carrier
SAS/SATA Drive Installation
1. Mounting a SAS/SATA drive in a drive carrier
Figure 6-4. Removing a SAS/SATA Drive Carrier
2. Installing/removing hot-swap SAS/SATA drives
Removing the Air Shroud
DVD-ROM and Floppy Drive Installation
Hard Drive Backplane
Power Supply Failure
6-5 Power Supply
Removing/Replacing the Power Supply
1. Removing the power supply
System BIOS
Chapter BIOS
How To Change the Configuration Data
Starting the Setup Utility
7-3 Main BIOS Setup
7-2 Running Setup
Default settings are in bold text unless otherwise noted
Press the Delete key to enter Setup
BIOS Date
Main BIOS Setup Menu Main Setup Features
System Time
System Date
Type
IDE Channel 0 Master/Slave and Secondary IDE Master/Slave
LBA Mode Control
Multi-Sector Transfers
32 Bit I/O
Transfer Mode
Parallel ATA
Serial ATA SATA RAID Enable
Native Mode Operation
SATA Controller Mode
Boot Features
7-4 Advanced Setup
QuickBoot Mode
QuietBoot Mode
Power Loss Control
Power Button Behavior
Memory Cache Cache System BIOS Area
Cache Video BIOS Area
Cache Base 512K-640K
Default Primary Video Adapter
Cache Extended Memory
Discrete MTRR Allocation
PCI Parity Error Forwarding
Emulated IRQ Solutions
Reset Configuration Data
PCI-Exp. I/O Performance
Latency Timer
Enable Master
Large Disk Access Mode
SERR Signal Condition
Clock Spectrum Feature
Crystal Beach Features
Branch 1 Rank Interleaving & Sparing
Enhanced x8 Detection
USB Function
Enabling Multi-Media Timer
Legacy USB Support
Advanced Processor Options
Intel EIST Support Available when supported by the CPU
Intel R Virtualization Technology Available when supported by the CPU
I/O Device Configuration
KBC Clock Input
Serial Port B
Interrupt
Mode
Floppy Disk Controller
Event Log Validity
DMI Event Logging
Event Log Capacity
View DMI Event Log
COM Port Address
Console Redirection
BAUD Rate
Console Type
CPU Temperature Threshold
Hardware Monitor Logic
Voltage Monitoring
CPU1 Temperature CPU1 Second Core Temperature CPU2 Temperature
CPU1 Temperature/CPU1 Second Core CPU2 Temperature/CPU2 Second Core
Temperature Monitoring Available if supported by the CPU
PECI Agent 1 Temperature PECI Agent 2 Temperature
PECI Agent 3 Temperature PECI Agent 4 Temperature System Temperature
Clear System Event Logging
System Event Logging
Existing Event Log Number
Event Log Control
Timer for Loading OS Minutes
OS Boot Watch Dog
Time Out Option
System Event Log/System Event Log List Mode
Realtime Sensor Data
User Password Is
Supervisor Password Is
Set Supervisor Password
Set User Password
Boot Priority Order/Excluded from Boot Orders
7-6 Boot
Password on Boot
7-7 Exit
Load Setup Defaults
Exit Saving Changes
Exit Discarding Changes
SUPERSERVER 6025B-UR Users Manual
Keyboard error
Appendix A BIOS POST Messages
Keyboard locked - Unlock key switch
Monitor type does not match CMOS - Run SETUP
System timer error
System CMOS checksum bad - Default configuration used
Real time clock error
Check date and time settings
Fail-Safe Timer NMI Failed
System cache error - Cache disabled
Allocation Error for device
Entering SETUP
Fixed Disk n
PS/2 Mouse Boot Summary Screen
Invalid System Configuration Data
I/O device IRQ conflict
Press F2 to enter Setup
Press F1 to resume, F2 to Setup, F3 for previous
System BIOS shadowed
Video BIOS shadowed
SUPERSERVER 6025B-UR Users Manual
Recoverable POST Errors
Appendix B BIOS POST Codes
Terminal POST Errors
POST Code
8254 timer initialization
Test RAM between 512 and 640 kB
Check for SMART Drive optional
The following are for boot block in Flash ROM
SUPERSERVER 6025B-UR Users Manual
C-1 Introduction
Appendix C Software Installation
Important Notes
Serial ATA SATA
Intel Matrix Storage
Configuring BIOS for SATA RAID Functions Native Mode
RAID Configurations
1. Creating, Deleting and Resetting RAID Volumes
Using the Intel ESB2 SATA RAID Utility Program
Creating a RAID 0 Volume
Creating a RAID 1 Volume
Creating a RAID 10 RAID 1+ RAID
Creating a RAID 5 Set Parity
Deleting a RAID Volume
Exiting the Intel Matrix Storage Manager Utility
Resetting to Non-RAID and Resetting a RAID HDD
New Operating System-Windows XP/2000/2003 Installation
C-2 Installing Windows XP/2000/2003 for RAID Systems
C-11
C-3 Installing the Operating System and other Software Programs
Driver/Tool Installation Display Screen
Supero Doctor III Interface Display Screen-I Health Information
Supero Doctor
C-12
C-13
Supero Doctor III Interface Display Screen-II Remote Control
C-14
Appendix D System Specifications
BIOS
Chipset
Memory Capacity
Power Supply
Weight
Serverboard
Chassis
Regulatory Compliance
SUPERSERVER 6025B-UR Users Manual
Top
Page
Image
Contents