PREPARING THE GROUND | 1 |
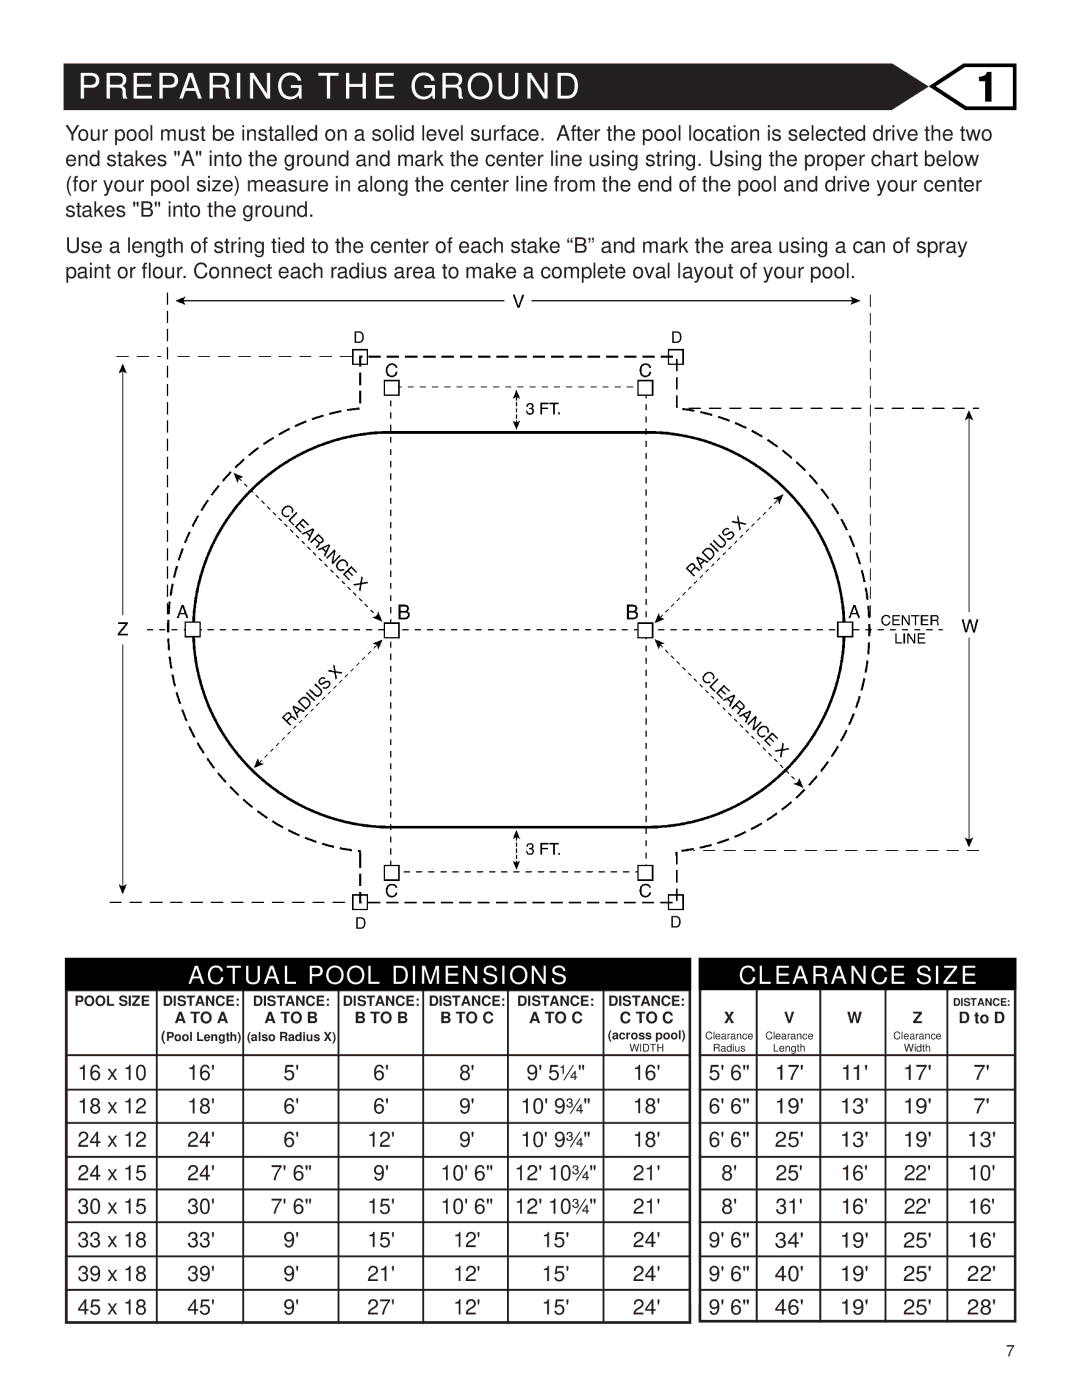
Your pool must be installed on a solid level surface. After the pool location is selected drive the two end stakes "A" into the ground and mark the center line using string. Using the proper chart below (for your pool size) measure in along the center line from the end of the pool and drive your center stakes "B" into the ground.
Use a length of string tied to the center of each stake “B” and mark the area using a can of spray paint or flour. Connect each radius area to make a complete oval layout of your pool.
DD
DD
| ACTUAL POOL DIMENSIONS |
|
| CLEARANCE SIZE | ||||||||
POOL SIZE | DISTANCE: | DISTANCE: | DISTANCE: | DISTANCE: | DISTANCE: | DISTANCE: |
|
|
|
|
| DISTANCE: |
| A TO A | A TO B | B TO B | B TO C | A TO C | C TO C |
| X | V | W | Z | D to D |
| (Pool Length) | (also Radius X) |
|
|
| (across pool) |
| Clearance | Clearance |
| Clearance |
|
|
|
|
|
|
| WIDTH |
| Radius | Length |
| Width |
|
16 x 10 | 16' | 5' | 6' | 8' | 9' 5¼" | 16' |
| 5' 6" | 17' | 11' | 17' | 7' |
|
|
|
|
|
|
|
|
|
|
|
|
|
18 x 12 | 18' | 6' | 6' | 9' | 10' 9¾" | 18' |
| 6' 6" | 19' | 13' | 19' | 7' |
24 x 12 | 24' | 6' | 12' | 9' | 10' 9¾" | 18' |
| 6' 6" | 25' | 13' | 19' | 13' |
|
|
|
|
|
|
|
|
|
|
|
|
|
24 x 15 | 24' | 7' 6" | 9' | 10' 6" | 12' 10¾" | 21' |
| 8' | 25' | 16' | 22' | 10' |
30 x 15 | 30' | 7' 6" | 15' | 10' 6" | 12' 10¾" | 21' |
| 8' | 31' | 16' | 22' | 16' |
33 x 18 | 33' | 9' | 15' | 12' | 15' | 24' |
| 9' 6" | 34' | 19' | 25' | 16' |
39 x 18 | 39' | 9' | 21' | 12' | 15' | 24' |
| 9' 6" | 40' | 19' | 25' | 22' |
45 x 18 | 45' | 9' | 27' | 12' | 15' | 24' |
| 9' 6" | 46' | 19' | 25' | 28' |
7
