Function Overview
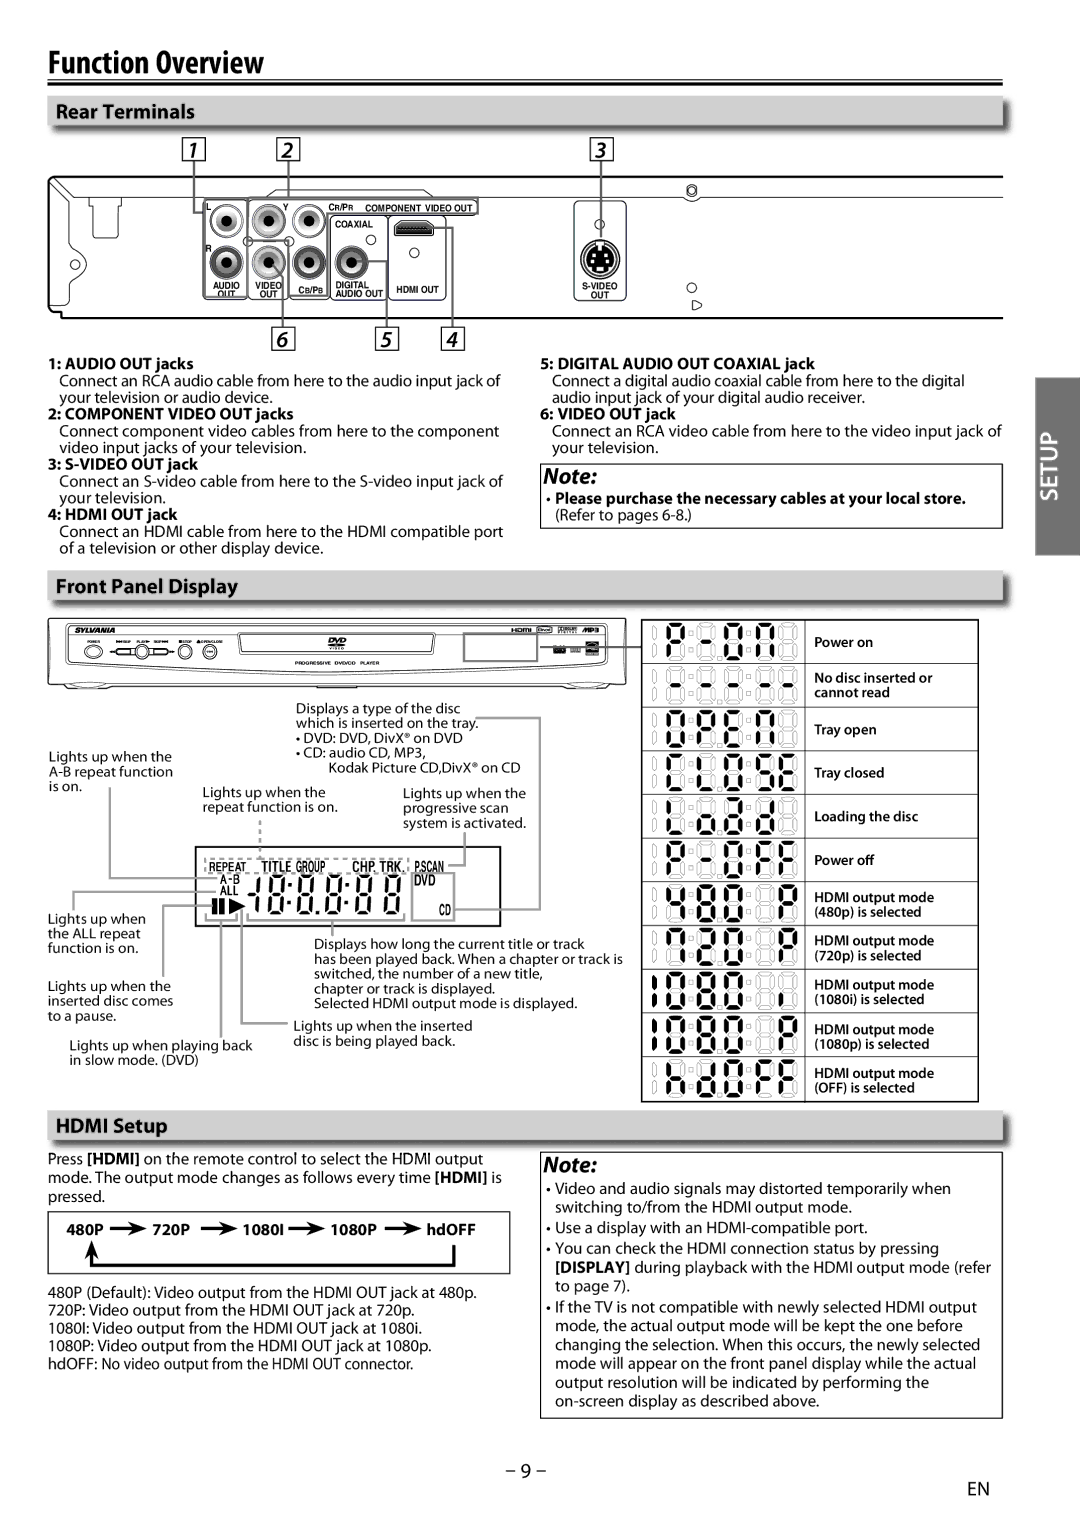
Rear Terminals
1 | 2 |
|
|
| 3 | |
L | Y |
| CR/PR COMPONENT VIDEO OUT |
| ||
|
|
| COAXIAL |
|
| |
R |
|
|
|
|
| |
AUDIO | VIDEO | CB/PB | DIGITAL | HDMI OUT | ||
OUT | OUT | AUDIO OUT | OUT | |||
|
| |||||
6 |
| 5 |
| 4 |
1: AUDIO OUT jacks
Connect an RCA audio cable from here to the audio input jack of your television or audio device.
2: COMPONENT VIDEO OUT jacks
Connect component video cables from here to the component video input jacks of your television.
3:
Connect an
4: HDMI OUT jack
Connect an HDMI cable from here to the HDMI compatible port of a television or other display device.
5: DIGITAL AUDIO OUT COAXIAL jack
Connect a digital audio coaxial cable from here to the digital audio input jack of your digital audio receiver.
6: VIDEO OUT jack
Connect an RCA video cable from here to the video input jack of your television.
Note:
•Please purchase the necessary cables at your local store. (Refer to pages
SETUP
Front Panel Display
POWER | SKIP PLAY | SKIP | STOP | OPEN/CLOSE |
PROGRESSIVE DVD/CD PLAYER
|
| Displays a type of the disc | |
|
| which is inserted on the tray. | |
|
| • DVD: DVD, DivX® on DVD | |
Lights up when the |
| • CD: audio CD, MP3, | |
| Kodak Picture CD,DivX® on CD | ||
is on. | Lights up when the | Lights up when the | |
| repeat function is on. | progressive scan | |
|
|
| system is activated. |
|
| GROUP | P.SCAN |
|
|
| DVD |
Lights up when |
|
| CD |
|
|
| |
the ALL repeat |
| Displays how long the current title or track | |
function is on. |
| ||
|
| has been played back. When a chapter or track is | |
Lights up when the |
| switched, the number of a new title, | |
| chapter or track is displayed. | ||
inserted disc comes |
| Selected HDMI output mode is displayed. | |
to a pause. |
| Lights up when the inserted | |
|
| ||
Lights up when playing back | disc is being played back. | ||
in slow mode. (DVD) |
|
|
|
Power on
No disc inserted or cannot read
Tray open
Tray closed
Loading the disc
Power off
HDMI output mode (480p) is selected
HDMI output mode (720p) is selected
HDMI output mode (1080i) is selected
HDMI output mode (1080p) is selected
HDMI output mode (OFF) is selected
HDMI Setup
Press [HDMI] on the remote control to select the HDMI output mode. The output mode changes as follows every time [HDMI] is pressed.
480P  720P
720P  1080I
1080I  1080P
1080P  hdOFF
hdOFF
480P (Default): Video output from the HDMI OUT jack at 480p.
720P: Video output from the HDMI OUT jack at 720p.
1080I: Video output from the HDMI OUT jack at 1080i.
1080P: Video output from the HDMI OUT jack at 1080p.
hdOFF: No video output from the HDMI OUT connector.
Note:
•Video and audio signals may distorted temporarily when switching to/from the HDMI output mode.
•Use a display with an
•You can check the HDMI connection status by pressing [DISPLAY] during playback with the HDMI output mode (refer to page 7).
•If the TV is not compatible with newly selected HDMI output mode, the actual output mode will be kept the one before changing the selection. When this occurs, the newly selected mode will appear on the front panel display while the actual output resolution will be indicated by performing the
– 9 –
EN