LC427SSX
FCC Warning
Precautions
RADIO-TV Interference
When Carrying this Unit
Do not handle the AC power cord with wet hands
5Trademark Information
To Avoid the Hazards of Electrical Shock and Fire
5Symbols Used in this Manual
5Supplied Accessories
Introduction
5Attaching the Stand
Contents
Features
DTV/TV/CATV
5Terminals
5Control Panel
5Installing the Batteries
5Remote Control Function
When using a universal remote control to operate This unit
Battery Precautions
5Antenna Connection
Preparation
5Connection to Cable Receiver or Satellite Box
Please contact your cable / satellite provider
Hdmi Connection
5External Device Connection
HDMI-DVI Connection
Video or Video Connection
Component Video Connection
Video
Audio Output Connection
Format Resolution Refresh rate
PC Connection
USB Flash Memory
5Plug In the AC Power Cord
Rear of this unit Side of this unit
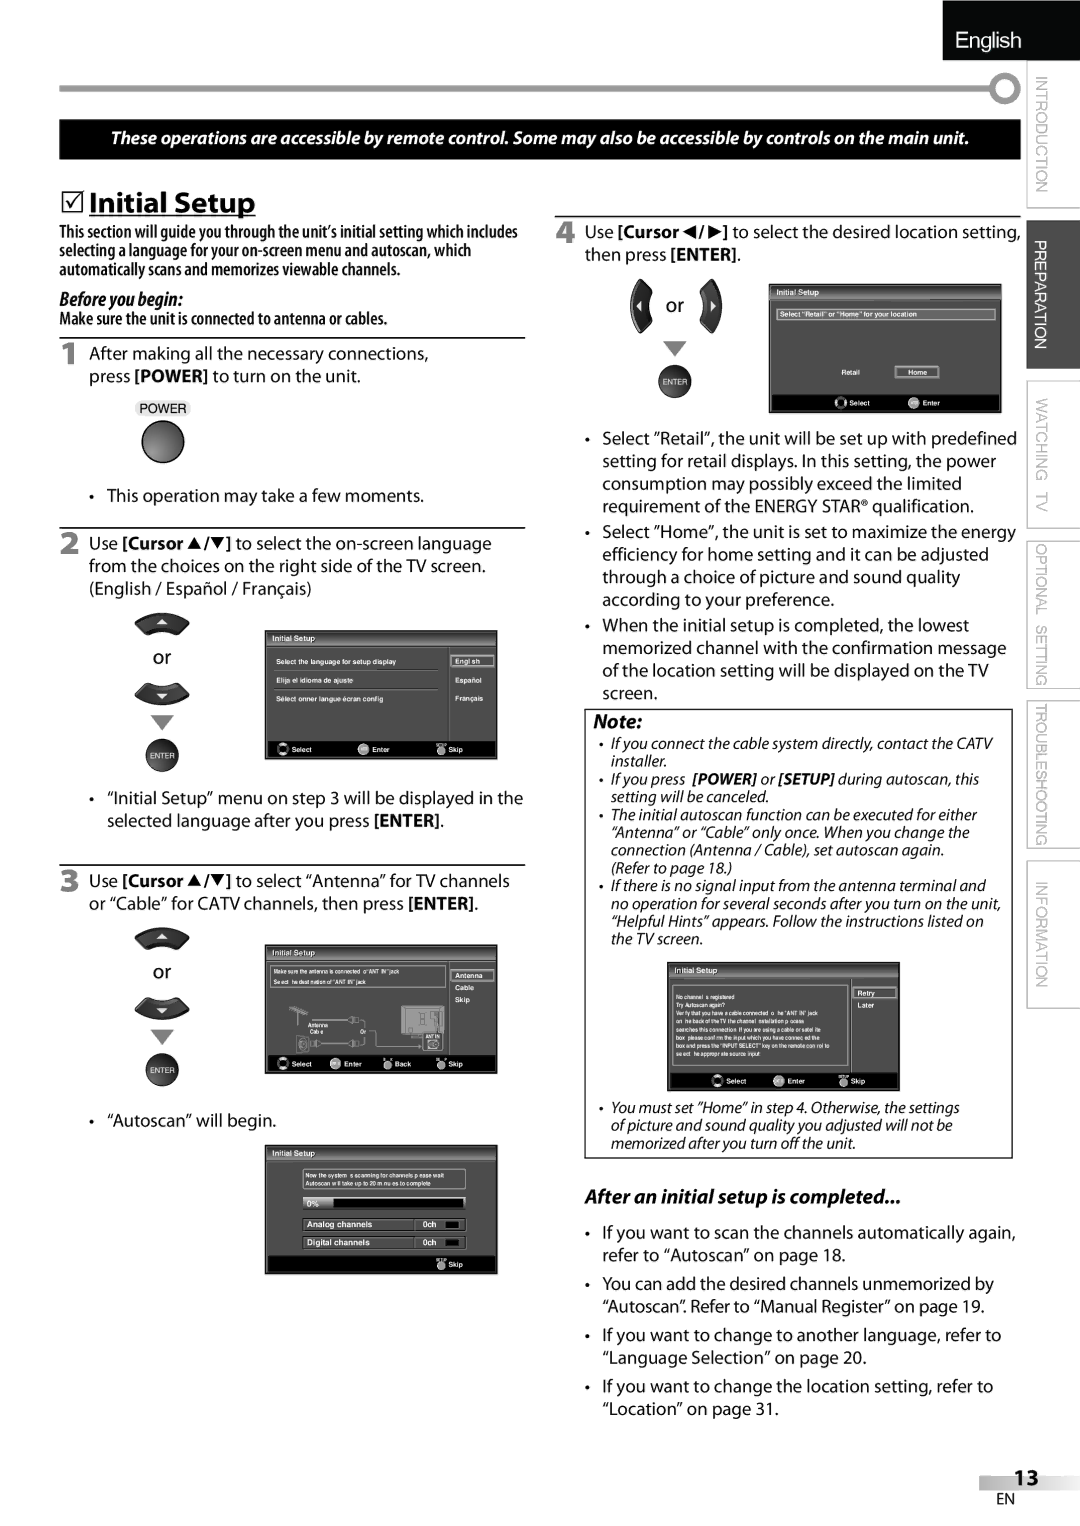
After an initial setup is completed
5Initial Setup
Before you begin
5Sleep Timer
5Volume Adjustment
Watching TV
5Channel Selection
5Switching Each Input Mode
5Still Mode
5Switching Audio Mode
Broadcasting information
5TV Screen Information
Press Info
Following information is displayed
5TV Screen Display Mode
5Main Menu
Optional Setting
Autoscan
Press Setup to exit
Using CH K/L
5Channel List 5Manual Register
Use Cursor K/L to select Channel List, then press Enter
5Language Selection
5Antenna Confirmation
Enter
Français, then press Enter
Picture Mode
5Picture Adjustment
Color Temperature
Adjust the picture quality
5Sound Adjustment
5Closed Caption
Caption Service
CC1 and Text1
CC3 and Text3
Service 1~6
Digital Caption Service
Font Size
Font Style
Font Color
Font Opacity
Use Cursor K/L to select Child Lock, then press Enter
5Child Lock
Function Association of America
Channel Lock Mpaa Rating
Use Cursor K/L to select Channel Lock, then press Enter
To set the sub ratings
TV Rating
Use Cursor K/L to select TV Rating, then press Enter
Use Cursor K/L to select New Password, then press Enter
New Password
New Password
Confirm password
Position Reset
5PC Settings
Press Setup to display the main menu Adjust the setting
Use Cursor K/L to select Reset, then press
Select if you want to reduce the power consumption
5Energy Saving Mode
Location
Use Cursor K/L to select the desired mode, then press Enter
Main menu appears automatically
5Current Software Info
Current Software Info
Picture
Settings ➁ or ➂
Music
Press Enter or Cursor B
5Troubleshooting Guide
Troubleshooting
Symptom Remedy
You switch to a different input
Volume
Repeatedly to switch various screen modes
Will change
Question Answer
Information
Maintenance
Glossary
Hdmi
5Electrical Specification
5General Specifications
5Other Specifications
5Cable Channel Designations
Limited Warranty Ninety 90 DAY Labor / ONE 1 Year Parts
LC427SSX
Ultérieure
Précautions
Avertissement DE LA FCC
Brouillage RADIO-TV
5Information sur les Marques Commerciales
Emplacement ET Manipulation
Pour Éviter LES Risques DE Choc Électrique ET D’INCENDIE
Remarque SUR LE Recyclage
5Symboles Utilisés dans ce Manuel
5Accessoires Fournis
5Montage du Support du Téléviseur
Pour Enlever le Support du Appareil
Contenu
Caractéristiques
Bornes
Panneau de Commande
RCA
5Insérer les Piles
5Boutons de la Télécommande
Précautions Concernant les Piles
5Connexion de l’Antenne
Préparation
5Connexion à un Décodeur de Diffusion par Câble / Satellite
Avant toute connexion
Connexion Hdmi
5Connexion d’un Appareil Externe
Connexion HDMI-DVI
Connexion S-vidéo ou Vidéo
Connexion Vidéo à Composantes
Ex. Video
Connexion de Sortie Audio
Format Résolution Fréquence du
Connexion PC
Les signaux suivants peuvent être affichés
5Branchez le Cordon d’Alimentation Secteur
5Gestion des Câbles
Mise en garde
Une fois la configuration initiale effectuée
5Installation Initiale
Avant de commencer
La Autoscan commence
Regarder LA Télévision
5Réglage du Volume
5Sélection de Chaîne
5Minuterie de Sommeil
5Arrêt sur Image
5Changement du Mode Audio
5Parcours des Modes d’Entrée
Stéréo
Informations de diffusion
5Informations sur Écran
Appuyez sur Info
Titre d’émission Guide des émissions
5Mode d’Affichage sur Écran de Télévision
5Menu Principal
Configuration Optionnelle
Chaîne via la touche CH K/L
5Liste Chaînes 5Enregistrer Manuel
Réception lors du réglage initial
Utilisez les touches numériques pour entrer le
5Vérification de l’Antenne
Appuyez sur Setup pour quitter le menu principal
5Sélection de la Langue
5Réglage de l’Image
Mode Image
Régler la qualité de l’image
5Réglage du Son
Sous-titres
Service Sous-titrage
T3 et Texte3
T2, S-T4, Texte2 et Texte4
Les différents réglages sont décrits sur la
Service Sous-titrage Num
Suivante
Consultez les réglages que vous avez effectués
Taille police
Style police Couleur bord
Couleur police
Opacité police
Verrouillage de Chaîne Dpage Cote Mpaa
Verrouillage
Cote TV
Nouveau Mot de Passe Dpage
Verrouillage de Chaîne Cote Mpaa
Appuyez sur la touche Setup pour quitter
De chaîne, puis appuyez sur Enter Puis appuyez sur Enter
Utilisez Curseur K/L pour sélectionner la cote
Pour spécifier les cotes secondaires
Cote TV
Sous Catégorie
Nouveau Mot de Passe
Réinitialisation de la Position
5Réglages PC
Position Horizontale, Position Verticale
Utilisez Curseur s/B pour régler
Région
5Mode Economie d’Energie
Utilisez Curseur K/L pour sélectionner
Utilisez Curseur Pour sélectionner le région de
5Info Logiciel Actuel
Configuration
Le menu principal s’affiche automatiquement
Actuel
Musique
Image
Les touches numériques
Vous pouvez utiliser les touches numériques 1 à
Dépannage
Symptôme Solution
5Guide de Dépannage
La totalité de l’écran
Réglés
Sous-titrés Une case noire s’affiche sur
’écran du téléviseur T4 ou Hf
Question Réponse
5Foire aux Questions FAQ
Input Select ou en utilisant CH K/ L
Entretien
Glossaire
5Spécifications Générales
5Désignation des Chaînes de Câblodiffusion
5Spécifications Électriques
5Autres Spécifications
LC427SSX
Para consultarlos, si los necesita, en el futuro
Precauciones
Advertencia DE LA FCC
Interferencia DE Radio Y TV
Para Evitar Peligros DE Descarga Eléctrica O Incendio
5Información sobre Marcas Registradas
Colocación Y Manejo
Nota Acerca DEL Reciclado
5Accesorios Suministrados
Introducción
5Conectar el Soporte
5Símbolos Utilizados en este Manual
Contenido
Características
5Terminales
5Panel de Control
5Instalación de las Pilas
5Función del Mando a Distancia
Precauciones sobre las Pilas
5Conexión de Antena
Preparación
5Conexión al Receptor de Cable o Caja de Satélite
Consulte a su proveedor de cable / satélite
Conexión Hdmi
5Conexión de Dispositivo Externo
Conexión HDMI-DVI
Conexión de S-video o Vídeo
Conexión de Vídeo en Componentes
Ej.VIDEO
Conexión de PC
Conexión de Salida de Audio Digital
Pueden aparecer las siguientes señales
Formato Resolución
5EnchufeelCableAlimentadordeCA
5Colocación de los Cables
Memoria Flash USB
Precaución
Una vez finalizada la configuración inicial…
5Configuración Inicial
Antes de Comenzar
Esta operación tardará unos momentos
Para VER LA Televisión
5Ajuste de Volumen
5Selección de Canal
5Temporizador de Apagado
5Para Cambiar Entre Cada Modo de Entrada
5Modo Fijo
Estéreo
Información de emisión
5Información de Pantalla
Presione Info
Se muestra la siguiente información
Para señal de vídeo
5Modo de Visualización de Pantalla del Televisor
Normal
Ampliar imáge
5Menú Principal
Ajuste Opcional
Presione Setup para visualizar el menú principal
Presione Setup para salir
5Lista de Canales 5Registro Manual
De canales usando CH K/L
5Selección de Idioma
5Confirmación de la Antena
Utilice los botones numéricos o CH K/L para
Antena.Video
5Ajuste de Imagen
Mode de imagen
Claridad, Contraste, Color, Matiz, Nitidez
Temperatura color
5Ajuste de Sonido
Nivelador automat. volumen
Modo sonido
Altavoces TV
1 y Texto1
5Subtítulo Cerrado
3 y Texto3
2, S.C.4, Texto2 y Texto4
Servicio1 a
Servicio Digital de Subtítulos
Cualquier otro elemento del menú
Servicio6
Tamaño fuente
Estilo fuente Color borde
Color fuente Tipo borde
Opaco fuente
Para seleccionar DETALLE, y
5Bloqueo Infantil
Luego presione Enter
Bloqueo infantil
Clase de Mpaa
Bloqueo de Canales
Utilice Cursor K/L para seleccionar la opción
Cambiar entre Mirar y Bloque
Para ajustar las subcategorías
Clase de TV
Nuevo código de acceso
Reinicio Posicion
5Ajustes de PC
Posición Horizontal, Posición Vertical
Utilice Cursor s/B para ajustar
Ubicación
5Modo de Ahorro de Energía
Puede ajustar el consumo de potencia en ahorrar o no
5Reproducción JPEG/MP3
5Información sobre el Software Actual
El menú principal aparecerá automáticamente
Actualmente
Música
Imagen
Puede utilizar los botones numéricos del
Para detener/iniciar la reproducción, presione
5Guía de Solución de Problemas
Solución DE Problemas
Síntoma Solución
La imagen visualizada no Cubre la pantalla entera
Modos de entrada concretos
Por los diferentes modos de pantalla
Recuadro blanco Que los subtítulos aparezcan incompletos
Pregunta Respuesta
5Preguntas Frecuentes
Glosario
Información
Mantenimiento
CEC
5Especificaciones Generales
5Denominaciones de Canales de Cable
5Especificación Eléctrica
5Otras Especificaciones
Español
1EMN24662
Imprimido en China