SRDV495
Supplied Accessory
Model No Serial No
Precautions
Laser Safety
Before you start
S2898A
Precautions cont’d
About Copyright
Installation Location
Maintenance
Moisture Condensation Warning
Features
Table of contents
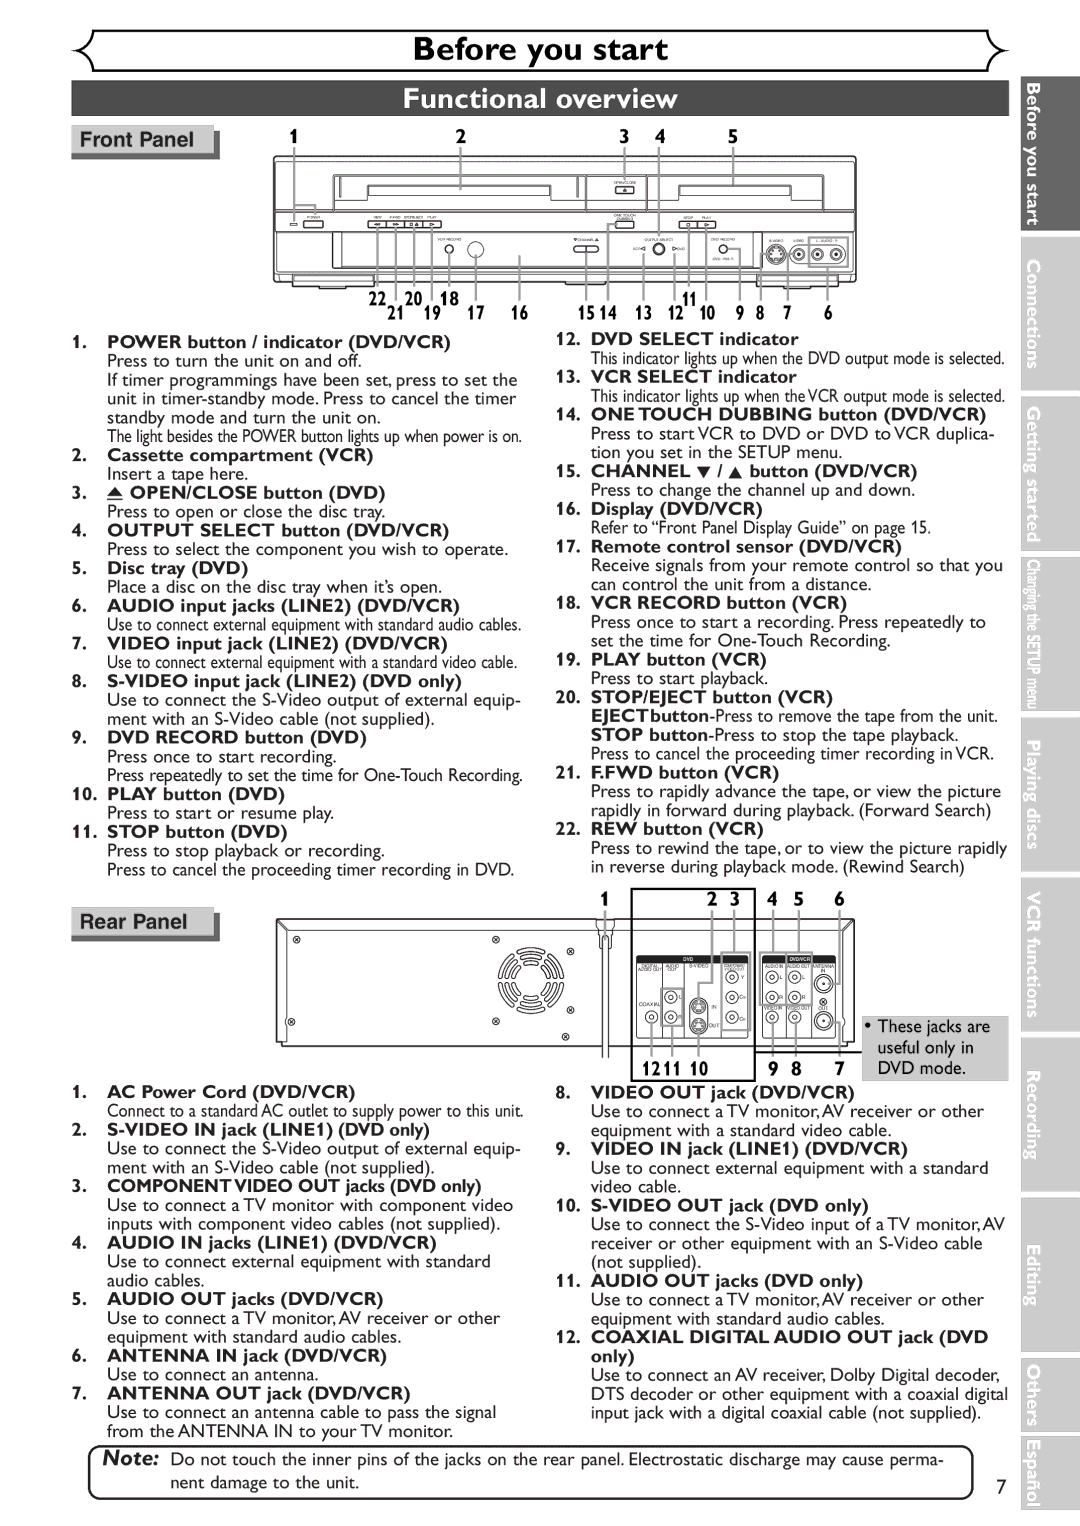
22 2120 1918
Functional overview
1211
Functional overview cont’d
DVD Mode
VCR/DVD recorder Switching
If your TV is not compatible with progressive scanning
Plug in the AC power cord of this unit
Connections
Connection to a TV
To view one channel while recording another
Connection to a cable box or satellite box
To select channels on the cable box or satellite box
To playback a DVD disc or a tape
Connection to an Audio System
Getting started
SETUP/DISC/CD menu
First DVD
Display menu
First VCR
Display message
Channel settings
Adding/deleting channels
Channel settings cont’d
Select Manual Preset using Buttons, then press Enter button
Select Channel using K / L Buttons, then press Enter button
Auto Clock Setting
Setting the clock
Select Setup using / B but
Manual Clock Setting
Using K / L buttons, then Buttons, then press Enter
Setting the clock cont’d
Clock menu will appear, then the settings will be activated
Select Auto Clock Setting Select OFF using K / L
Select on or OFF using Buttons, then press Enter button
Setting the daylight sav- ing time
Daylight Saving Time options will appear
Refer to the Note on this
Select TV Aspect using K Buttons, then press Enter
Selecting the TV aspect ratio
Option window will appear
Select TV Audio Select
Selecting TV stereo or SAP
Outputs main-audio
Select channel 3 on your TV
Press VIDEO/TV button on the remote control
RF converter output
Change from CH3 to CH4
Tour of the Setup menu
Changing the Setup menu
Press Setup button to display SETUP/DISC menu
Language settings
SETUP/DISC menu will appear
Language settings cont’d
Setup Display
Display settings
OSD Language Default English Set the OSD language
Display settings cont’d
OSD Background Transparency Default 35%
OSD Background Color Default 1 Green
Option window will appear. Proceed to steps a or B
Audio settings
Choose the appropriate Audio settings for your equipment
It will only affect DVD discs during playback
Audio settings cont’d
Parental control settings
Parental control settings cont’d
Information on DVD play
Playing discs
Playback
Basic playback
For MP3 playback
Basic playback cont’d
Press MENU/LIST button to exit the menu
Playing discs using the disc menu
First DVD Press MENU/LIST button
B buttons
Press TOP Menu button to exit the title menu
Playing discs using the title menu
Press TOP Menu button
TOP Menu button
Resume play
Special playback
Fast forward / Fast reverse
During playback, press CM Skip button
Special playback cont’d
Skipping TV commercials during play
Pause
To play step by step back- ward
Step by step playback
Slow forward / Slow reverse play
Press Skip G button repeatedly
During playback, press Zoom button
Marker Setup
Select icon using / B buttons, then press Enter button
Zoom
Title/Chapter search
Using Skip H / G buttons
Using Display button
Search
Track search
Search cont’d
Time search
Repeat play
Repeat/Random/Program play
Random play
Press Play B button to start program playback
Select Program Play using Buttons, then press Enter button
Repeat/Random/Program play cont’d
Program play
Track using K / L buttons
Contents of the disc you are playing
Switch between them anytime
VR mode, you can switch to main
Selecting audio and video formats cont’d
Switching subtitles
During playback, press DIS Play button
Switching camera angles
Angle will switch each you press
Reducing block noise
Playback
Recording and One-touch timer recording
Press Stop button when Recording is completed
VCR functions
During normal recording
One-touch timer recording
Begin one-touch timer
Index search
Direction, press g button
Press g/h buttons to
Start time search
If you want to go in the forward
Other operations
Counter Reset
Press CLEAR/C.RESET button
When you playback a tape recorded in Hi-Fi stereo
Easy DVD recording
Recording
Channel
Easy DVD recording Cont’d
Restrictions on recording
Information on DVD recording
Information
Recording speed
This unit cannot record CD-R or CD-RW discs
Information on DVD recording cont’d
Information on copy control
Making discs playable in other DVD player Finalize
Formatting a disc
SETUP/DISC menu will appear Screen
Select Setup using / B
Setup Menu Setup Recording
Minutes has been selected as
Select Auto Chapter using
Default
Formatting a disc cont’d
This operation may take a few minutes to complete
Select Format using K / L buttons, then press Enter button
Reformatting a disc
Formatting is complete
Basic recording
First DVD Press REC Monitor button again to exit
Basic recording cont’d
Checking the recording picture quality
XP SP LP
Make sure that the TV input is set on the DVD/VCR
One-touch timer recording
Recording will start
Timer recording
To stop the timer recording in process
Timer recording cont’d
Select a recording speed using K / L buttons
Press Power button to turn off
Priority of overlapped settings
Hints for timer recording
Connection to an external source
Settings for an external source
Select L1 Rear using K / L buttons, then press Enter button
Setup Select Video
Recording from an external source
Settings for an external source cont’d
Dubbing Mode
DVD to VCR duplication will start
VCR to DVD duplication will start
Finalizing the discs
Select Disc using / B buttons, then press Enter button
Finalizing is complete
58% Writing to Disc
Setting a disc to protect
Disc will be protected
→ OFF at , then select Yes
Guide to a title list
Editing discs in Video mode
Editing
Information on disc editing
Editing playlists
Editing discs in VR mode
Information on disc editing cont’d
Editing original titles
Titlelist will appear Screen
Editing DVD-RW discs in Video mode
When the last title in the title list
Deleting titles
Putting names on titles
Editing DVD-RW discs in Video mode cont’d
Select Chapter Mark using
Setting or clearing chapter markers
Chapter markers will be added at a specified time
Original menu will appear
Editing DVD-RW discs in VR mode Original
Select a desired title using K
Select Original using / B buttons, then press Enter button
Deleting parts of titles
Editing DVD-RW discs in VR mode Original cont’d
Button Ton
Select Delete using K / L Select Yes using / B but
Naming Titles
Buttons, then press Enter Tons, then press Enter but
Buttons, then press Enter Steps of Guide to edit
Select Original using / B To enter a title name, follow
Title name on this
Enter button Original menu will appear
Select Chapter Mark using Buttons, then press Enter button
Option window will appear. Add
Setting pictures for thumbnails
To exit Disc menu
Pleted, press Setup button
Picture for thumbnail will be
Set
Title Protection
Protect on OFF is selected
Titles from protection Select a desired title using K
Releasing titles from protection
You are allowed to release
Playlist will appear
Editing DVD-RW discs in VR mode Playlist
Select Title Delete using K
Playlist menu will appear
DVD will begin to play in a win- dow
Editing DVD-RW discs in VR mode Playlist cont’d
Select PlayList using / B buttons, then press Enter button
Enter button Option window will appear
After writing to disc is com To exit Disc menu
Select Delete using K / L
Select Yes using / B but Tons, then press Enter but
Select PlayList using / B
Disc Edit Playlist Edit Title Name
Each title. Once a chapter is
Using the chapter search feature
Where you want
You can put chapter markers
Disc Disc Edit Original
Chapter marker will be added. Add
DVD will begin to play in a window
Playlist will appear Picture for thumbnail will be
First Original list will appear
Select Edit using K / L but Tons, then press Enter but
Adding titles to a Playlist
You can add or delete a title
Playlist will be erased
Select Delete Playlist using
Deleting a Playlist
Editing
You cannot select Chapter Mark
Editing DVD-R discs
To enter a title name, follow Title name on this
Select Edit Title Name
Others
Troubleshooting
Disc is not correctly inserted
Troubleshooting cont’d
100
Repairing
Error message Cause Solution
Glossary
Language code
Specifications
103
Mando a distancia
Español
Fácil grabación de DVD
Nota
¿Qué significa Original o Playlist?
¿Qué son títulos y capítulos?
Puede editar lo siguiente de la lista de títulos
Original y Playlist modo VR
Presione VCR
Reproducción con videograbadora
Presione el botón Play B para continuar la reproduc- ción
Grabación con temporizador de un toque
Grabación
Get it fixed, at your home or ours