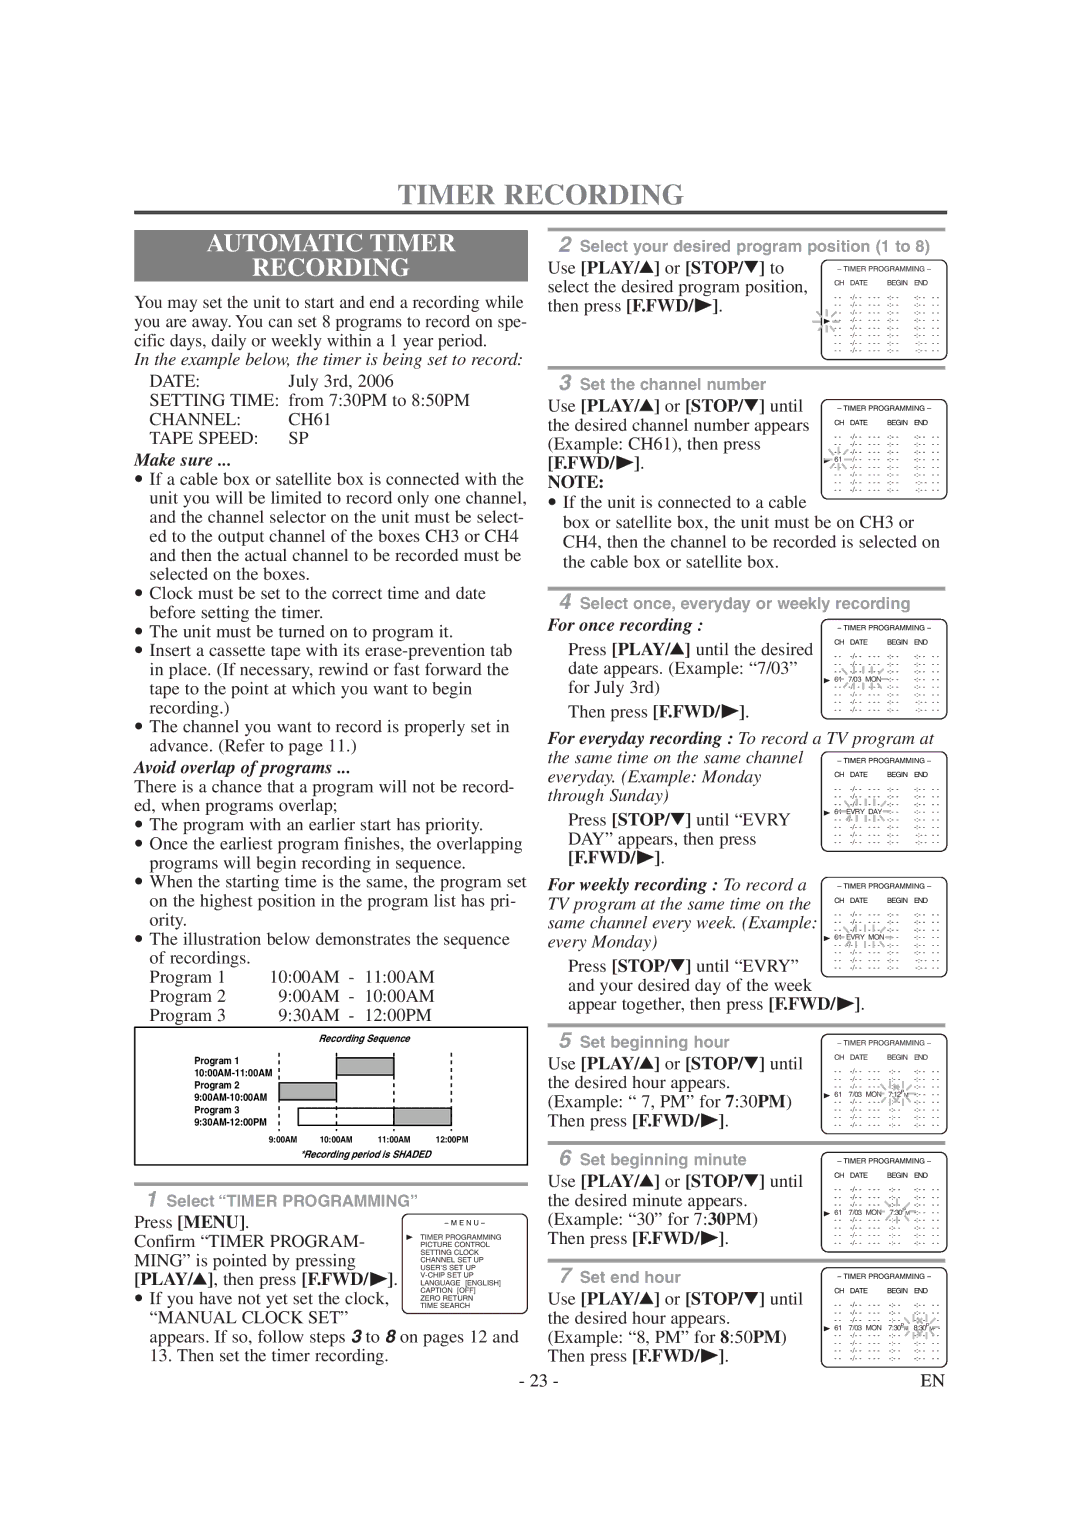
TIMER RECORDING

AUTOMATIC TIMER

RECORDING

You may set the unit to start and end a recording while you are away. You can set 8 programs to record on spe- cific days, daily or weekly within a 1 year period.

In the example below, the timer is being set to record:

2Select your desired program position (1 to 8)

Use [PLAY/K] or [STOP/L] to

– TIMER PROGRAMMING –

select the desired program position,

CH DATE

BEGIN END

then press [F.FWD/ B].

- -

-/- - - - -

-:- -

-:- - - -

- -

-/- - - - -

-:- -

-:- - - -


- -

-/- - - - -

-:- -

-:- - - -


B - -

-/- - - - -

-:- -

-:- - - -


- -

-/- - - - -

-:- -

-:- - - -


- -

-/- - - - -

-:- -

-:- - - -


- -

-/- - - - -

-:- -

-:- - - -


- -

-/- - - - -

-:- -

-:- - - -


DATE:


July 3rd, 2006


3 Set the channel number


SETTING TIME: from 7:30PM to 8:50PM

Use [PLAY/K] or [STOP/L] until

– TIMER PROGRAMMING –


CHANNEL:


CH61


the desired channel number appears

CH DATE

BEGIN

END


TAPE SPEED:


SP


- -

-/- -


-:- -

-:- - - -


(Example: CH61), then press

- - -


- -

-/- -

- - -

-:- -

-:- - - -

Make sure


- -

-/- -


-:- -

-:- - - -


[F.FWD/ B].

- - -


B 61

-/- -

- - -

-:- -

-:- - - -


- -

-/- -

- - -

-:- -

-:- - - -

If a cable box or satellite box is connected with the

NOTE:

- -

-/- -

- - -

-:- -

-:- - - -

- -

-/- -

- - -

-:- -

-:- - - -


- -

-/- -

- - -

-:- -

-:- - - -


unit you will be limited to record only one channel,

If the unit is connected to a cable


and the channel selector on the unit must be select-

box or satellite box, the unit must be on CH3 or


ed to the output channel of the boxes CH3 or CH4

CH4, then the channel to be recorded is selected on


and then the actual channel to be recorded must be


the cable box or satellite box.


selected on the boxes.


Clock must be set to the correct time and date


4 Select once, everyday or weekly recording


before setting the timer.


For once recording :


The unit must be turned on to program it.

– TIMER PROGRAMMING –

Press [PLAY/K] until the desired

CH DATE

BEGIN

END

Insert a cassette tape with its erase-prevention tab

- -

-/- -

- - -

-:- -

-:- - - -


in place. (If necessary, rewind or fast forward the

date appears. (Example: “7/03”

- -

-/- -

- - -

-:- -

-:- - - -


- -

-/- -

- - -

-:- -

-:- - - -


tape to the point at which you want to begin

for July 3rd)

B 61

7/03

MON

-:- -

-:- - - -


- -

-/- -

- - -

-:- -

-:- - - -


- -

-/- -

- - -

-:- -

-:- - - -


recording.)


Then press [F.FWD/ B].

- -

-/- -

- - -

-:- -

-:- - - -


- -

-/- -

- - -

-:- -

-:- - - -


The channel you want to record is properly set in

For everyday recording : To record a TV program at


advance. (Refer to page 11.)


the same time on the same channel


Avoid overlap of programs


– TIMER PROGRAMMING –


everyday. (Example: Monday

CH DATE

BEGIN

END

There is a chance that a program will not be record-

- -

-/- -


-:- -

-:- - - -

through Sunday)

- - -

ed, when programs overlap;


- -

-/- -

- - -

-:- -

-:- - - -


- -

-/- -

- - -

-:- -

-:- - - -


Press [STOP/L] until “EVRY

B 61

EVRY DAY -:- -

-:- - - -

The program with an earlier start has priority.

- -

-/- -

- - -

-:- -

-:- - - -

- -

-/- -

- - -

-:- -

-:- - - -

DAY” appears, then press

- -

-/- -

- - -

-:- -

-:- - - -

Once the earliest program finishes, the overlapping

- -

-/- -

- - -

-:- -

-:- - - -


programs will begin recording in sequence.

[F.FWD/ B].


When the starting time is the same, the program set

For weekly recording : To record a

– TIMER PROGRAMMING –


on the highest position in the program list has pri-

TV program at the same time on the

CH DATE

BEGIN

END


ority.


same channel every week. (Example:

- -

-/- -

- - -

-:- -

-:- - - -


- -

-/- -

- - -

-:- -

-:- - - -


- -

-/- -

- - -

-:- -

-:- - - -

The illustration below demonstrates the sequence

every Monday)

B 61 EVRY MON -:- -

-:- - - -

- -

-/- -

- - -

-:- -

-:- - - -


of recordings.


Press [STOP/L] until “EVRY”

- -

-/- -

- - -

-:- -

-:- - - -


- -

-/- -

- - -

-:- -

-:- - - -


Program 1

10:00AM - 11:00AM

- -

-/- -

- - -

-:- -

-:- - - -


and your desired day of the week


Program 2


9:00AM - 10:00AM


appear together, then press [F.FWD/ B].


Program 3


9:30AM - 12:00PM


Recording Sequence


5 Set beginning hour

– TIMER PROGRAMMING –


Program 1


Use [PLAY/K] or [STOP/L] until

CH DATE

BEGIN

END


10:00AM-11:00AM


- -

-/- -


-:- -

-:- - - -


the desired hour appears.

- - -


Program 2


- -

-/- -

- - -

-:- -

-:- - - -


- -

- --/

- - -

- - -:

- - - --:


9:00AM-10:00AM


(Example: “ 7, PM” for 7:30PM)

B 61

7/03

MON

7:12PM

-:- - - -


Program 3


- -

-/- -

- - -

-:- -

-:- - - -


Then press [F.FWD/ B].

- -

- --/

- - -

- - -:

- - - --:


9:30AM-12:00PM


- -

-/- -

- - -

-:- -

-:- - - -


- -

-/- -

- - -

-:- -

-:- - - -


9:00AM

10:00AM

11:00AM

12:00PM


*Recording period is SHADED


6 Set beginning minute

– TIMER PROGRAMMING –


Use [PLAY/K] or [STOP/L] until

CH DATE

BEGIN

END


- -

-/- -


-:- -

-:- - - -


1 Select “TIMER PROGRAMMING”


the desired minute appears.

- - -


- -

-/- -

- - -

-:- -

-:- - - -


- -

-/- -

MON- - -

-:- - P

-:- - - -

Press [MENU].


(Example: “30” for 7:30PM)

B 61

7/03

7:30 M

-:- - - -


– M E N U –

- -

-/- -

- - -

-:- -

-:- - - -


- -

-/- -

- - -

-:- -

-:- - - -

Confirm “TIMER PROGRAM-


B TIMER PROGRAMMING

Then press [F.FWD/ B].

- -

-/- -

- - -

-:- -

-:- - - -


PICTURE CONTROL

- -

-/- -

- - -

-:- -

-:- - - -

MING” is pointed by pressing


SETTING CLOCK


CHANNEL SET UP


USER’S SET UP

7 Set end hour


[PLAY/K], then press [F.FWD/ B].

V-CHIP SET UP

– TIMER PROGRAMMING –

LANGUAGE [ENGLISH]


If you have not yet set the clock,

CAPTION [OFF]

Use [PLAY/K] or [STOP/L] until

CH DATE

BEGIN

END

ZERO RETURN

- -

-/- -


-:- -

-:- - - -

TIME SEARCH

- - -


“MANUAL CLOCK SET”


the desired hour appears.

- -

-/- -

- - -

-:- -

-:- - - -


- -

-/- -

- - -

-:- -

-:- - - -


B 61

7/03 MON

7:30PM

8:30PM- -


appears. If so, follow steps 3 to 8 on pages 12 and

(Example: “8, PM” for 8:50PM)

- -

-/- -

- - -

-:- -

-:- - - -


- -

-/- -

- - -

-:- -

-:- - - -


13. Then set the timer recording.


Then press [F.FWD/ B].

- -

-/- -

- - -

-:- -

-:- - - -


- -

-/- -

- - -

-:- -

-:- - - -


- 23 -


EN

Page 23
Image 23
Symphonic SC1304 owner manual Automatic Timer Recording, Fwd/ B, PLAY/K, then press F.FWD/ B

SC1304 specifications

The Symphonic SC1304 is a versatile and innovative piece of technology that has gained attention for its remarkable features and advanced capabilities. Designed for both professional and personal use, this device stands out in the realm of electronics due to its functionality and ease of use.

One of the key features of the SC1304 is its high-fidelity audio output. It incorporates advanced sound processing technologies that ensure crystal clear sound quality, making it ideal for music lovers, audiophiles, and content creators alike. The device supports a wide range of audio formats, allowing users to enjoy versatile playback options that cater to various preferences.

Another notable aspect of the SC1304 is its sleek and modern design. The device features a compact form factor, making it easy to integrate into any environment, whether at home or in a professional studio. Its user-friendly interface allows for easy navigation and control, enabling users to access various functions without a steep learning curve.

The SC1304 also employs cutting-edge wireless technologies, including Bluetooth and Wi-Fi connectivity, allowing users to stream audio directly from their devices. This feature simplifies the user experience by eliminating the hassle of wired connections and enhancing mobility for those on the go. Additionally, the seamless pairing process ensures that users can connect their devices effortlessly, making it a convenient choice for everyday use.

In terms of durability, the Symphonic SC1304 is built with high-quality materials that not only enhance its aesthetic appeal but also ensure longevity. The robust construction allows the device to withstand the rigors of daily use, making it a reliable companion for various audio experiences.

Moreover, the device is equipped with an array of customization options, including adjustable equalizer settings that allow users to fine-tune their audio experience to their liking. Whether it’s boosting bass or enhancing treble, the SC1304 provides the flexibility needed for tailored sound.

Lastly, the Symphonic SC1304 is designed with energy efficiency in mind. It incorporates technologies that minimize power consumption without compromising performance, making it an environmentally friendly choice.

In summary, the Symphonic SC1304 is a multifunctional device that excels in audio quality, design, connectivity, durability, customization, and energy efficiency. It is a perfect choice for anyone seeking a high-performance audio solution that meets diverse needs and preferences.