STEP FIVE: INSTALL THE COOKTOP

Continued from Page 5

Install the cooktops as follows:

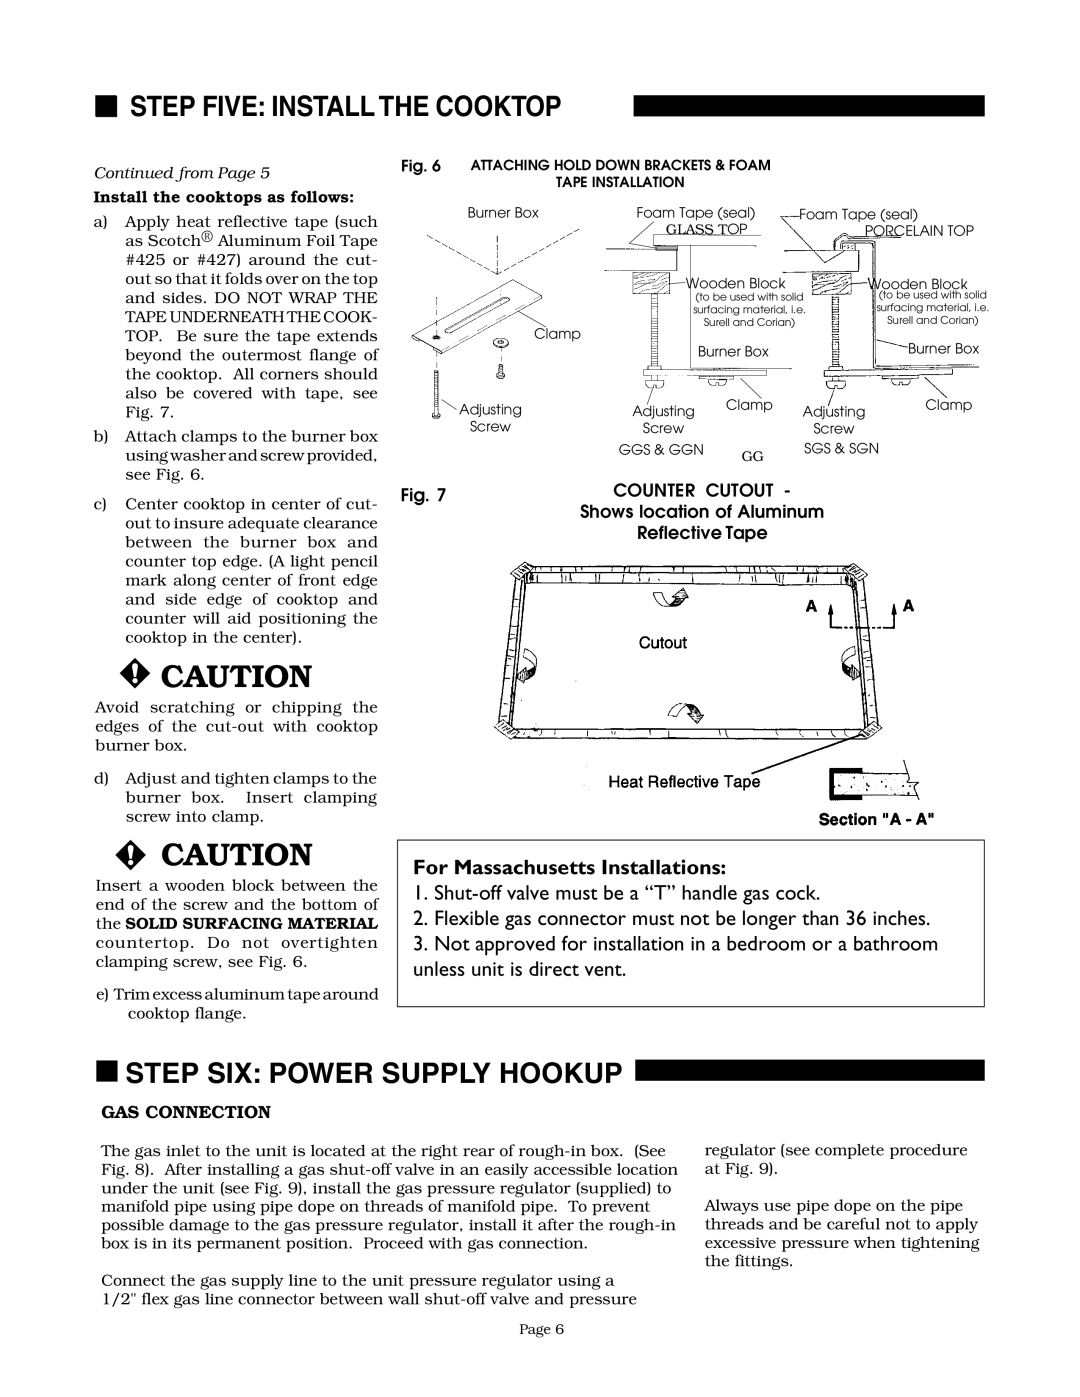
Fig. 6 ATTACHING HOLD DOWN BRACKETS & FOAM TAPE INSTALLATION

a) Apply heat reflective tape (such

as Scotch® Aluminum Foil Tape

#425 or #427) around the cut-

out so that it folds over on the top

and sides. DO NOT WRAP THE

TAPE UNDERNEATH THE COOK-

TOP. Be sure the tape extends

beyond the outermost flange of

the cooktop. All corners should

also be covered with tape, see

Fig. 7.

b) Attach clamps to the burner box

using washer and screw provided,

see Fig. 6.

Burner Box

Clamp

Adjusting

Screw

Foam Tape (seal)

Foam Tape (seal)


GLASS TOP


PORCELAIN TOP


Wooden Block


Wooden Block


(to be used with solid


(to be used with solid


surfacing material, i.e.


surfacing material, i.e.


Surell and Corian)


Surell and Corian)


Burner Box


Burner Box

Adjusting


Clamp

Adjusting

Clamp


Screw


Screw


GGS & GGN

GG

SGS & SGN


c) Center cooktop in center of cut-

out to insure adequate clearance

between the burner box and

counter top edge. (A light pencil

mark along center of front edge

and side edge of cooktop and

counter will aid positioning the

cooktop in the center).

CAUTION

Avoid scratching or chipping the edges of the cut-out with cooktop burner box.

d)Adjust and tighten clamps to the burner box. Insert clamping screw into clamp.

Fig. 7

COUNTER CUTOUT -


Shows location of Aluminum


Reflective Tape

CAUTION

Insert a wooden block between the end of the screw and the bottom of the SOLID SURFACING MATERIAL countertop. Do not overtighten clamping screw, see Fig. 6.

e)Trim excess aluminum tape around cooktop flange.

For Massachusetts Installations:

1.Shut-off valve must be a “T” handle gas cock.

2.Flexible gas connector must not be longer than 36 inches.

3.Not approved for installation in a bedroom or a bathroom unless unit is direct vent.

STEP SIX: POWER SUPPLY HOOKUP

GAS CONNECTION

The gas inlet to the unit is located at the right rear of rough-in box. (See Fig. 8). After installing a gas shut-off valve in an easily accessible location under the unit (see Fig. 9), install the gas pressure regulator (supplied) to manifold pipe using pipe dope on threads of manifold pipe. To prevent possible damage to the gas pressure regulator, install it after the rough-in box is in its permanent position. Proceed with gas connection.

Connect the gas supply line to the unit pressure regulator using a 1/2" flex gas line connector between wall shut-off valve and pressure

regulator (see complete procedure at Fig. 9).

Always use pipe dope on the pipe threads and be careful not to apply excessive pressure when tightening the fittings.

Page 6

Page 6
Image 6
Thermador GGN30, SGS36G, SGS30 Step Five Install the Cooktop, Step SIX Power Supply Hookup, Counter Cutout, GAS Connection

GGS365, GGS30, GGN365, GGN30, GGN36 specifications

The Thermador SGNCV36G, SGN36G, SGN30, GGNCV30, and GGNCV36 are part of Thermador’s premier collection of gas ranges, designed for culinary enthusiasts who prioritize performance, style, and technology in their kitchen. These models illustrate Thermador's dedication to professional-grade equipment, integrating robust features and advanced technologies that cater to both home chefs and culinary artisans.

One of the standout characteristics of these ranges is their powerful heating elements. Each model is equipped with Thermador’s signature Star Burner design, which delivers superior heat distribution for even cooking results. With an impressive output ranging from 18,000 BTU for quick boiling to low simmer settings, users can easily navigate a wide array of cooking techniques, whether searing meats or delicate sauce preparation.

In addition to exceptional heating capabilities, the Thermador SGNCV36G and the GGNCV36 feature a seamless surface design that not only enhances aesthetic appeal but also simplifies cleaning. This innovative design minimizes gaps and crevices where food particles can accumulate, making maintenance a breeze. Moreover, the ranges come with continuous grates, allowing for easy movement of pots and pans across the cooktop without lifting.

These ranges also incorporate advanced technologies such as the MultiPoint Temperature Probe that offers precise cooking results by monitoring the internal temperature of meats, ensuring they are cooked perfectly every time. The iconic Thermador oven features include various cooking modes, such as convection baking and roasting, to elevate your culinary creations further.

The design of the SGN and GGNC models is equally impressive, with sleek stainless-steel finishes and professional-style knobs offering a modern yet timeless look that fits seamlessly into any kitchen decor. The built-in features, like the soft-close oven door and triple-glazed oven window, enhance usability and convenience.

In summary, the Thermador SGNCV36G, SGN36G, SGN30, GGNCV30, and GGNCV36 gas ranges are a testament to Thermador’s commitment to excellence in the kitchen. With features designed for the serious cook, from powerful burners and easy-to-clean surfaces to advanced technological integrations, these ranges promise a cooking experience that is both efficient and gratifying. Embrace the art of cooking with Thermador, where high-performance appliances meet refined design.