www.timex.com
THANK YOU FOR PURCHASING YOUR TIMEX¨ WATCH.
Extended Warranty
Available in U.S. only. Extend your warranty for an additional
4 years from date of purchase for $5. You can pay with AMEX, Discover, Visa or MasterCard by calling 1
AR 72203.
Please read instructions carefully to understand how to operate your Timex¨ watch.
FEATURES AND BASIC OPERATION
¥Time with 12- or
¥Date with
¥3 time zones
¥Optional hourly chime
¥
¥
¥Occasion reminders
¥Hydration timer
¥3 daily/weekday/weekend alarms with
¥Customizable mode set (hide unwanted modes)
¥INDIGLO¨
Press MODE repeatedly to step through modes: Chrono, Timer, Occasion, Hydration, Alarm 1, Alarm 2, and Alarm 3. Press MODE to exit current mode and return to Time mode.
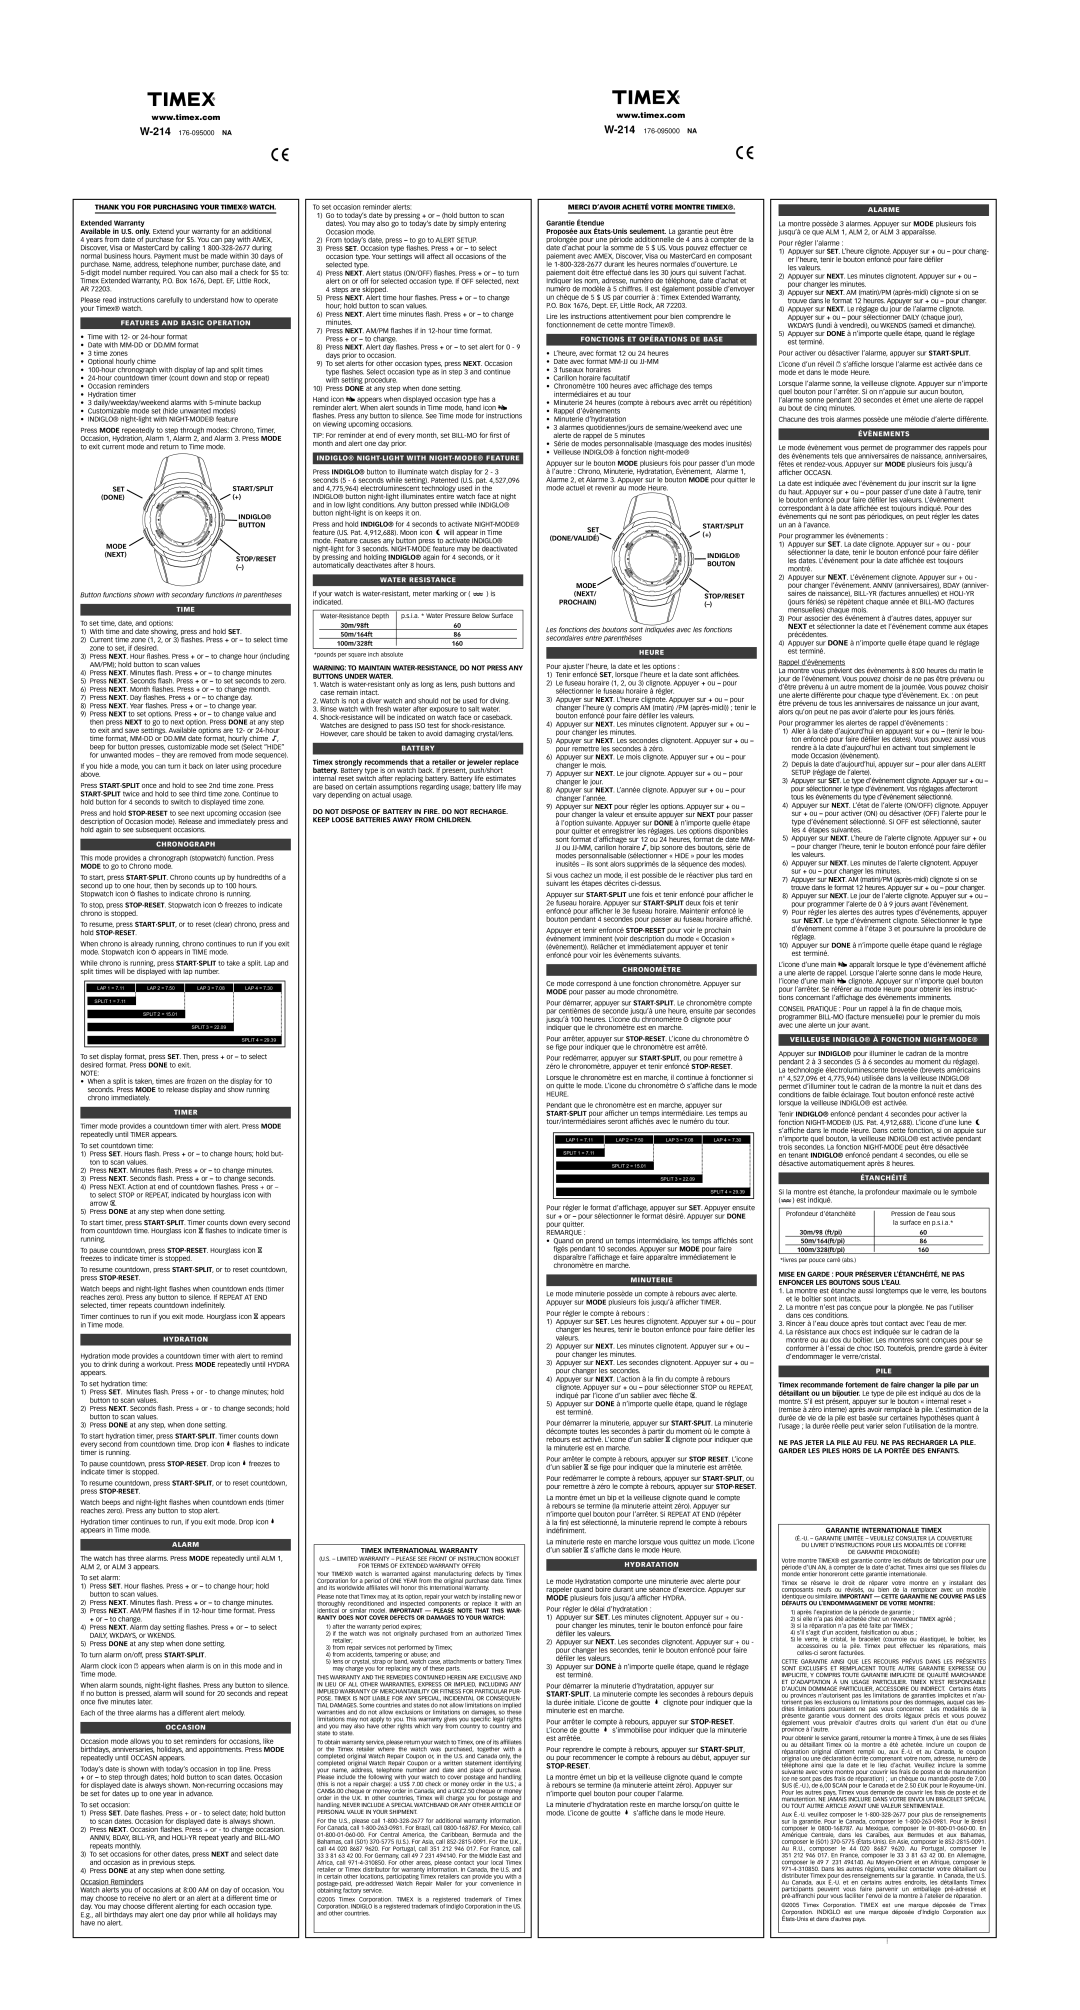
SET | START/SPLIT |
(DONE) | (+) |
| INDIGLO¨ |
| BUTTON |
MODE |
|
(NEXT) | STOP/RESET |
| |
| (Ð) |
Button functions shown with secondary functions in parentheses
TIME
To set time, date, and options:
1)With time and date showing, press and hold SET.
2)Current time zone (1, 2, or 3) ßashes. Press + or Ð to select time zone to set, if desired.
3)Press NEXT. Hour ßashes. Press + or Ð to change hour (including AM/PM); hold button to scan values
4)Press NEXT. Minutes ßash. Press + or Ð to change minutes
5)Press NEXT. Seconds ßash. Press + or Ð to set seconds to zero.
6)Press NEXT. Month ßashes. Press + or Ð to change month.
7)Press NEXT. Day ßashes. Press + or Ð to change day.
8)Press NEXT. Year ßashes. Press + or Ð to change year.
9)Press NEXT to set options. Press + or Ð to change value and then press NEXT to go to next option. Press DONE at any step to exit and save settings. Available options are 12- or
If you hide a mode, you can turn it back on later using procedure above.
Press STARTáSPLIT once and hold to see 2nd time zone. Press STARTáSPLIT twice and hold to see third time zone. Continue to hold button for 4 seconds to switch to displayed time zone.
Press and hold STOPáRESET to see next upcoming occasion (see description of Occasion mode). Release and immediately press and hold again to see subsequent occasions.
CHRONOGRAPH
This mode provides a chronograph (stopwatch) function. Press MODE to go to Chrono mode.
To start, press STARTáSPLIT. Chrono counts up by hundredths of a second up to one hour, then by seconds up to 100 hours. Stopwatch icon w ßashes to indicate chrono is running.
To stop, press STOPáRESET. Stopwatch icon w freezes to indicate chrono is stopped.
To resume, press STARTáSPLIT, or to reset (clear) chrono, press and hold STOPáRESET.
When chrono is already running, chrono continues to run if you exit mode. Stopwatch icon w appears in TIME mode.
While chrono is running, press STARTáSPLIT to take a split. Lap and split times will be displayed with lap number.
LAP 1 = 7.11 | LAP 2 = 7.50 | LAP 3 = 7.08 | LAP 4 = 7.30 |
SPLIT 1 = 7.11
SPLIT 2 = 15.01
SPLIT 3 = 22.09
SPLIT 4 = 29.39
To set display format, press SET. Then, press + or Ð to select desired format. Press DONE to exit.
NOTE:
¥When a split is taken, times are frozen on the display for 10 seconds. Press MODE to release display and show running chrono immediately.
TIMER
Timer mode provides a countdown timer with alert. Press MODE repeatedly until TIMER appears.
To set countdown time:
1)Press SET. Hours ßash. Press + or Ð to change hours; hold but- ton to scan values.
2)Press NEXT. Minutes ßash. Press + or Ð to change minutes.
3)Press NEXT. Seconds ßash. Press + or Ð to change seconds.
4)Press NEXT. Action at end of countdown ßashes. Press + or Ð to select STOP or REPEAT, indicated by hourglass icon with arrow I.
5)Press DONE at any step when done setting.
To start timer, press STARTáSPLIT. Timer counts down every second from countdown time. Hourglass icon H ßashes to indicate timer is running.
To pause countdown, press STOPáRESET. Hourglass icon H freezes to indicate timer is stopped.
To resume countdown, press STARTáSPLIT, or to reset countdown, press STOPáRESET.
Watch beeps and
Timer continues to run if you exit mode. Hourglass icon H appears in Time mode.
HYDRATION
Hydration mode provides a countdown timer with alert to remind you to drink during a workout. Press MODE repeatedly until HYDRA appears.
To set hydration time:
1)Press SET. Minutes ßash. Press + or - to change minutes; hold button to scan values.
2)Press NEXT. Seconds ßash. Press + or - to change seconds; hold button to scan values.
3)Press DONE at any step, when done setting.
To start hydration timer, press STARTáSPLIT. Timer counts down every second from countdown time. Drop icon ![]() ßashes to indicate timer is running.
ßashes to indicate timer is running.
To pause countdown, press STOPáRESET. Drop icon ![]() freezes to indicate timer is stopped.
freezes to indicate timer is stopped.
To resume countdown, press STARTáSPLIT, or to reset countdown, press STOPáRESET.
Watch beeps and
Hydration timer continues to run, if you exit mode. Drop icon ![]() appears in Time mode.
appears in Time mode.
ALARM
The watch has three alarms. Press MODE repeatedly until ALM 1, ALM 2, or ALM 3 appears.
To set alarm:
1)Press SET. Hour ßashes. Press + or Ð to change hour; hold button to scan values.
2)Press NEXT. Minutes ßash. Press + or Ð to change minutes.
3)Press NEXT. AM/PM ßashes if in
4)Press NEXT. Alarm day setting ßashes. Press + or Ð to select DAILY, WKDAYS, or WKENDS.
5)Press DONE at any step when done setting.
To turn alarm on/off, press STARTáSPLIT.
Alarm clock icon a appears when alarm is on in this mode and in Time mode.
When alarm sounds,
Each of the three alarms has a different alert melody.
OCCASION
Occasion mode allows you to set reminders for occasions, like birthdays, anniversaries, holidays, and appointments. Press MODE repeatedly until OCCASN appears.
TodayÕs date is shown with todayÕs occasion in top line. Press
+or Ð to step through dates; hold button to scan dates. Occasion for displayed date is always shown.
To set occasion:
1)Press SET. Date ßashes. Press + or - to select date; hold button to scan dates. Occasion for displayed date is always shown.
2)Press NEXT. Occasion ßashes. Press + or - to change occasion. ANNIV, BDAY,
3)To set occasions for other dates, press NEXT and select date and occasion as in previous steps.
4)Press DONE at any step when done setting.
Occasion Reminders
Watch alerts you of occasions at 8:00 AM on day of occasion. You may choose to receive no alert or an alert at a different time or day. You may choose different alerting for each occasion type. E.g., all birthdays may alert one day prior while all holidays may have no alert.
To set occasion reminder alerts:
1)Go to todayÕs date by pressing + or Ð (hold button to scan dates). You may also go to todayÕs date by simply entering Occasion mode.
2)From todayÕs date, press Ð to go to ALERT SETUP.
3)Press SET. Occasion type ßashes. Press + or Ð to select occasion type. Your settings will affect all occasions of the selected type.
4)Press NEXT. Alert status (ON/OFF) ßashes. Press + or Ð to turn alert on or off for selected occasion type. If OFF selected, next 4 steps are skipped.
5)Press NEXT. Alert time hour ßashes. Press + or Ð to change hour; hold button to scan values.
6)Press NEXT. Alert time minutes ßash. Press + or Ð to change minutes.
7)Press NEXT. AM/PM ßashes if in
8)Press NEXT. Alert day ßashes. Press + or Ð to set alert for 0 - 9 days prior to occasion.
9)To set alerts for other occasion types, press NEXT. Occasion type ßashes. Select occasion type as in step 3 and continue with setting procedure.
10)Press DONE at any step when done setting.
Hand icon F appears when displayed occasion type has a reminder alert. When alert sounds in Time mode, hand icon F ßashes. Press any button to silence. See Time mode for instructions on viewing upcoming occasions.
TIP: For reminder at end of every month, set
INDIGLO¨ NIGHT-LIGHT WITH NIGHT-MODE¨ FEATURE
Press INDIGLO¨ button to illuminate watch display for 2 - 3 seconds (5 - 6 seconds while setting). Patented (U.S. pat. 4,527,096 and 4,775,964) electroluminescent technology used in the INDIGLO¨ button
Press and hold INDIGLO¨ for 4 seconds to activate
WATER RESISTANCE
If your watch is
p.s.i.a. * Water Pressure Below Surface | |
30m/98ft | 60 |
50m/164ft | 86 |
100m/328ft | 160 |
*pounds per square inch absolute
WARNING: TO MAINTAIN
1.Watch is
2.Watch is not a diver watch and should not be used for diving.
3.Rinse watch with fresh water after exposure to salt water.
4.
BATTERY
Timex strongly recommends that a retailer or jeweler replace battery. Battery type is on watch back. If present, push/short internal reset switch after replacing battery. Battery life estimates are based on certain assumptions regarding usage; battery life may vary depending on actual usage.
DO NOT DISPOSE OF BATTERY IN FIRE. DO NOT RECHARGE. KEEP LOOSE BATTERIES AWAY FROM CHILDREN.
TIMEX INTERNATIONAL WARRANTY
(U.S. Ð LIMITED WARRANTY Ð PLEASE SEE FRONT OF INSTRUCTION BOOKLET
FOR TERMS OF EXTENDED WARRANTY OFFER)
Your TIMEX¨ watch is warranted against manufacturing defects by Timex Corporation for a period of ONE YEAR from the original purchase date. Timex and its worldwide afÞliates will honor this International Warranty.
Please note that Timex may, at its option, repair your watch by installing new or thoroughly reconditioned and inspected components or replace it with an identical or similar model. IMPORTANT Ñ PLEASE NOTE THAT THIS WAR-
RANTY DOES NOT COVER DEFECTS OR DAMAGES TO YOUR WATCH:
1)after the warranty period expires;
2)if the watch was not originally purchased from an authorized Timex retailer;
3)from repair services not performed by Timex;
4)from accidents, tampering or abuse; and
5)lens or crystal, strap or band, watch case, attachments or battery. Timex may charge you for replacing any of these parts.
THIS WARRANTY AND THE REMEDIES CONTAINED HEREIN ARE EXCLUSIVE AND IN LIEU OF ALL OTHER WARRANTIES, EXPRESS OR IMPLIED, INCLUDING ANY IMPLIED WARRANTY OF MERCHANTABILITY OR FITNESS FOR PARTICULAR PUR- POSE. TIMEX IS NOT LIABLE FOR ANY SPECIAL, INCIDENTAL OR CONSEQUEN- TIAL DAMAGES. Some countries and states do not allow limitations on implied warranties and do not allow exclusions or limitations on damages, so these limitations may not apply to you. This warranty gives you speciÞc legal rights and you may also have other rights which vary from country to country and state to state.
To obtain warranty service, please return your watch to Timex, one of its afÞliates or the Timex retailer where the watch was purchased, together with a completed original Watch Repair Coupon or, in the U.S. and Canada only, the completed original Watch Repair Coupon or a written statement identifying your name, address, telephone number and date and place of purchase. Please include the following with your watch to cover postage and handling (this is not a repair charge): a US$ 7.00 check or money order in the U.S.; a CAN$6.00 cheque or money order in Canada; and a UK£2.50 cheque or money order in the U.K. In other countries, Timex will charge you for postage and handling. NEVER INCLUDE A SPECIAL WATCHBAND OR ANY OTHER ARTICLE OF PERSONAL VALUE IN YOUR SHIPMENT.
For the U.S., please call
©2005 Timex Corporation. TIMEX is a registered trademark of Timex Corporation. INDIGLO is a registered trademark of Indiglo Corporation in the US. and other countries.
www.timex.com
MERCI DÕAVOIR ACHETƒ VOTRE MONTRE TIMEX¨.
Garantie ƒtendue
ProposŽe aux
Lire les instructions attentivement pour bien comprendre le fonctionnement de cette montre Timex¨.
FONCTIONS ET OPƒRATIONS DE BASE
¥LÕheure, avec format 12 ou 24 heures
¥Date avec format
¥3 fuseaux horaires
¥Carillon horaire facultatif
¥Chronom•tre 100 heures avec afÞchage des temps intermŽdiaires et au tour
¥Minuterie 24 heures (compte ˆ rebours avec arr•t ou rŽpŽtition)
¥Rappel dÕŽv•nements
¥Minuterie dÕhydratation
¥3 alarmes quotidiennes/jours de semaine/weekend avec une alerte de rappel de 5 minutes
¥SŽrie de modes personnalisable (masquage des modes inusitŽs)
¥Veilleuse INDIGLO¨ ˆ fonction
Appuyer sur le bouton MODE plusieurs fois pour passer dÕun mode
ˆlÕautre : Chrono, Minuterie, Hydratation, ƒv•nement, Alarme 1, Alarme 2, et Alarme 3. Appuyer sur le bouton MODE pour quitter le mode actuel et revenir au mode Heure.
SET | START/SPLIT | |
(+) | ||
(DONE/VALIDƒ) | ||
| ||
| INDIGLO¨ | |
| BOUTON | |
MODE |
| |
(NEXT/ | STOP/RESET | |
PROCHAIN) | ||
(Ð) | ||
|
Les fonctions des boutons sont indiquŽes avec les fonctions secondaires entre parenth•ses
HEURE
Pour ajuster lÕheure, la date et les options :
1)Tenir enfoncŽ SET, lorsque lÕheure et la date sont afÞchŽes.
2)Le fuseau horaire (1, 2, ou 3) clignote. Appuyer + ou Ð pour sŽlectionner le fuseau horaire ˆ rŽgler.
3)Appuyer sur NEXT. LÕheure clignote. Appuyer sur + ou Ð pour changer lÕheure (y compris AM (matin) /PM
4)Appuyer sur NEXT. Les minutes clignotent. Appuyer sur + ou Ð pour changer les minutes.
5)Appuyer sur NEXT. Les secondes clignotent. Appuyer sur + ou Ð pour remettre les secondes ˆ zŽro.
6)Appuyer sur NEXT. Le mois clignote. Appuyer sur + ou Ð pour changer le mois.
7)Appuyer sur NEXT. Le jour clignote. Appuyer sur + ou Ð pour changer le jour.
8)Appuyer sur NEXT. LÕannŽe clignote. Appuyer sur + ou Ð pour changer lÕannŽe.
9)Appuyer sur NEXT pour rŽgler les options. Appuyer sur + ou Ð pour changer la valeur et ensuite appuyer sur NEXT pour passer ˆ lÕoption suivante. Appuyer sur DONE ˆ nÕimporte quelle Žtape pour quitter et enregistrer les rŽglages. Les options disponibles sont format dÕafÞchage sur 12 ou 24 heures, format de date MM- JJ ou
Si vous cachez un mode, il est possible de le rŽactiver plus tard en suivant les Žtapes dŽcrites
Appuyer sur STARTáSPLIT une fois et tenir enfoncŽ pour afÞcher le 2e fuseau horaire. Appuyer sur STARTáSPLIT deux fois et tenir enfoncŽ pour afÞcher le 3e fuseau horaire. Maintenir enfoncŽ le bouton pendant 4 secondes pour passer au fuseau horaire afÞchŽ.
Appuyer et tenir enfoncŽ STOPáRESET pour voir le prochain Žv•nement imminent (voir description du mode Ç Occasion È (Žv•nement)). Rel‰cher et immŽdiatement appuyer et tenir enfoncŽ pour voir les Žv•nements suivants.
CHRONOMéTRE
Ce mode correspond ˆ une fonction chronom•tre. Appuyer sur MODE pour passer au mode chronom•tre.
Pour dŽmarrer, appuyer sur STARTáSPLIT. Le chronom•tre compte par centi•mes de seconde jusquÕˆ une heure, ensuite par secondes jusquÕˆ 100 heures. LÕicone du chronom•tre w clignote pour indiquer que le chronom•tre est en marche.
Pour arr•ter, appuyer sur STOPáRESET. LÕicone du chronom•tre w se Þge pour indiquer que le chronom•tre est arr•tŽ.
Pour redŽmarrer, appuyer sur STARTáSPLIT, ou pour remettre ˆ zŽro le chronom•tre, appuyer et tenir enfoncŽ STOPáRESET.
Lorsque le chronom•tre est en marche, il continue ˆ fonctionner si on quitte le mode. LÕicone du chronom•tre w sÕafÞche dans le mode
HEURE.
Pendant que le chronom•tre est en marche, appuyer sur STARTáSPLIT pour afÞcher un temps intermŽdiaire. Les temps au tour/intermŽdiaires seront afÞchŽs avec le numŽro du tour.
LAP 1 = 7.11 | LAP 2 = 7.50 | LAP 3 = 7.08 | LAP 4 = 7.30 |
SPLIT 1 = 7.11
SPLIT 2 = 15.01
SPLIT 3 = 22.09
SPLIT 4 = 29.39
Pour rŽgler le format dÕafÞchage, appuyer sur SET. Appuyer ensuite sur + or Ð pour sŽlectionner le format dŽsirŽ. Appuyer sur DONE pour quitter.
REMARQUE :
¥Quand on prend un temps intermŽdiaire, les temps afÞchŽs sont ÞgŽs pendant 10 secondes. Appuyer sur MODE pour faire dispara”tre lÕafÞchage et faire appara”tre immŽdiatement le chronom•tre en marche.
MINUTERIE
Le mode minuterie poss•de un compte ˆ rebours avec alerte. Appuyer sur MODE plusieurs fois jusquÕˆ afÞcher TIMER.
Pour rŽgler le compte ˆ rebours :
1)Appuyer sur SET. Les heures clignotent. Appuyer sur + ou Ð pour changer les heures, tenir le bouton enfoncŽ pour faire dŽÞler les valeurs.
2)Appuyer sur NEXT. Les minutes clignotent. Appuyer sur + ou Ð pour changer les minutes.
3)Appuyer sur NEXT. Les secondes clignotent. Appuyer sur + ou Ð pour changer les secondes.
4)Appuyer sur NEXT. LÕaction ˆ la Þn du compte ˆ rebours clignote. Appuyer sur + ou Ð pour sŽlectionner STOP ou REPEAT, indiquŽ par lÕicone dÕun sablier avec ß•che I.
5)Appuyer sur DONE ˆ nÕimporte quelle Žtape, quand le rŽglage est terminŽ.
Pour dŽmarrer la minuterie, appuyer sur STARTáSPLIT. La minuterie dŽcompte toutes les secondes ˆ partir du moment o• le compte ˆ rebours est activŽ. LÕicone dÕun sablier H clignote pour indiquer que la minuterie est en marche.
Pour arr•ter le compte ˆ rebours, appuyer sur STOP RESET. LÕicone dÕun sablier H se Þge pour indiquer que la minuterie est arr•tŽe.
Pour redŽmarrer le compte ˆ rebours, appuyer sur STARTáSPLIT, ou pour remettre ˆ zŽro le compte ˆ rebours, appuyer sur STOPáRESET.
La montre Žmet un bip et la veilleuse clignote quand le compte
ˆrebours se termine (la minuterie atteint zŽro). Appuyer sur nÕimporte quel bouton pour lÕarr•ter. Si REPEAT AT END (rŽpŽter
ˆla Þn) est sŽlectionnŽ, la minuterie reprend le compte ˆ rebours indŽÞniment.
La minuterie reste en marche lorsque vous quittez un mode. LÕicone dÕun sablier H sÕafÞche dans le mode Heure.
HYDRATATION
Le mode Hydratation comporte une minuterie avec alerte pour rappeler quand boire durant une sŽance dÕexercice. Appuyer sur MODE plusieurs fois jusquÕˆ afÞcher HYDRA.
Pour rŽgler le dŽlai dÕhydratation :
1)Appuyer sur SET. Les minutes clignotent. Appuyer sur + ou - pour changer les minutes, tenir le bouton enfoncŽ pour faire dŽÞler les valeurs.
2)Appuyer sur NEXT. Les secondes clignotent. Appuyer sur + ou - pour changer les secondes, tenir le bouton enfoncŽ pour faire dŽÞler les valeurs.
3)Appuyer sur DONE ˆ nÕimporte quelle Žtape, quand le rŽglage est terminŽ.
Pour dŽmarrer la minuterie dÕhydratation, appuyer sur STARTáSPLIT. La minuterie compte les secondes ˆ rebours depuis
la durŽe initiale. LÕicone de goutte ![]() clignote pour indiquer que la minuterie est en marche.
clignote pour indiquer que la minuterie est en marche.
Pour arr•ter le compte ˆ rebours, appuyer sur STOPáRESET.
LÕicone de goutte ![]() sÕimmobilise pour indiquer que la minuterie est arr•tŽe.
sÕimmobilise pour indiquer que la minuterie est arr•tŽe.
Pour reprendre le compte ˆ rebours, appuyer sur STARTáSPLIT, ou pour recommencer le compte ˆ rebours au dŽbut, appuyer sur STOPáRESET.
La montre Žmet un bip et la veilleuse clignote quand le compte
ˆrebours se termine (la minuterie atteint zŽro). Appuyer sur nÕimporte quel bouton pour couper lÕalarme.
La minuterie dÕhydratation reste en marche lorsquÕon quitte le
mode. LÕicone de goutte ![]() sÕafÞche dans le mode Heure.
sÕafÞche dans le mode Heure.
ALARME
La montre poss•de 3 alarmes. Appuyer sur MODE plusieurs fois jusquÕˆ ce que ALM 1, ALM 2, or ALM 3 appara”sse.
Pour rŽgler lÕalarme :
1)Appuyer sur SET. LÕheure clignote. Appuyer sur + ou Ð pour chang- er lÕheure, tenir le bouton enfoncŽ pour faire dŽÞler
les valeurs.
2)Appuyer sur NEXT. Les minutes clignotent. Appuyer sur + ou Ð pour changer les minutes.
3)Appuyer sur NEXT. AM (matin)/PM
4)Appuyer sur NEXT. Le rŽglage du jour de lÕalarme clignote. Appuyer sur + ou Ð pour sŽlectionner DAILY (chaque jour), WKDAYS (lundi ˆ vendredi), ou WKENDS (samedi et dimanche).
5)Appuyer sur DONE ˆ nÕimporte quelle Žtape, quand le rŽglage est terminŽ.
Pour activer ou dŽsactiver lÕalarme, appuyer sur STARTáSPLIT.
LÕicone dÕun rŽveil a sÕafÞche lorsque lÕalarme est activŽe dans ce mode et dans le mode Heure.
Lorsque lÕalarme sonne, la veilleuse clignote. Appuyer sur nÕimporte quel bouton pour lÕarr•ter. Si on nÕappuie sur aucun bouton, lÕalarme sonne pendant 20 secondes et Žmet une alerte de rappel au bout de cinq minutes.
Chacune des trois alarmes poss•de une mŽlodie dÕalerte diffŽrente.
ƒVéNEMENTS
Le mode Žv•nement vous permet de programmer des rappels pour des Žv•nements tels que anniversaires de naissance, anniversaires, f•tes et
La date est indiquŽe avec lÕŽv•nement du jour inscrit sur la ligne du haut. Appuyer sur + ou Ð pour passer dÕune date ˆ lÕautre, tenir le bouton enfoncŽ pour faire dŽÞler les valeurs. LÕŽv•nement correspondant ˆ la date afÞchŽe est toujours indiquŽ. Pour des Žv•nements qui ne sont pas pŽriodiques, on peut rŽgler les dates un an ˆ lÕavance.
Pour programmer les Žv•nements :
1)Appuyer sur SET. La date clignote. Appuyer sur + ou - pour sŽlectionner la date, tenir le bouton enfoncŽ pour faire dŽÞler les dates. LÕŽvŽnement pour la date afÞchŽe est toujours montrŽ.
2)Appuyer sur NEXT. LÕŽvŽnement clignote. Appuyer sur + ou - pour changer lÕŽvŽnement. ANNIV (anniversaires), BDAY (anniver- saires de naissance),
3)Pour associer des ŽvŽnement ˆ dÕautres dates, appuyer sur NEXT et sŽlectionner la date et lÕŽvŽnement comme aux Žtapes prŽcŽdentes.
4)Appuyer sur DONE ˆ nÕimporte quelle Žtape quand le rŽglage est terminŽ.
Rappel dÕŽv•nements
La montre vous prŽvient des Žv•nements ˆ 8:00 heures du matin le jour de lÕŽv•nement. Vous pouvez choisir de ne pas •tre prŽvenu ou dÕ•tre prŽvenu ˆ un autre moment de la journŽe. Vous pouvez choisir une alerte diffŽrente pour chaque type dÕŽv•nement. Ex. : on peut •tre prŽvenu de tous les anniversaires de naissance un jour avant, alors quÕon peut ne pas avoir dÕalerte pour les jours fŽriŽs.
Pour programmer les alertes de rappel dÕŽv•nements :
1)Aller ˆ la date dÕaujourdÕhui en appuyant sur + ou Ð (tenir le bou- ton enfoncŽ pour faire dŽÞler les dates). Vous pouvez aussi vous rendre ˆ la date dÕaujourdÕhui en activant tout simplement le mode Occasion (Žv•nement).
2)Depuis la date dÕaujourdÕhui, appuyer sur Ð pour aller dans ALERT SETUP (rŽglage de lÕalerte).
3)Appuyer sur SET. Le type dÕŽv•nement clignote. Appuyer sur + ou Ð pour sŽlectionner le type dÕŽv•nement. Vos rŽglages affecteront tous les Žv•nements du type dÕŽv•nement sŽlectionnŽ.
4)Appuyer sur NEXT. LÕŽtat de lÕalerte (ON/OFF) clignote. Appuyer sur + ou Ð pour activer (ON) ou dŽsactiver (OFF) lÕalerte pour le type dÕŽvŽnement sŽlectionnŽ. Si OFF est sŽlectionnŽ, sauter les 4 Žtapes suivantes.
5)Appuyer sur NEXT. LÕheure de lÕalerte clignote. Appuyer sur + ou Ð pour changer lÕheure, tenir le bouton enfoncŽ pour faire dŽÞler les valeurs.
6)Appuyer sur NEXT. Les minutes de lÕalerte clignotent. Appuyer sur + ou Ð pour changer les minutes.
7)Appuyer sur NEXT. AM (matin)/PM
8)Appuyer sur NEXT. Le jour de lÕalerte clignote. Appuyer sur + ou Ð pour programmer lÕalerte de 0 ˆ 9 jours avant lÕŽv•nement.
9)Pour rŽgler les alertes des autres types dÕŽvŽnements, appuyer sur NEXT. Le type dÕŽvŽnement clignote. SŽlectionner le type dÕŽvŽnement comme ˆ lÕŽtape 3 et poursuivre la procŽdure de rŽglage.
10)Appuyer sur DONE ˆ nÕimporte quelle Žtape quand le rŽglage est terminŽ.
LÕicone dÕune main F appara”t lorsque le type dÕŽv•nement afÞchŽ a une alerte de rappel. Lorsque lÕalerte sonne dans le mode Heure, lÕicone dÕune main F clignote. Appuyer sur nÕimporte quel bouton pour lÕarr•ter. Se rŽfŽrer au mode Heure pour obtenir les instruc- tions concernant lÕafÞchage des Žv•nements imminents.
CONSEIL PRATIQUE : Pour un rappel ˆ la Þn de chaque mois, programmer
VEILLEUSE INDIGLO¨ Ë FONCTION NIGHT-MODE¨
Appuyer sur INDIGLO¨ pour illuminer le cadran de la montre pendant 2 ˆ 3 secondes (5 ˆ 6 secondes au moment du rŽglage). La technologie Žlectroluminescente brevetŽe (brevets amŽricains n¡ 4,527,096 et 4,775,964) utilisŽe dans la veilleuse INDIGLO¨ permet dÕilluminer tout le cadran de la montre la nuit et dans des conditions de faible Žclairage. Tout bouton enfoncŽ reste activŽ lorsque la veilleuse INDIGLO¨ est activŽe.
Tenir INDIGLO¨ enfoncŽ pendant 4 secondes pour activer la fonction
en tenant INDIGLO¨ enfoncŽ pendant 4 secondes, ou elle se dŽsactive automatiquement apr•s 8 heures.
ƒTANCHƒITƒ
Si la montre est Žtanche, la profondeur maximale ou le symbole (O) est indiquŽ.
| Profondeur dÕŽtanchŽitŽ |
| Pression de lÕeau sous |
|
|
|
| ||
|
|
| la surface en p.s.i.a.* |
|
| 30m/98 (ft/pi) |
| 60 |
|
| 50m/164(ft/pi) |
| 86 |
|
| 100m/328(ft/pi) |
| 160 |
|
|
|
|
|
|
*livres par pouce carrŽ (abs.)
MISE EN GARDE : POUR PRƒSERVER LÕƒTANCHƒITƒ, NE PAS ENFONCER LES BOUTONS SOUS LÕEAU.
1.La montre est Žtanche aussi longtemps que le verre, les boutons et le bo”tier sont intacts.
2.La montre nÕest pas con•ue pour la plongŽe. Ne pas lÕutiliser dans ces conditions.
3.Rincer ˆ lÕeau douce apr•s tout contact avec lÕeau de mer.
4.La rŽsistance aux chocs est indiquŽe sur le cadran de la montre ou au dos du bo”tier. Les montres sont con•ues pour se conformer ˆ lÕessai de choc ISO. Toutefois, prendre garde ˆ Žviter dÕendommager le verre/cristal.
PILE
Timex recommande fortement de faire changer la pile par un dŽtaillant ou un bijoutier. Le type de pile est indiquŽ au dos de la montre. SÕil est prŽsent, appuyer sur le bouton Ç internal reset È (remise ˆ zŽro interne) apr•s avoir remplacŽ la pile. LÕestimation de la durŽe de vie de la pile est basŽe sur certaines hypoth•ses quant ˆ lÕusage ; la durŽe rŽelle peut varier selon lÕutilisation de la montre.
NE PAS JETER LA PILE AU FEU. NE PAS RECHARGER LA PILE. GARDER LES PILES HORS DE LA PORTƒE DES ENFANTS.
GARANTIE INTERNATIONALE TIMEX
DU LIVRET DÕINSTRUCTIONS POUR LES MODALITƒS DE LÕOFFRE
DE GARANTIE PROLONGƒE)
Votre montre TIMEX¨ est garantie contre les dŽfauts de fabrication pour une pŽriode dÕUN AN, ˆ compter de la date dÕachat. Timex ainsi que ses Þliales du monde entier honoreront cette garantie internationale.
Timex se rŽserve le droit de rŽparer votre montre en y installant des composants neufs ou rŽvisŽs, ou bien de la remplacer avec un mod•le identique ou similaire. IMPORTANT Ñ CETTE GARANTIE NE COUVRE PAS LES
DƒFAUTS OU LÕENDOMMAGEMENT DE VOTRE MONTRE:
1)apr•s lÕexpiration de la pŽriode de garantie ;
2)si elle nÕa pas ŽtŽ achetŽe chez un revendeur TIMEX agrŽŽ ;
3)si la rŽparation nÕa pas ŽtŽ faite par TIMEX ;
4)sÕil sÕagit dÕun accident, falsiÞcation ou abus ;
5)le verre, le cristal, le bracelet (courroie ou Žlastique), le bo”tier, les accessoires ou la pile. Timex peut effectuer les rŽparations, mais
CETTE GARANTIE AINSI QUE LES RECOURS PRƒVUS DANS LES PRƒSENTES SONT EXCLUSIFS ET REMPLACENT TOUTE AUTRE GARANTIE EXPRESSE OU IMPLICITE, Y COMPRIS TOUTE GARANTIE IMPLICITE DE QUALITƒ MARCHANDE ET DÕADAPTATION Ë UN USAGE PARTICULIER. TIMEX NÕEST RESPONSABLE DÕAUCUN DOMMAGE PARTICULIER, ACCESSOIRE OU INDIRECT. Certains Žtats ou provinces nÕautorisent pas les limitations de garanties implicites et nÕau- torisent pas les exclusions ou limitations pour des dommages, auquel cas les- dites limitations pourraient ne pas vous concerner. Les modalitŽs de la prŽsente garantie vous donnent des droits lŽgaux prŽcis et vous pouvez Žgalement vous prŽvaloir dÕautres droits qui varient dÕun Žtat ou dÕune province ˆ lÕautre.
Pour obtenir le service garanti, retourner la montre ˆ Timex, ˆ une de ses Þliales ou au dŽtaillant Timex o• la montre a ŽtŽ achetŽe. Inclure un coupon de rŽparation original džment rempli ou, aux
Aux
©2005 Timex Corporation. TIMEX est une marque déposée de Timex Corporation. INDIGLO est une marque déposée d’Indiglo Corporation aux