www.timex.com
THANK YOU FOR PURCHASING YOUR TIMEX WATCH.
EXTENDED WARRANTY
Available in U.S. only. Extend your warranty for an additional 4 years from date of purchase for $5. You can pay with AMEX, Discover, Visa or MasterCard by calling 1
Please read instructions carefully to understand how to oper- ate your Timex watch. Your model may not have all of the features described in this booklet.
START WATCH
Important: Set day and date first! Remove guard from crown and push in. For
SET TIME
Pull crown all the way out and turn to correct time. Push crown in to restart. For
Watches with date: Note correct time of day (A.M. or P.M.) for proper date function.
SET DAY
Pull crown to “middle” position and turn CLOCKWISE until correct day appears. If day does not change, pull crown to “out” position and turn CLOCKWISE or COUNTERCLOCKWISE through necessary number of 24 hour periods until correct day appears.
I | IN | I | MIDDLE | I | OUT | WE |
|
|
|
|
|
| D |
|
| WED 14 |
|
|
| 14 |
WED 14 |
|
| WED 14 |
|
| |
I |
| I |
| I |
|
|
SET DATE “FAST DATE”
|
| NOTE: Date may need to be manually | |
I | 14 | updated at the end of each month by | |
| |||
14 | following above procedure (otherwise | ||
| |||
I |
| it will continue to 39 and then roll | |
|
| over to 00). |
ROTATING TIME RING (OPTIONAL)
Position symbol (▲) at desired time to start or end activity.
Elapsed ring | Tide ring |
COMPASS DIRECTIONAL RING (OPTIONAL)
To get approximate compass reading, point |
|
|
|
|
|
hour hand at sun. Adjust ring so S (South) is | S | 1112 | 1 | W | |
halfway between hour hand and 12. Adjust | 10 |
|
| 2 | |
9 |
|
|
| 3 | |
every hour. Make sure hour hand is always | 8 | 7 |
| 5 | 4 |
pointed towards the sun. | E | 6 |
| ||
|
|
|
| N | |
INDIGLO® NIGHT-LIGHT
Press button or crown to activate light. Patented (U.S. pat. 4,527,096 and 4,775,964) electroluminescent technology used in the INDIGLO
BRACELET ADJUSTMENT
SLIDING CLASP BRACELET
Open locking plate. Move clasp to desired
bracelet length. Exert pressure while holding locking plate and slide clasp back and forth until it engages in grooves on underside of bracelet.
Press locking plate down until it snaps closed. Clasp can be damaged if excessive force is used.
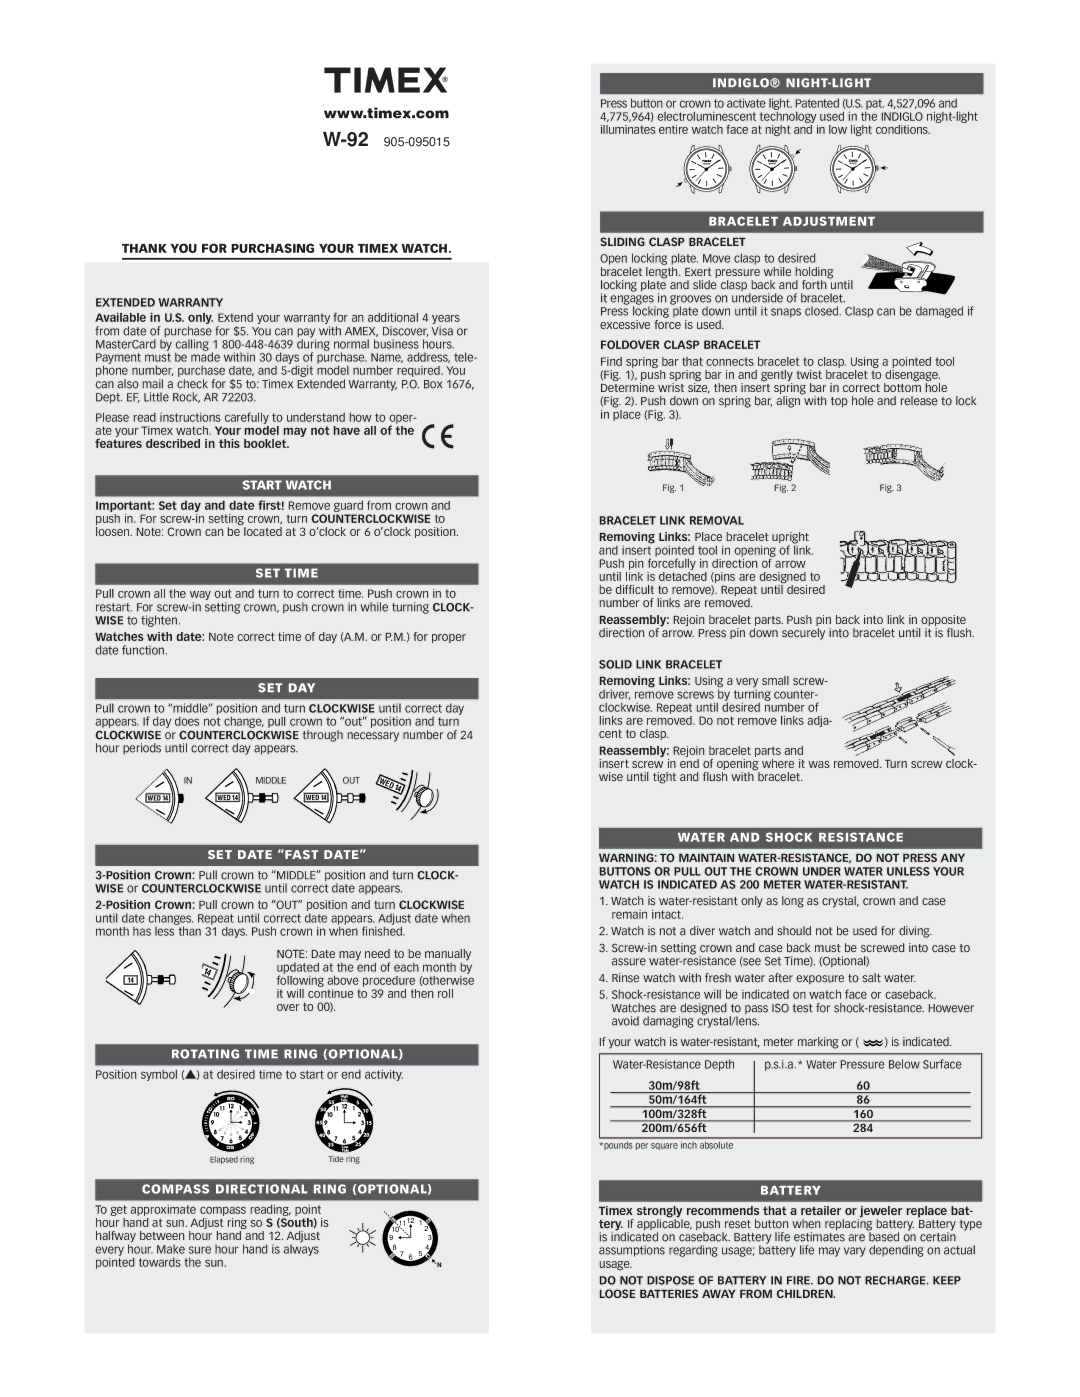
FOLDOVER CLASP BRACELET
Find spring bar that connects bracelet to clasp. Using a pointed tool (Fig. 1), push spring bar in and gently twist bracelet to disengage. Determine wrist size, then insert spring bar in correct bottom hole (Fig. 2). Push down on spring bar, align with top hole and release to lock in place (Fig. 3).
Fig. 1 | Fig. 2 | Fig. 3 |
BRACELET LINK REMOVAL
Removing Links: Place bracelet upright and insert pointed tool in opening of link. Push pin forcefully in direction of arrow until link is detached (pins are designed to be difficult to remove). Repeat until desired number of links are removed.
Reassembly: Rejoin bracelet parts. Push pin back into link in opposite direction of arrow. Press pin down securely into bracelet until it is flush.
SOLID LINK BRACELET
Removing Links: Using a very small screw- driver, remove screws by turning counter- clockwise. Repeat until desired number of links are removed. Do not remove links adja- cent to clasp.
Reassembly: Rejoin bracelet parts and
insert screw in end of opening where it was removed. Turn screw clock- wise until tight and flush with bracelet.
WATER AND SHOCK RESISTANCE
WARNING: TO MAINTAIN
1.Watch is
2.Watch is not a diver watch and should not be used for diving.
3.
4.Rinse watch with fresh water after exposure to salt water.
5.
If your watch is ![]() ) is indicated.
) is indicated.
|
| p.s.i.a.* Water Pressure Below Surface |
| |
|
|
| ||
| 30m/98ft |
| 60 |
|
| 50m/164ft |
| 86 |
|
| 100m/328ft |
| 160 |
|
| 200m/656ft |
| 284 |
|
|
|
|
|
|
*pounds per square inch absolute
BATTERY
Timex strongly recommends that a retailer or jeweler replace bat- tery. If applicable, push reset button when replacing battery. Battery type is indicated on caseback. Battery life estimates are based on certain assumptions regarding usage; battery life may vary depending on actual usage.
DO NOT DISPOSE OF BATTERY IN FIRE. DO NOT RECHARGE. KEEP LOOSE BATTERIES AWAY FROM CHILDREN.