2. PRINTER SETUP | ENGLISH VERSION |
| 2.7 Media Sensor Calibration, Self Print Test, and Dump Mode Utilities |
|
|
2.7 Media Sensor | This utility is used to calibrate the sensitivity of the Feed Gap/Black |
Mark Sensor. |
Calibration, Self Print It is necessary to set the media sensors after the media is changed to
Test, and Dump Mode different type.
Utilities
2.7.1Media Sensor Calibration
NOTE:
The Transmissive Sensor (Feed Gap Sensor) has been selected as factory default.
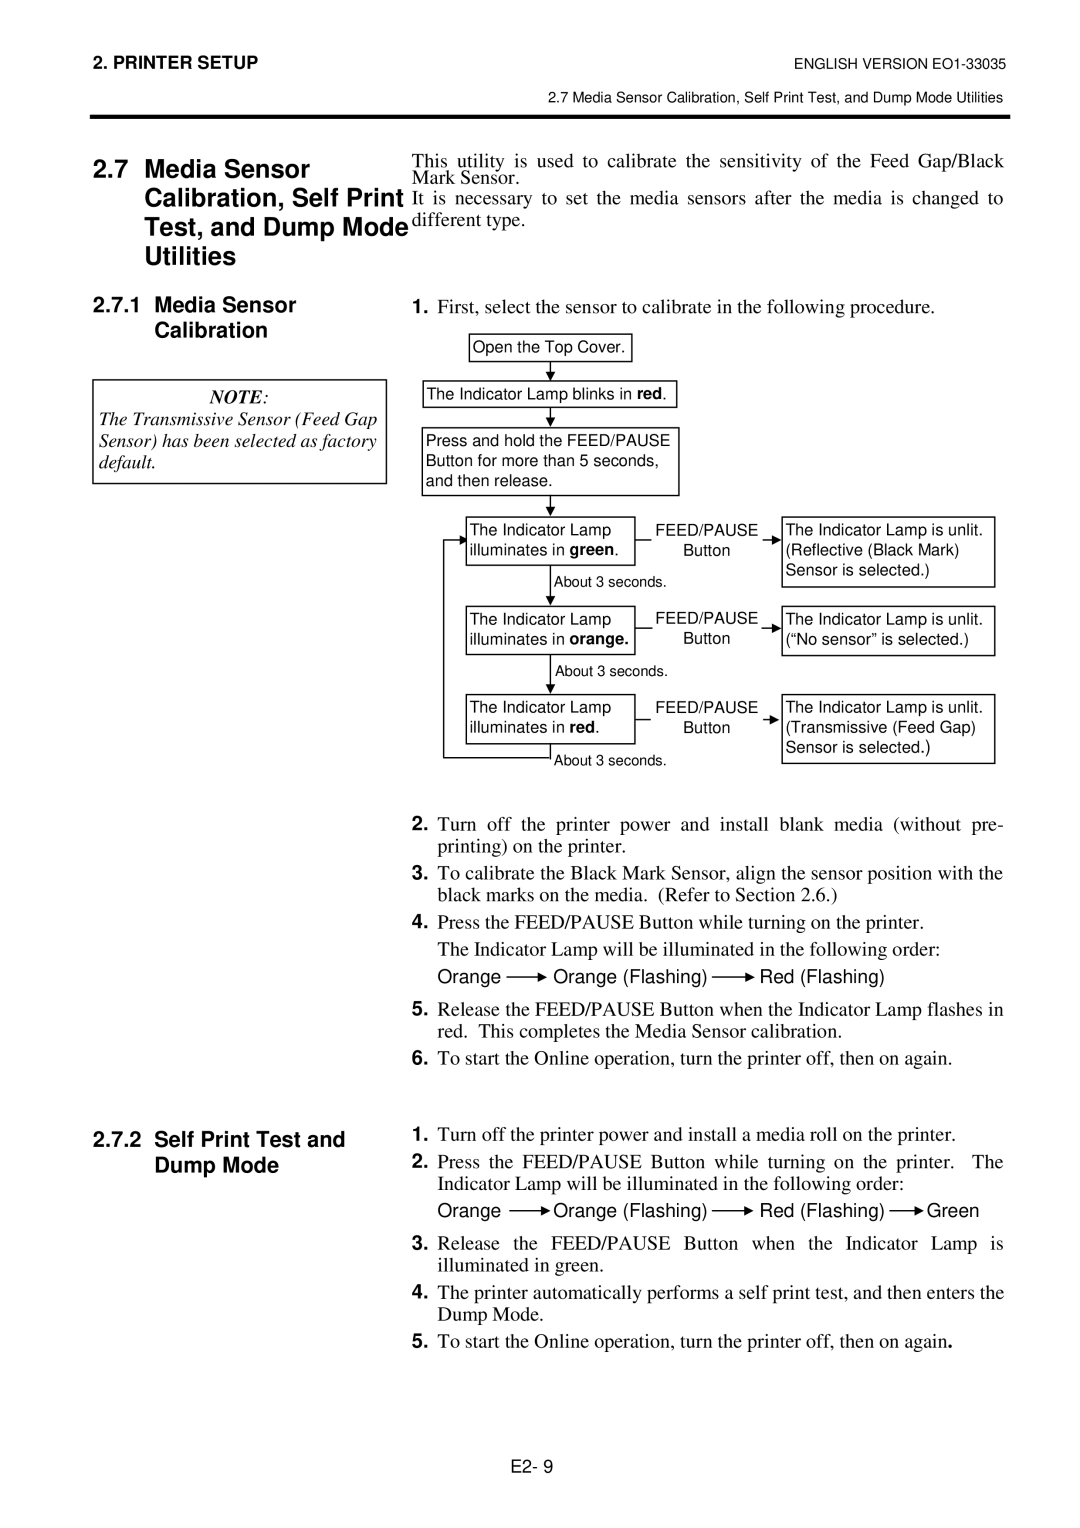
1.First, select the sensor to calibrate in the following procedure.
Open the Top Cover.
The Indicator Lamp blinks in red.
Press and hold the FEED/PAUSE Button for more than 5 seconds, and then release.
The Indicator Lamp |
|
| FEED/PAUSE |
| ||
illuminates in green. |
|
| Button |
| ||
|
|
|
|
|
|
|
| About 3 seconds. |
| ||||
|
|
|
|
|
|
|
|
|
|
|
|
| |
The Indicator Lamp |
|
| FEED/PAUSE |
|
| |
illuminates in orange. |
|
| Button |
|
| |
|
|
|
|
|
|
|
|
|
|
|
|
|
|
The Indicator Lamp is unlit. (Reflective (Black Mark) Sensor is selected.)
The Indicator Lamp is unlit. (“No sensor” is selected.)
About 3 seconds.
The Indicator Lamp |
| FEED/PAUSE |
illuminates in red. |
| Button |
| ||
|
|
|
|
|
|
About 3 seconds.
The Indicator Lamp is unlit. (Transmissive (Feed Gap) Sensor is selected.)
2.7.2Self Print Test and Dump Mode
2.Turn off the printer power and install blank media (without pre- printing) on the printer.
3.To calibrate the Black Mark Sensor, align the sensor position with the black marks on the media. (Refer to Section 2.6.)
4.Press the FEED/PAUSE Button while turning on the printer. The Indicator Lamp will be illuminated in the following order:
Orange ![]() Orange (Flashing)
Orange (Flashing) ![]() Red (Flashing)
Red (Flashing)
5.Release the FEED/PAUSE Button when the Indicator Lamp flashes in red. This completes the Media Sensor calibration.
6.To start the Online operation, turn the printer off, then on again.
1.Turn off the printer power and install a media roll on the printer.
2.Press the FEED/PAUSE Button while turning on the printer. The Indicator Lamp will be illuminated in the following order:
Orange ![]() Orange (Flashing)
Orange (Flashing) ![]() Red (Flashing)
Red (Flashing) ![]() Green
Green
3.Release the FEED/PAUSE Button when the Indicator Lamp is illuminated in green.
4.The printer automatically performs a self print test, and then enters the Dump Mode.
5.To start the Online operation, turn the printer off, then on again.
E2- 9