Toshiba SD-V592SU, SD-V596SU Before Operation VCR Part Setting the Clock, Auto Clock Set

Models: SD-V596SU SD-V592SU

1 49
Download 49 pages 27.96 Kb
Page 17
Image 17
Note:
If setting the clock manually, “AUTO CLOCK SET” must set to “OFF”.
If set to “ON”, an incorrect date and/or time will be entered again when the DVD+VCR is turned off.
17
Press VCR MENU when finished.
8
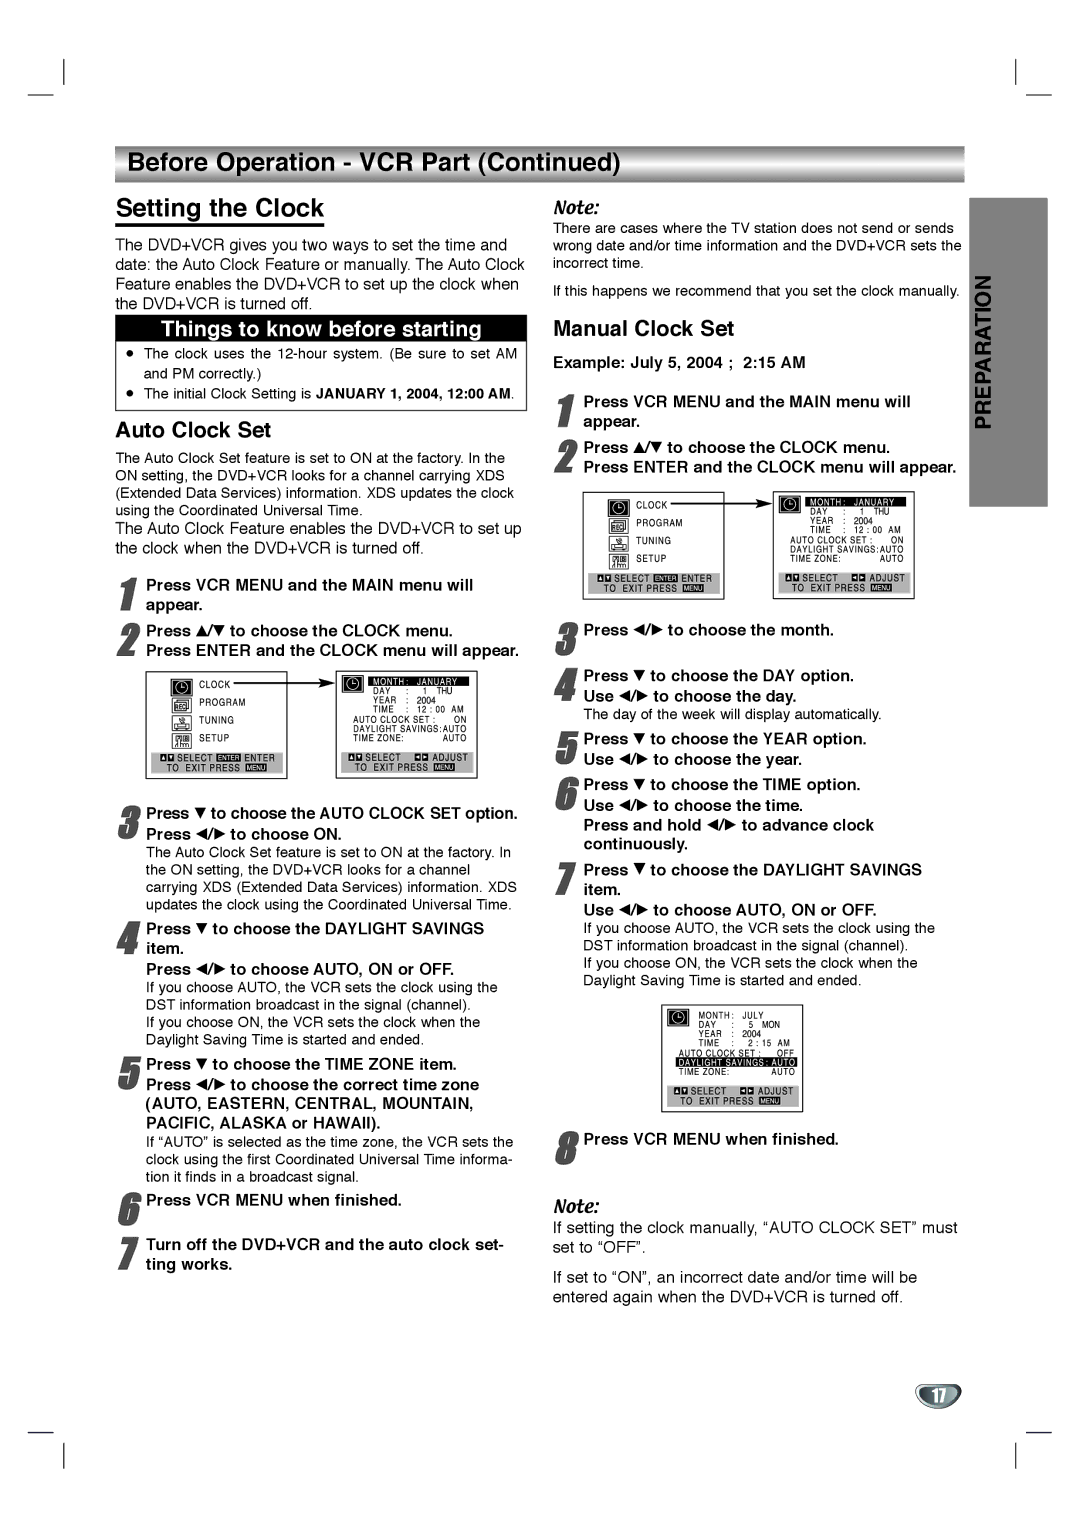
Press E to choose the DAYLIGHT SAVINGS item.
Use b/B to choose AUTO, ON or OFF.
If you choose AUTO, the VCR sets the clock using the DST information broadcast in the signal (channel).
If you choose ON, the VCR sets the clock when the Daylight Saving Time is started and ended.
7
The day of the week will display automatically.
5 Press V to choose the YEAR option. Use b/B to choose the year.
6 Press V to choose the TIME option. Use b/B to choose the time.
Press and hold b/B to advance clock continuously.
Press b/B to choose the month.
Press V to choose the DAY option. Use b/B to choose the day.
3
4
Press VCR MENU and the MAIN menu will appear.
Press v/V to choose the CLOCK menu.
Press ENTER and the CLOCK menu will appear.
1
2
Note:
There are cases where the TV station does not send or sends wrong date and/or time information and the DVD+VCR sets the incorrect time.
If this happens we recommend that you set the clock manually.
Manual Clock Set
Example: July 5, 2004 ; 2:15 AM

Before Operation - VCR Part (Continued)

Setting the Clock

The DVD+VCR gives you two ways to set the time and date: the Auto Clock Feature or manually. The Auto Clock Feature enables the DVD+VCR to set up the clock when the DVD+VCR is turned off.

Things to know before starting

The clock uses the 12-hour system. (Be sure to set AM and PM correctly.)

The initial Clock Setting is JANUARY 1, 2004, 12:00 AM.

Auto Clock Set

The Auto Clock Set feature is set to ON at the factory. In the ON setting, the DVD+VCR looks for a channel carrying XDS (Extended Data Services) information. XDS updates the clock using the Coordinated Universal Time.

The Auto Clock Feature enables the DVD+VCR to set up the clock when the DVD+VCR is turned off.

1 Press VCR MENU and the MAIN menu will appear.

2 Press v/V to choose the CLOCK menu.

Press ENTER and the CLOCK menu will appear.

3 Press V to choose the AUTO CLOCK SET option. Press b/B to choose ON.

The Auto Clock Set feature is set to ON at the factory. In the ON setting, the DVD+VCR looks for a channel carrying XDS (Extended Data Services) information. XDS updates the clock using the Coordinated Universal Time.

4 Press V to choose the DAYLIGHT SAVINGS item.

Press b/B to choose AUTO, ON or OFF.

If you choose AUTO, the VCR sets the clock using the

DST information broadcast in the signal (channel).

If you choose ON, the VCR sets the clock when the

Daylight Saving Time is started and ended.

5 Press V to choose the TIME ZONE item. Press b/B to choose the correct time zone

(AUTO, EASTERN, CENTRAL, MOUNTAIN, PACIFIC, ALASKA or HAWAII).

If “AUTO” is selected as the time zone, the VCR sets the clock using the first Coordinated Universal Time informa- tion it finds in a broadcast signal.

6 Press VCR MENU when finished.

7

Turn off the DVD+VCR and the auto clock set-

ting works.

PREPARATION

Page 17
Image 17
Toshiba SD-V592SU, SD-V596SU owner manual Before Operation VCR Part Setting the Clock, Auto Clock Set

SD-V596SU, SD-V592SU specifications

The Toshiba SD-V592SU and SD-V596SU are versatile and reliable DVD and VCR combo players that combine the features of a traditional VCR with the modern technology of DVD playback. These compact devices are designed to provide users with an easy way to enjoy a variety of media formats, making them ideal for both nostalgic and contemporary viewing experiences.

One of the main features of these models is their dual functionality. With the built-in VHS player, users can enjoy their favorite cassette tapes while simultaneously accessing a wide library of DVD titles. The SD-V592SU and SD-V596SU support multiple formats, including DVD Video, DVD-R/RW, CD, CD-R/RW, and VCD, which ensures compatibility with numerous media types. This flexibility allows users to play movies, music, and even home videos without the need for multiple devices.

Both models boast an impressive picture quality with progressive scan technology, which enhances the visual experience by producing clearer and sharper images. This feature is particularly noticeable when watching DVDs, as it improves the resolution and reduces motion blur. The built-in digital noise reduction further enhances playback quality for both DVDs and VHS tapes by minimizing interference and improving sound clarity.

Additionally, the Toshiba SD-V592SU and SD-V596SU are equipped with a range of connectivity options. They feature composite video outputs for easy connection to standard televisions, as well as S-Video outputs for users seeking improved picture quality. The audio outputs include stereo RCA for straightforward integration into home theater systems.

Another notable aspect of these players is their user-friendly interface and remote control options. Users can easily navigate through menus and access playback features such as pause, rewind, fast forward, and program playback. The inclusion of on-screen menus makes it simple to set up and adjust various settings for an optimal viewing experience.

In summary, the Toshiba SD-V592SU and SD-V596SU are excellent choices for those looking to bridge the gap between traditional and modern media formats. With their dual functionality, impressive picture quality, connectivity options, and user-friendly features, these combo players serve as a valuable addition to any home entertainment system. Whether enjoying classic VHS tapes or the latest DVD releases, users can count on Toshiba’s commitment to quality and innovation in their viewing experience.