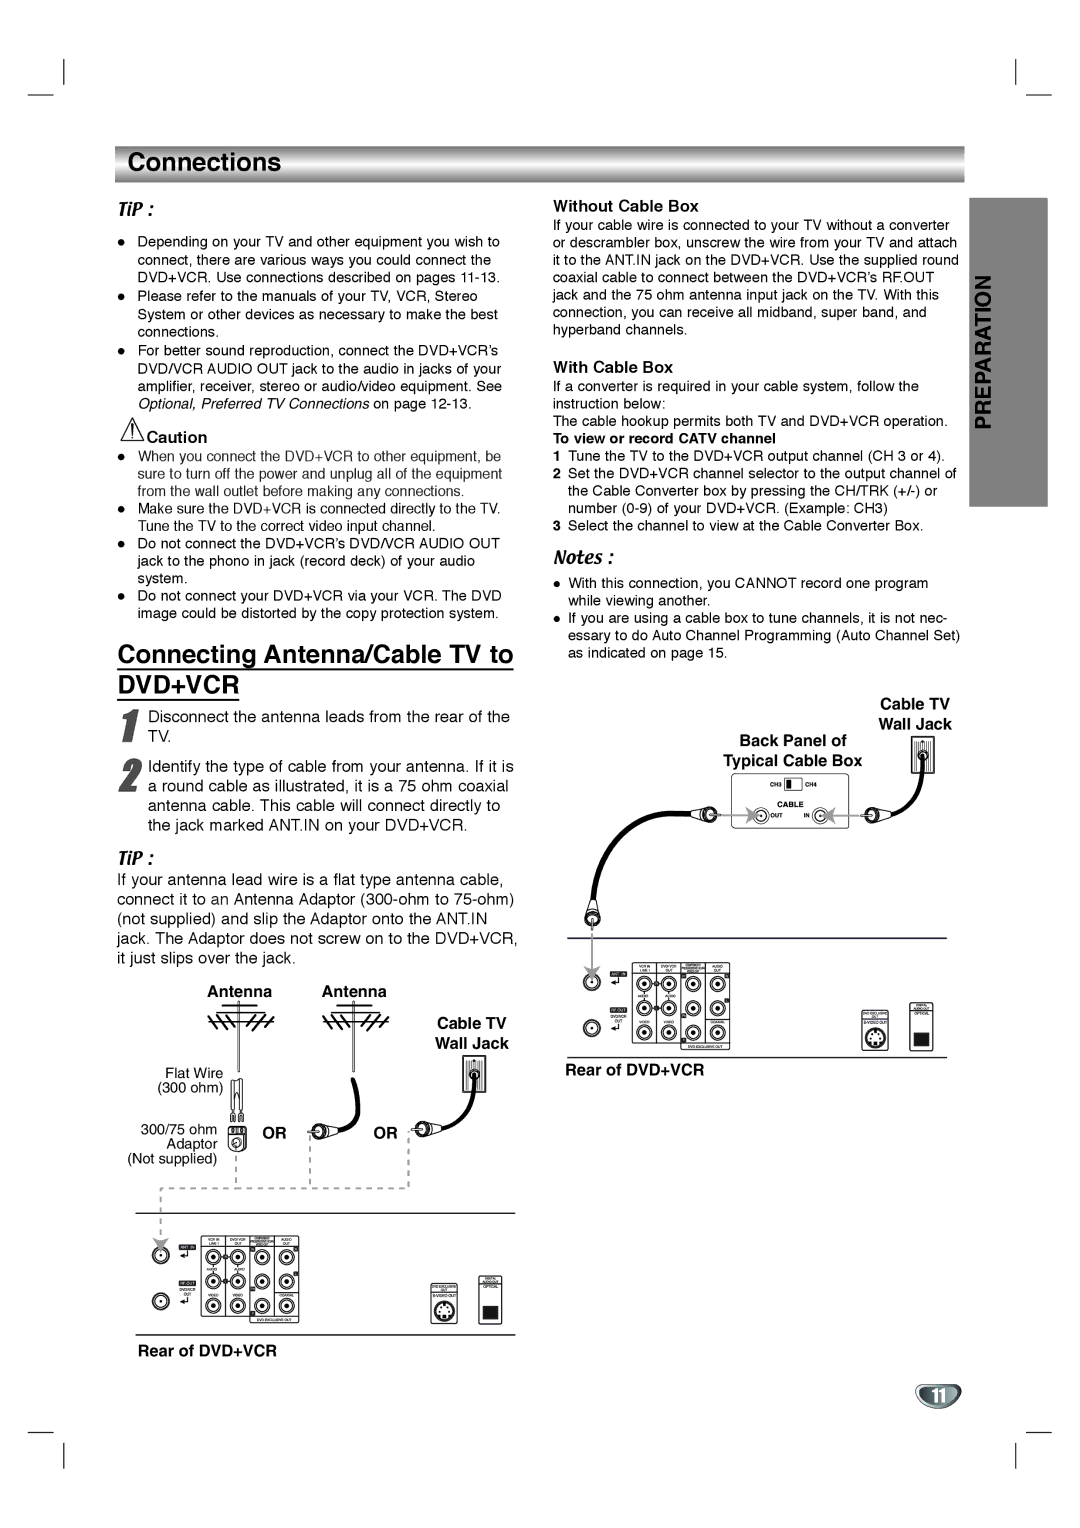
Disconnect the antenna leads from the rear of the TV.

Connections

TiP :

Depending on your TV and other equipment you wish to connect, there are various ways you could connect the DVD+VCR. Use connections described on pages 11-13. Please refer to the manuals of your TV, VCR, Stereo System or other devices as necessary to make the best connections.

For better sound reproduction, connect the DVD+VCR’s DVD/VCR AUDIO OUT jack to the audio in jacks of your amplifier, receiver, stereo or audio/video equipment. See Optional, Preferred TV Connections on page 12-13.

Caution

When you connect the DVD+VCR to other equipment, be sure to turn off the power and unplug all of the equipment from the wall outlet before making any connections.

Make sure the DVD+VCR is connected directly to the TV. Tune the TV to the correct video input channel.

Do not connect the DVD+VCR’s DVD/VCR AUDIO OUT jack to the phono in jack (record deck) of your audio system.

Do not connect your DVD+VCR via your VCR. The DVD image could be distorted by the copy protection system.

Connecting Antenna/Cable TV to

DVD+VCR

1

2 Identify the type of cable from your antenna. If it is a round cable as illustrated, it is a 75 ohm coaxial antenna cable. This cable will connect directly to the jack marked ANT.IN on your DVD+VCR.

TiP :

If your antenna lead wire is a flat type antenna cable, connect it to an Antenna Adaptor (300-ohm to 75-ohm) (not supplied) and slip the Adaptor onto the ANT.IN jack. The Adaptor does not screw on to the DVD+VCR, it just slips over the jack.

Antenna Antenna

Cable TV

Wall Jack

Flat Wire


(300 ohm)


300/75 ohm

OR

OR

Adaptor


(Not supplied)


Rear of DVD+VCR

Without Cable Box

If your cable wire is connected to your TV without a converter


or descrambler box, unscrew the wire from your TV and attach


it to the ANT.IN jack on the DVD+VCR. Use the supplied round


coaxial cable to connect between the DVD+VCR’s RF.OUT

PREPARATION

The cable hookup permits both TV and DVD+VCR operation.

jack and the 75 ohm antenna input jack on the TV. With this


connection, you can receive all midband, super band, and


hyperband channels.


With Cable Box


If a converter is required in your cable system, follow the


instruction below:


To view or record CATV channel


1Tune the TV to the DVD+VCR output channel (CH 3 or 4).

2Set the DVD+VCR channel selector to the output channel of the Cable Converter box by pressing the CH/TRK (+/-) or number (0-9) of your DVD+VCR. (Example: CH3)

3Select the channel to view at the Cable Converter Box.

Notes :

With this connection, you CANNOT record one program while viewing another.

If you are using a cable box to tune channels, it is not nec- essary to do Auto Channel Programming (Auto Channel Set) as indicated on page 15.

Cable TV

Wall Jack

Back Panel of

Typical Cable Box

Rear of DVD+VCR

11

Page 11
Image 11
Toshiba SD-V592SU Connections, Connecting Antenna/Cable TV to, Antenna Antenna Cable TV Wall Jack, With Cable Box

SD-V596SU, SD-V592SU specifications

The Toshiba SD-V592SU and SD-V596SU are versatile and reliable DVD and VCR combo players that combine the features of a traditional VCR with the modern technology of DVD playback. These compact devices are designed to provide users with an easy way to enjoy a variety of media formats, making them ideal for both nostalgic and contemporary viewing experiences.

One of the main features of these models is their dual functionality. With the built-in VHS player, users can enjoy their favorite cassette tapes while simultaneously accessing a wide library of DVD titles. The SD-V592SU and SD-V596SU support multiple formats, including DVD Video, DVD-R/RW, CD, CD-R/RW, and VCD, which ensures compatibility with numerous media types. This flexibility allows users to play movies, music, and even home videos without the need for multiple devices.

Both models boast an impressive picture quality with progressive scan technology, which enhances the visual experience by producing clearer and sharper images. This feature is particularly noticeable when watching DVDs, as it improves the resolution and reduces motion blur. The built-in digital noise reduction further enhances playback quality for both DVDs and VHS tapes by minimizing interference and improving sound clarity.

Additionally, the Toshiba SD-V592SU and SD-V596SU are equipped with a range of connectivity options. They feature composite video outputs for easy connection to standard televisions, as well as S-Video outputs for users seeking improved picture quality. The audio outputs include stereo RCA for straightforward integration into home theater systems.

Another notable aspect of these players is their user-friendly interface and remote control options. Users can easily navigate through menus and access playback features such as pause, rewind, fast forward, and program playback. The inclusion of on-screen menus makes it simple to set up and adjust various settings for an optimal viewing experience.

In summary, the Toshiba SD-V592SU and SD-V596SU are excellent choices for those looking to bridge the gap between traditional and modern media formats. With their dual functionality, impressive picture quality, connectivity options, and user-friendly features, these combo players serve as a valuable addition to any home entertainment system. Whether enjoying classic VHS tapes or the latest DVD releases, users can count on Toshiba’s commitment to quality and innovation in their viewing experience.