on the control panel (main unit side) and remote control.

Using the menus

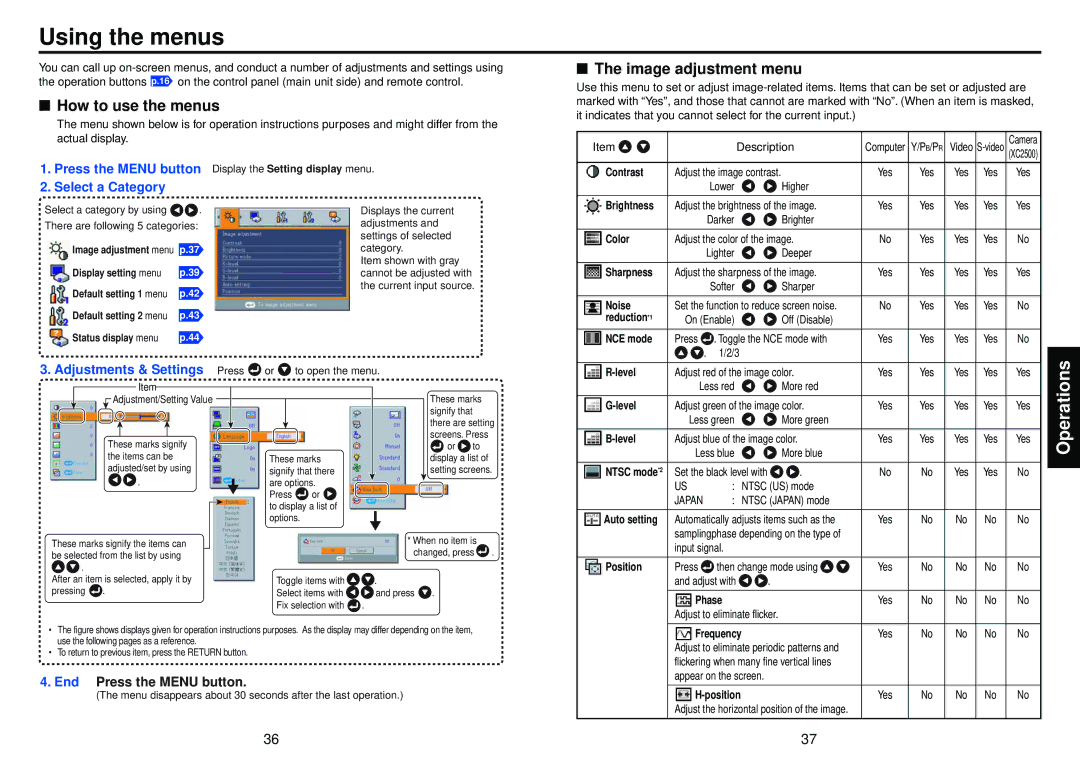
You can call up on-screen menus, and conduct a number of adjustments and settings using the operation buttons p.16

How to use the menus

The menu shown below is for operation instructions purposes and might differ from the actual display.

The image adjustment menu

Use this menu to set or adjust image-related items. Items that can be set or adjusted are marked with “Yes”, and those that cannot are marked with “No”. (When an item is masked, it indicates that you cannot select for the current input.)

Item

Description

Computer Y/PB/PR Video S-video(XC2500)Camera

1.Press the MENU button

2.Select a Category

Select a category by using . There are following 5 categories:

Image adjustment menu p.37

Display setting menu

p.39

Default setting 1 menu

p.42

Default setting 2 menu

p.43

Status display menu

p.44

Display the Setting display menu.

Displays the current adjustments and settings of selected category.

Item shown with gray cannot be adjusted with the current input source.

Contrast

Adjust the image contrast.


Yes

Yes

Yes

Yes

Yes


Lower

Higher


Brightness

Adjust the brightness of the image.

Yes

Yes

Yes

Yes

Yes


Darker

Brighter


Color

Adjust the color of the image.

No

Yes

Yes

Yes

No


Lighter

Deeper


Sharpness

Adjust the sharpness of the image.

Yes

Yes

Yes

Yes

Yes


Softer

Sharper


Noise

Set the function to reduce screen noise.

No

Yes

Yes

Yes

No

reduction*1

On (Enable)

Off (Disable)


NCE mode

Press

. Toggle the NCE mode with

Yes

Yes

Yes

Yes

No


.

1/2/3


3.Adjustments & Settings Press or to open the menu.


Item


Adjustment/Setting Value


These marks


signify that


there are setting


These marks signify


screens. Press


or

to


the items can be


These marks


display a list of


adjusted/set by using


signify that there


setting screens.


.


are options.


Press

or


to display a list of


options.


These marks signify the items can


* When no item is


be selected from the list by using


changed, press

.


.


After an item is selected, apply it by


Toggle items with

.


pressing

.


Select items with


and press

.


Fix selection with

.


The figure shows displays given for operation instructions purposes. As the display may differ depending on the item, use the following pages as a reference.

To return to previous item, press the RETURN button.

4. End Press the MENU button.

(The menu disappears about 30 seconds after the last operation.)

/

R-level

Adjust red of the image color.

Yes

Yes

Yes

Yes

Yes

/


Less red

More red


G-level

Adjust green of the image color.

Yes

Yes

Yes

Yes

Yes


Less green

More green


B-level

Adjust blue of the image color.

Yes

Yes

Yes

Yes

Yes


Less blue

More blue


NTSC mode*2

Set the black level with

.

No

No

Yes

Yes

No


US

: NTSC (US) mode


JAPAN

: NTSC (JAPAN) mode


Auto setting

Automatically adjusts items such as the

Yes

No

No

No

No


samplingphase depending on the type of


input signal.


Position

Press

then change mode using

Yes

No

No

No

No


and adjust with

.


Phase


Yes

No

No

No

No


Adjust to eliminate flicker.


Frequency


Yes

No

No

No

No


Adjust to eliminate periodic patterns and


flickering when many fine vertical lines


appear on the screen.


H-position


Yes

No

No

No

No

Adjust the horizontal position of the image.

Operations

36

37

Page 19
Image 19
Toshiba TLP-X2500, TLP-XC2500 owner manual Using the menus, How to use the menus, Image adjustment menu

TLP-XC2500, TLP-X2500 specifications

The Toshiba TLP-X2500 and TLP-XC2500 projectors are designed to deliver high-quality images and versatile functionality for both professional and educational environments. These projectors are known for their advanced features, compact design, and easy operational capabilities, making them an excellent choice for a variety of applications.

One of the main features of the TLP-X2500 and TLP-XC2500 is their impressive brightness levels. With a high lumens output, these projectors ensure vibrant and clear images even in well-lit rooms. This capability is crucial for presentations, classrooms, and conference settings where ambient light cannot be controlled easily.

The resolution of these projectors is another notable characteristic. The TLP-X2500 offers XGA resolution, providing sharp and detailed visuals that enhance the viewing experience. The TLP-XC2500 takes it a step further with a higher resolution capability, making it suitable for detailed graphic presentations and multimedia usage.

Both projectors incorporate advanced image technologies, including Enhanced Color Management and BrilliantColor technology. These features contribute to accurate color reproduction, allowing for vivid and realistic images. The projectors also support a range of aspect ratios, accommodating different content formats and viewing preferences.

Interconnectivity is a strong point of the TLP-X2500 and TLP-XC2500. The models offer multiple input options, including HDMI, VGA, and composite, enabling users to connect various devices with ease. This versatility makes the projectors ideal for use with laptops, DVD players, and other multimedia devices.

Portable and lightweight, the TLP-X2500 and TLP-XC2500 are designed for mobility. They come equipped with a user-friendly interface, allowing for quick setup and operation. These features make them suitable for on-the-go presentations and dynamic learning environments.

Furthermore, Toshiba emphasizes energy efficiency in these models. The projectors are engineered to reduce power consumption while maintaining performance, contributing to lower operational costs and a reduced environmental footprint.

In summary, the Toshiba TLP-X2500 and TLP-XC2500 projectors stand out for their brightness, resolution, color accuracy, and connectivity options. Their design and energy-saving features position them as valuable tools for enhancing presentations and educational experiences across various settings. With reliable performance and extensive capabilities, these projectors are well-suited for anyone looking to make a lasting impression.