TD-8816 ADSL2+ Modem Router
Rev2.0.0 1910010536
COPYRIGHT & TRADEMARKS
FCC STATEMENT
CE Mark Warning
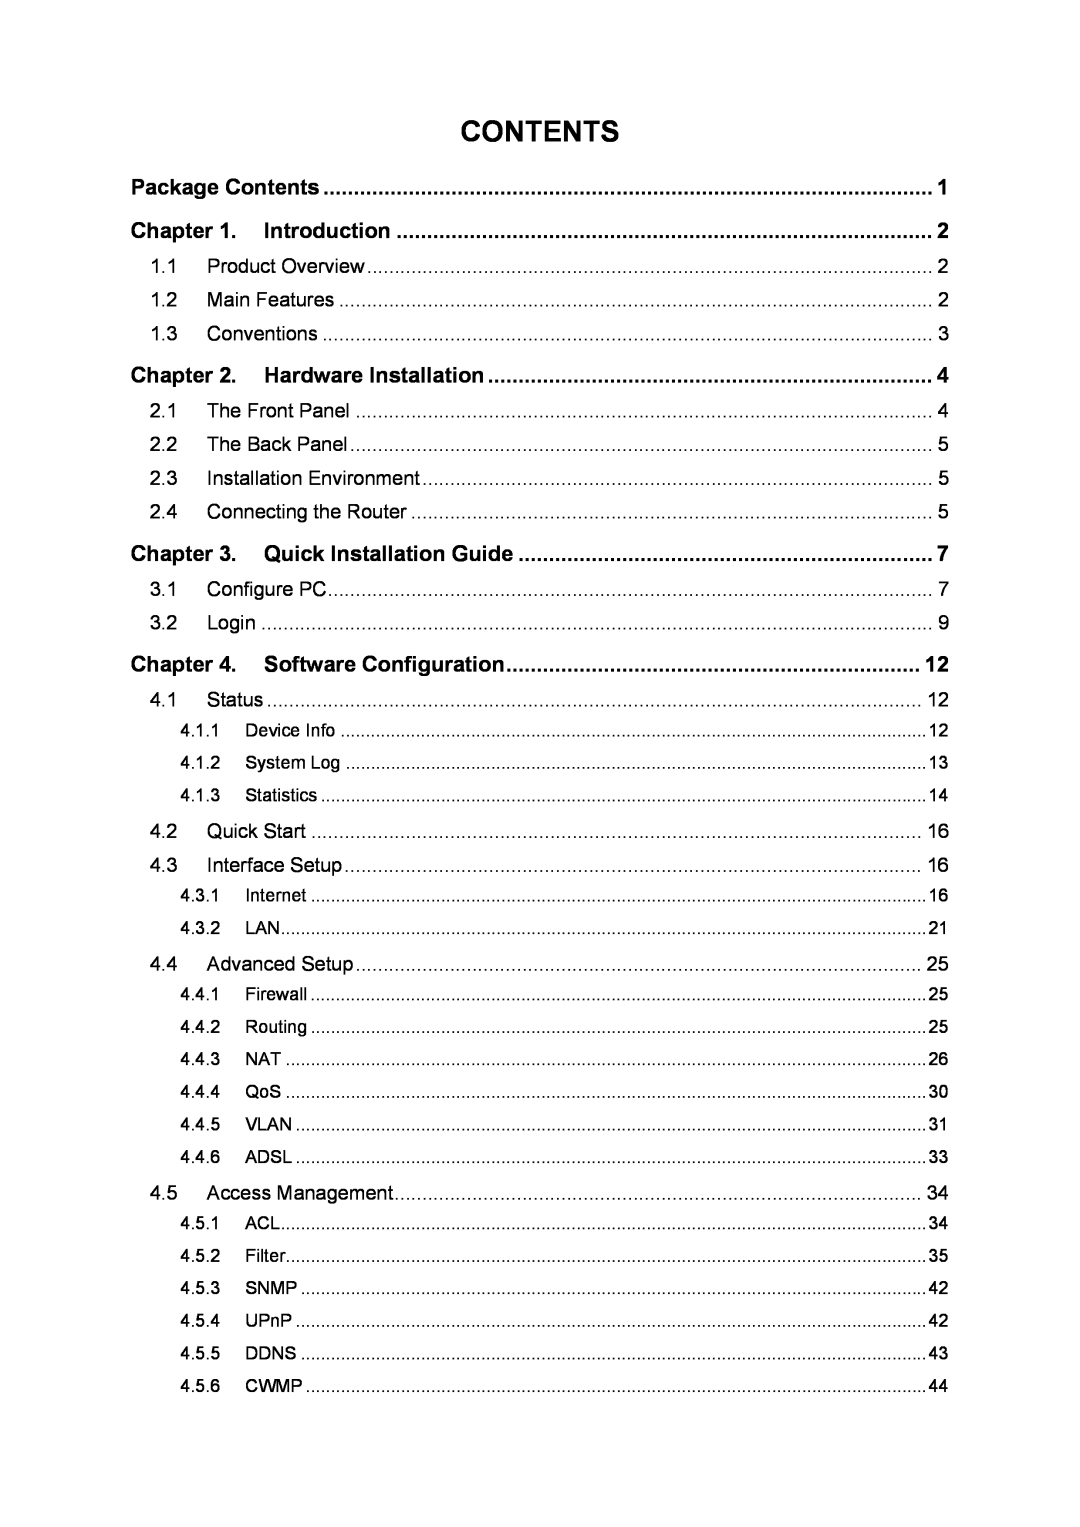
CONTENTS
Package Contents
Hardware Installation
Chapter 3. Quick Installation Guide
Appendix A Specifications
Appendix B Troubleshooting
Appendix C Technical Support
4.6.1
TD-8816
Package Contents
ADSL2+ Modem Router User Guide
1.2 Main Features
Chapter 1. Introduction
1.1 Product Overview
ADSL
1.3 Conventions
Chapter 2. Hardware Installation
2.1 The Front Panel
LED Explanation
Name
2.4 Connecting the Router
2.3 Installation Environment
2.2 The Back Panel
PHONE Connect to the phone sets
Chapter 3. Quick Installation Guide
3.1 Configure PC
TD-8816
2 Is the TCP/IP configuration for your PC correct?
3.2 Login
1 Is the connection between your PC and the Router correct?
After that, you will see the screen shown below, enter the default User Name admin and the default Password admin, and then click OK to access to the Quick Start screen. You can follow the steps below to complete the Quick Setup
Step 5 Click NEXT to finish the Quick Start
4.1 Status
Chapter 4. Software Configuration
4.1.1 Device Info
4.1.2 System Log
4.1.3 Statistics
Statistics Table
¾ Select Ethernet, and you will see the statistics table as below
¾ Select ADSL, and you will see the statistics table as below
4.2 Quick Start
4.3 Interface Setup
4.3.1 Internet
Virtual Circuit Select the VC number you want to setup, PVC0~PVC7
1. Dynamic IP Address
¾ TCP MTU Option Enter the TCP MTU as your desire
2. Static IP Address
Direction Select this option to specify the RIP direction. None is for disabling the RIP function. Both means the ADSL Router will periodically send routing information and accept routing information, and then incorporate them into routing table. IN only means the ADSL router will only accept but will not send RIP packet. OUT only means the ADSL router will only send but will not accept RIP packet
3. PPPoA/PPPoE
TD-8816
4.3.2 LAN
4. Bridge Mode
TD-8816
IP Pool Count The max user pool size
If you select Disabled, the DHCP function will not take effect
4.4.1 Firewall
4.4 Advanced Setup
4.4.2 Routing
4.4.3 NAT
4.4.3.1. DMZ
¾ Virtual Circuit Enter Virtual Circuit Index that you plan to setup for the NAT function
4.4.3.2. Virtual Server
To add a virtual server entry
Other configurations for the entries as shown in Figure
4.4.3.3. IP Address Mapping
IP Address Mapping is only available for VCs with Multiple IPs
To add a mapping rule
Step 2 Select the Rule index for the rule as shown in Figure
4.4.4 QoS
4.4.5 VLAN
1. Assign VLAN PVID for each Interface
Virtual LAN VLAN is a group of devices on one or more LANs that are configured so that they can communicate as if they were attached to the same wire, when in fact they are located on a number of different LAN segments. Because VLANs are based on logical instead of physical connections, it is very flexible for user/host management, bandwidth allocation and resource optimization. There are two types of VLAN as follows
2. Define VLAN Group
4.4.6 ADSL
4.5 Access Management
4.5.1 ACL
4.5.2 Filter
4.5.2.1. IP Filter
¾ Interface Select the interface for the entry
¾ Rule Type For IP Filter, please select IP here
be shown in the row 2 for the matching with
To add an IP Address filtering entry
Step 5 Finally, click the SAVE to save the entry
4.5.2.2. MAC Filter
To add a MAC Address filtering entry
Step 4 Finally, click the SAVE to save the entry
4.5.2.3. Application Filter
¾ Application Filter Activate or deactivate the function
4.5.2.4. URL Filter
4.5.4 UPnP
4.5.3 SNMP
To add a URL filter entry
4.5.5 DDNS
4.6 Maintenance
4.5.6 CWMP
4.6.2 Time Zone
4.6.1 Administration
1. NTP Server automatically
Select PC’s Clock as the Synchronize time, you don’t need to set any items
2. PC’s Clock
3. Manually
4.6.3 Firmware
To upgrade the routers firmware, follow these instructions below
To back up the Router’s current settings
4 The router will reboot after the upgrading has been finished
To restore the Router’s settings
4.6.4 SysRestart
4.6.5 Diagnostics
TD-8816 ADSL2+ Modem Router User Guide
4.7 Help
General
Appendix A Specifications
Physical and Environment
Appendix B Troubleshooting
2. What can I do if I don’t know or forgot my password?
3. What can I do if I cannot access the web-based configuration page?
For Windows XP OS
Right-click Local Area
Click Network Connections
Connection Click Properties
Double-click Internet
Protocol TCP/IP Select Obtain an IP address automatically
Click OK
Select Obtain DNS server address automatically
TD-8816
Click View network status and tasks Click View status
For Windows Vista OS
Click Properties
Protocol Version 4 TCP/IPv4 Select Obtain an IP address automatically
For Windows 7 OS
Click View network status and tasks Click Change adapter settings
Area Connection Click Properties
Select Obtain DNS server address automatically
4. What can I do if I cannot access the Internet?
Click Internet Options Select Never dial a connection
try the following steps. If you cannot, please set your computer referring to T3 then try to see if you can access the Internet. If the problem persists, please go to the next step
Appendix C Technical Support Technical Support
Global
E-mail support@tp-link.com
Singapore