VII. SERVICE & MAINTENANCE INFORMATION

VII. a - CLEANING THE CONDENSER:

Clean the condenser at least monthly (more often if necessary) to insure long service life. Keeping the condenser free of lint and dust will allow the refrigeration system to operate at peak efficiency and minimize the risk of premature failure.

To clean the condenser, open or remove the front louver assembly then turn the Power switch OFF. If the louvered door is not hinged, lift the door out of the lower cradle and then slide it down and out of the top bracket. Vacuum and brush any dirt, lint or dust from the finned condenser coil, taking care not to bend the thin aluminum fins.

VII. b - LIGHT BULB REPLACEMENT (if equipped): Turn the power switch OFF, remove the light cover and unscrew the light bulb. Replace with a bulb of identical type (115V 40-Watt T-6 1/2 Intermediate Base Clear Refrigerator Lamp) and reinstall the light cover.

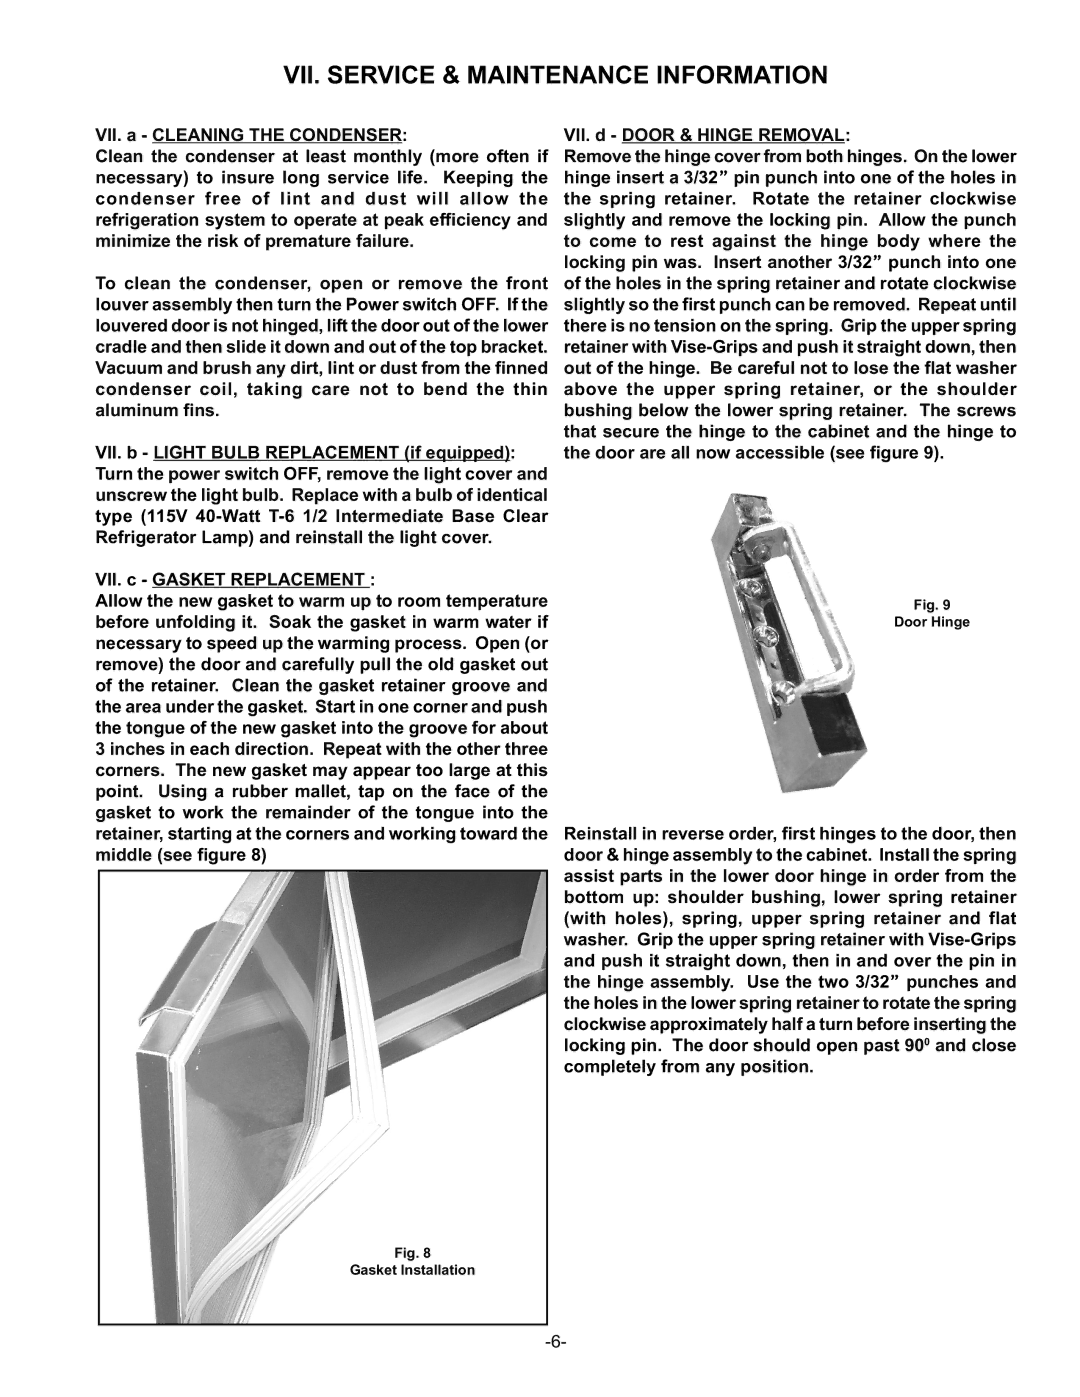
VII. d - DOOR & HINGE REMOVAL:

Remove the hinge cover from both hinges. On the lower hinge insert a 3/32pin punch into one of the holes in the spring retainer. Rotate the retainer clockwise slightly and remove the locking pin. Allow the punch to come to rest against the hinge body where the locking pin was. Insert another 3/32punch into one of the holes in the spring retainer and rotate clockwise slightly so the first punch can be removed. Repeat until there is no tension on the spring. Grip the upper spring retainer with Vise-Grips and push it straight down, then out of the hinge. Be careful not to lose the flat washer above the upper spring retainer, or the shoulder bushing below the lower spring retainer. The screws that secure the hinge to the cabinet and the hinge to the door are all now accessible (see figure 9).

VII. c - GASKET REPLACEMENT :

Allow the new gasket to warm up to room temperature before unfolding it. Soak the gasket in warm water if necessary to speed up the warming process. Open (or remove) the door and carefully pull the old gasket out of the retainer. Clean the gasket retainer groove and the area under the gasket. Start in one corner and push the tongue of the new gasket into the groove for about 3 inches in each direction. Repeat with the other three corners. The new gasket may appear too large at this point. Using a rubber mallet, tap on the face of the gasket to work the remainder of the tongue into the retainer, starting at the corners and working toward the middle (see figure 8)

Fig. 9

Door Hinge

Reinstall in reverse order, first hinges to the door, then door & hinge assembly to the cabinet. Install the spring assist parts in the lower door hinge in order from the bottom up: shoulder bushing, lower spring retainer (with holes), spring, upper spring retainer and flat washer. Grip the upper spring retainer with Vise-Grips and push it straight down, then in and over the pin in the hinge assembly. Use the two 3/32punches and the holes in the lower spring retainer to rotate the spring clockwise approximately half a turn before inserting the locking pin. The door should open past 900 and close completely from any position.

Fig. 8

Gasket Installation

-6-

Page 7
Image 7
Traulsen VPS48S, VPS54S, VPS66S, VPS90S, VPS114S, VPS54J, VPS66J, VPS72J, VPS90J, VPS120J VII. c Gasket Replacement

VPS54J, VPS66J, VPS72J, VPS48S, VPS54S, VPS66S, VPS90S, VPS114S, VPS54J, VPS66J, VPS72J, VPS90J, VPS120J specifications

The Traulsen VPS series is renowned in the commercial refrigeration industry, offering a range of versatile and reliable reach-in refrigerators. The models VPS48S, VPS54S, VPS66S, VPS90S, VPS114S, VPS54J, VPS66J, VPS72J, VPS90J, and VPS120J are designed for optimal performance in busy kitchen environments, making them ideal for restaurants, catering services, and food storage facilities.

One of the standout features of the VPS series is its exceptional durability. Constructed with high-quality stainless steel exteriors and interiors, these models resist corrosion and ensure easy cleaning, which is crucial in maintaining hygiene standards. The reinforced doors are built for repeated use, equipped with magnetic gaskets that provide a tight seal to preserve interior temperature.

The cooling technology employed in the VPS series is designed for efficiency and reliability. These refrigerators utilize a high-performance refrigeration system that maintains consistent temperatures between 33°F and 41°F. The units incorporate environmentally-friendly refrigerants, making them not only efficient but also compliant with regulatory standards. Additionally, the self-contained refrigeration system streamlines maintenance and reduces the risk of refrigerant leaks.

The VPS series also features an intuitive electronic control system that provides precise temperature management. This system allows for easy adjustments and features digital displays that show current and set temperatures, enhancing user convenience. The automatic LED interior lighting offers excellent visibility, making it easy to locate stored items quickly.

With various sizes available, including the VPS48S (48 inches), VPS54S (54 inches), VPS66S (66 inches), VPS90S (90 inches), VPS114S (114 inches), VPS54J, VPS66J, VPS72J, VPS90J, and VPS120J, restaurant owners can choose the model that best fits their kitchen layout and storage needs. All models are designed with strategically arranged shelving to maximize storage space while accommodating various container sizes.

In conclusion, the Traulsen VPS series stands out for its robust construction, advanced cooling technology, and user-friendly features. These reach-in refrigerators are a solid investment for any food service operation looking to ensure excellence in food preservation and accessibility.