10. Administrator Utility

10.2 Topology Considerations

The use of RJ45 KVM port connectors, combined with Auto Signal Compensation (ASC), allows signals to travel up to 1000 ft. (300m) while maintaining reliability and high video resolution. This enables the B060-032-8 installation to take advantage of the internal Cat5e and Cat6 wiring built-in to most modern commercial buildings. Since the data signals are not transmitted in packets, the transmission cannot go through network hubs or switches. Passive components such as patch panels, keystone jacks, patch cables, etc. can be used to channel the traffic instead.

10.3 Setting the IP Address

You can use a Web browser, the IP Installer, or the OSD to configure the B060-032-8 for deployment on your local network. You can also assign an IP address from the command line. To use a Web browser to configure the B060-032-8 you will need:

(1)A computer equipped with a Web browser

(2)An Ethernet hub with at least 2 ports

(3)Two Cat5 cables

To configure the network settings via a Web browser:

Plug one end of a Cat 5 cable into the Ethernet hub and the other end into the CONFIGURATION port on the rear panel of the B060-032-8.

Plug one end of a Cat 5 cable into the Ethernet hub and the other end into the network adapter of a computer equipped with a Web browser.

Make sure that the computer’s IP address lies within the same subunit as that of the B060-032-8. (The default IP address for the B060-032-8 is 192.168.0.10.) Set the IP address for the computer’s network adapter to 192.168.0.XXX, where XXX represents any value from 1–254 (except 10 and 254, which are reserved for the B060-032-8). (See “Factory Default Settings,” page 49, for a list of B060-032-8 default network settings.) Note: If you are using a proxy server, your computer’s proxy server settings may need to be modified before accessing the B060-032-8.

Enter 192.168.0.10 in your Web browser’s address bar and hit the ENTER key. The B060-032-8 Login page appears. Login using the default username and password: Username—ADMIN; Password—ADMIN.

After logging in, assign an IP address that is appropriate for your local network to the B060-032-8. (See “Network Configuration,” page 18).

After logging out, restore your computer’s network adapter settings to their original values.

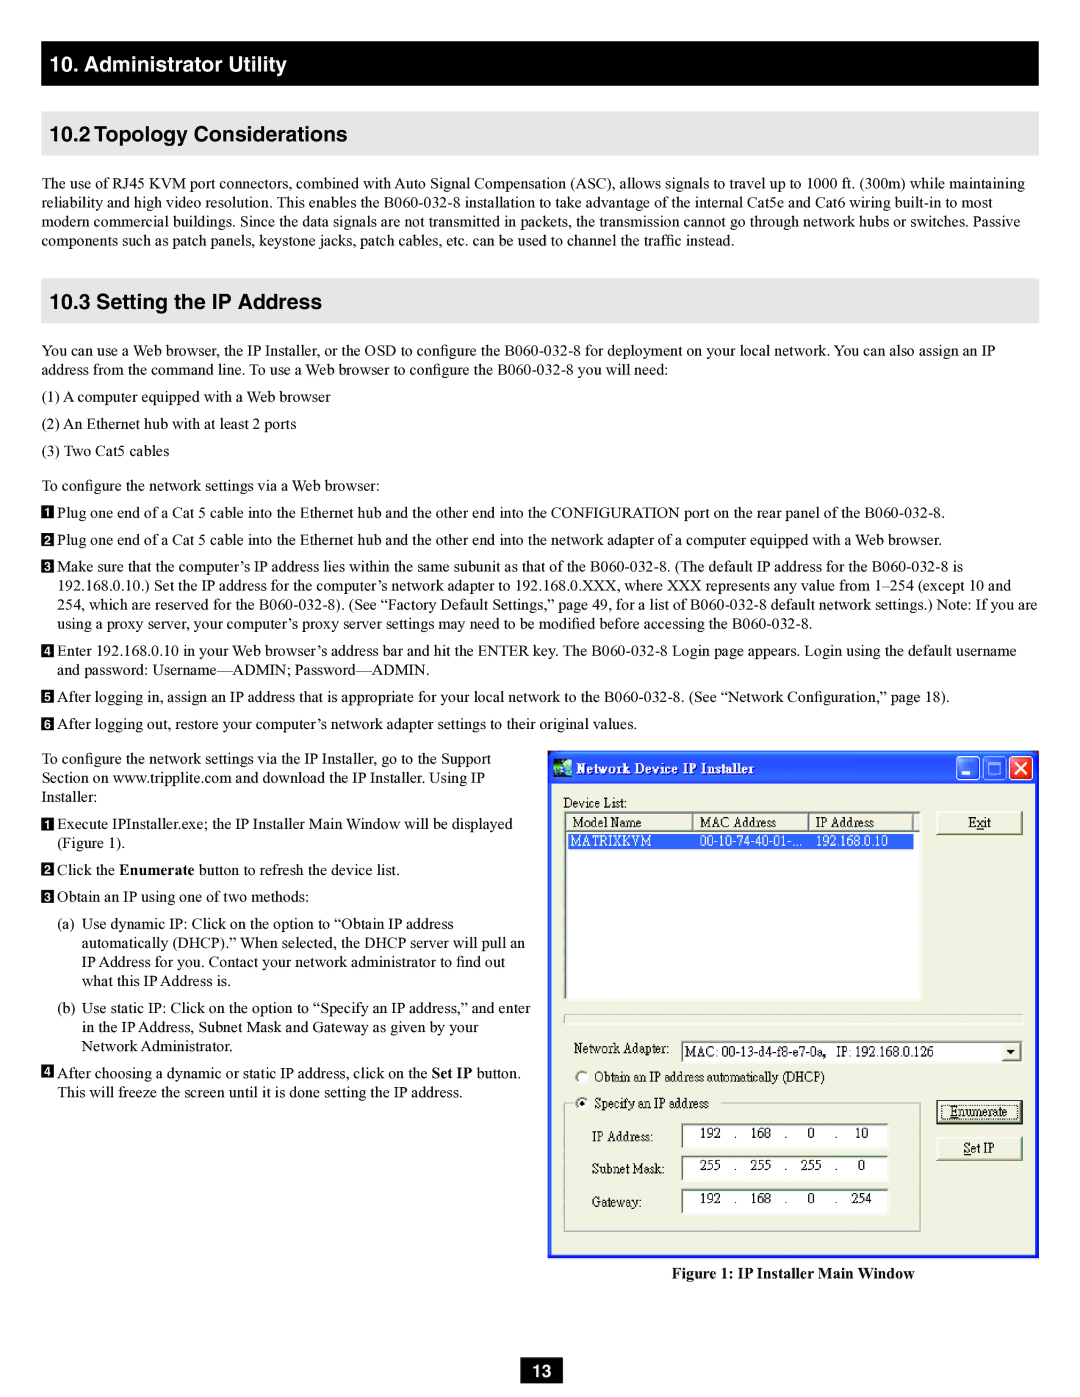
To configure the network settings via the IP Installer, go to the Support Section on www.tripplite.com and download the IP Installer. Using IP Installer:

Execute IPInstaller.exe; the IP Installer Main Window will be displayed (Figure 1).

Click the Enumerate button to refresh the device list.

Obtain an IP using one of two methods:

(a)Use dynamic IP: Click on the option to “Obtain IP address automatically (DHCP).” When selected, the DHCP server will pull an IP Address for you. Contact your network administrator to find out what this IP Address is.

(b)Use static IP: Click on the option to “Specify an IP address,” and enter in the IP Address, Subnet Mask and Gateway as given by your Network Administrator.

After choosing a dynamic or static IP address, click on the Set IP button.

This will freeze the screen until it is done setting the IP address.

Figure 1: IP Installer Main Window

13

Page 13
Image 13
Tripp Lite B060-032-8 owner manual Topology Considerations, Setting the IP Address

B060-032-8 specifications

The Tripp Lite B060-032-8 is an advanced KVM switch designed to simplify and enhance the management of multiple computers from a single interface. This device supports up to eight computers, making it ideal for environments such as server rooms, data centers, and heavy IT operations that require efficient controls over numerous systems.

One of the standout features of the B060-032-8 is its ability to support high-definition resolutions up to 1920x1200, allowing users to operate multiple systems seamlessly without sacrificing visual quality. The switch utilizes advanced video technology to ensure that display outputs remain clear, crisp, and lag-free, which is critical in environments where real-time monitoring and response are essential.

Moreover, the B060-032-8 supports both USB and PS/2 connections, granting flexibility in compatibility with a variety of computers and peripheral devices. This dual connection capability expands the scope of use, as users can effortlessly switch between different types of systems, whether they're running legacy software or the latest OS platforms.

Another technological highlight is the built-in firmware that ensures ease of use and stability. The switching process is facilitated via an intuitive front-panel push-button interface and includes keyboard hotkey commands, allowing users to toggle between connected computers with minimal disruption to their workflow. The inclusion of LED indicators provides clarity on which ports are active, enhancing overall situational awareness in critical operations.

Security is also a key component of the B060-032-8. The unit supports password protection features, ensuring that unauthorized users cannot easily access critical systems. This security feature is vital for environments where sensitive data is handled, offering peace of mind for IT administrators.

In terms of power efficiency, the Tripp Lite B060-032-8 is designed to operate with minimal power consumption, which is an important consideration for organizations looking to reduce energy costs while maintaining effective IT operations.

In conclusion, the Tripp Lite B060-032-8 KVM switch is an outstanding solution for managing multiple computers efficiently and effectively. With its wide compatibility, high-resolution support, user-friendly design, enhanced security features, and energy-efficient operation, it stands out as a valuable tool for IT professionals who demand high performance and reliability in their technology infrastructure. This KVM switch represents a smart investment for any organization aiming to streamline its operations while maximizing resource utilization and system management efficiency.