SECTION 3: UNPACKING & ASSEMBLING YOUR RIDER MOWER

Remove all screws and staples from crate.

Holding the sides of the crate firmly, lift the top of the crate up and keep it aside. Avoid tire punctures.

Remove and discard plastic bag covering the unit.

Lift the rear of the mower and clear the bottom of the crate. Repeat for the front.

Be sure parking brake is disengaged; roll unit out of the crate’s way.

Loose Parts

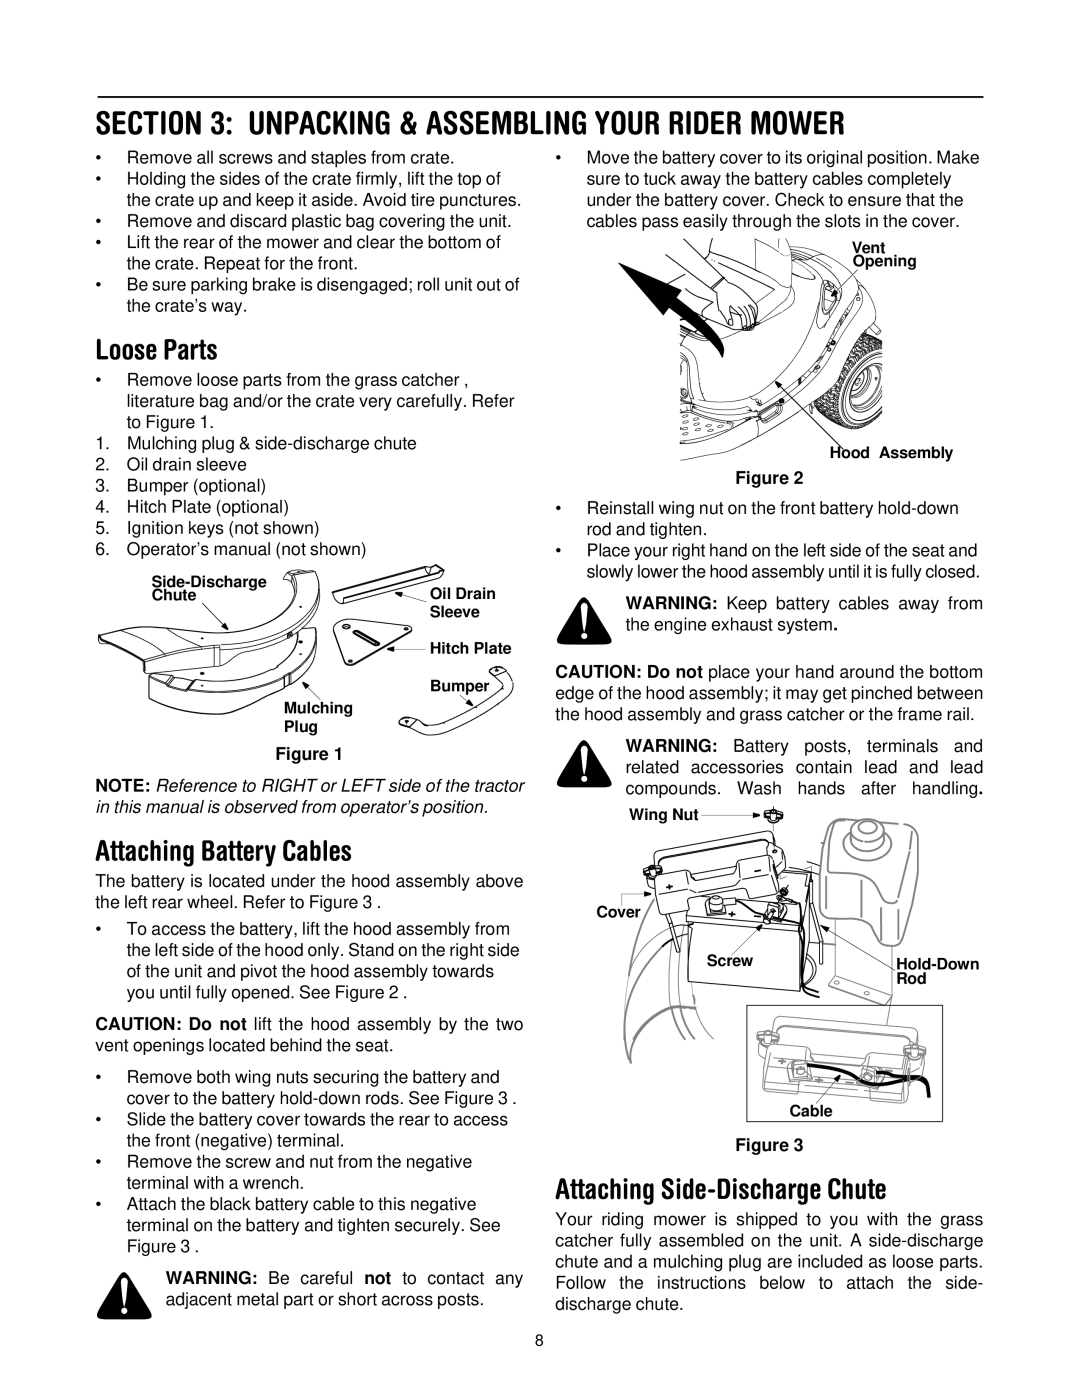
Remove loose parts from the grass catcher ,

literature bag and/or the crate very carefully. Refer to Figure 1.

1.Mulching plug & side-discharge chute

2.Oil drain sleeve

3.Bumper (optional)

4.Hitch Plate (optional)

5.Ignition keys (not shown)

6.Operator’s manual (not shown)

Side-Discharge


Oil Drain

Chute


Sleeve


Hitch Plate


Bumper


Mulching


Plug

Move the battery cover to its original position. Make sure to tuck away the battery cables completely under the battery cover. Check to ensure that the cables pass easily through the slots in the cover.

Vent

Opening

Hood Assembly

Figure 2

Reinstall wing nut on the front battery hold-down rod and tighten.

Place your right hand on the left side of the seat and slowly lower the hood assembly until it is fully closed.

WARNING: Keep battery cables away from the engine exhaust system.

CAUTION: Do not place your hand around the bottom edge of the hood assembly; it may get pinched between the hood assembly and grass catcher or the frame rail.

Figure 1

NOTE: Reference to RIGHT or LEFT side of the tractor in this manual is observed from operator’s position.

WARNING: Battery posts, terminals and related accessories contain lead and lead compounds. Wash hands after handling.

Attaching Battery Cables

The battery is located under the hood assembly above the left rear wheel. Refer to Figure 3 .

To access the battery, lift the hood assembly from the left side of the hood only. Stand on the right side of the unit and pivot the hood assembly towards you until fully opened. See Figure 2 .

Wing Nut

Cover

Screw

Hold-Down Rod

CAUTION: Do not lift the hood assembly by the two vent openings located behind the seat.

Remove both wing nuts securing the battery and cover to the battery hold-down rods. See Figure 3 .

Slide the battery cover towards the rear to access the front (negative) terminal.

Remove the screw and nut from the negative terminal with a wrench.

Attach the black battery cable to this negative terminal on the battery and tighten securely. See Figure 3 .

WARNING: Be careful not to contact any adjacent metal part or short across posts.

Cable

Figure 3

Attaching Side-Discharge Chute

Your riding mower is shipped to you with the grass catcher fully assembled on the unit. A side-discharge chute and a mulching plug are included as loose parts. Follow the instructions below to attach the side- discharge chute.

8

Page 8
Image 8
Troy-Bilt 13A-344-563 manual Unpacking & Assembling Your Rider Mower, Loose Parts, Attaching Battery Cables

13A-344-563 specifications

The Troy-Bilt 13A-344-563 is a robust and reliable tiller that caters to both gardening enthusiasts and professional landscapers alike. Known for its durability and efficiency, this tiller is designed to make the often labor-intensive process of soil cultivation easier and more effective.

One of the standout features of the Troy-Bilt 13A-344-563 is its powerful engine. Equipped with a reliable 3.5 HP engine, this tiller is capable of tackling tough soil conditions with ease. The engine's performance ensures that gardeners can break up hard, compacted soil efficiently, allowing for better plant growth and a healthier garden.

The tiller is also designed with a large tilling width of up to 16 inches, enabling users to cover more ground in less time. This feature is particularly advantageous for those with larger gardens or landscaping projects. Alongside its width, the tiller has a tilling depth of up to 8 inches, making it suitable for a variety of soil types and gardening tasks.

The Troy-Bilt 13A-344-563 incorporates patented technologies that enhance its ease of use. One such feature is the adjustable tilling depth, which allows users to customize how deep they want to till based on the specific needs of their garden. Additionally, its rear-tine design helps to maintain stability and provides a smoother operation when maneuvering around different garden terrains.

Furthermore, the tiller boasts a user-friendly design with an ergonomic handle that reduces fatigue during prolonged use. The handles are adjustable, allowing users of various heights to find a comfortable position while operating the machine. This thoughtful design is geared towards maximizing efficiency without sacrificing user comfort.

Maintenance is also a breeze with the Troy-Bilt 13A-344-563. Its easy-access oil fill and dipstick make routine checks and changes hassle-free. Additionally, the robust construction ensures that the machine can withstand regular use over an extended lifespan.

In summary, the Troy-Bilt 13A-344-563 combines powerful performance, versatile features, and user-friendly design, making it a valuable addition to any gardener’s toolkit. Whether preparing soil for planting or cultivating existing beds, this tiller stands out for its ability to deliver reliable, effective results that promote healthy, vibrant gardens.