Set-Up

Shear Pins

A pair of replacement auger shear pins and bow tie cotter pins have been included with your snow thrower. Store the pins in a convenient place for use if an original equipment shear pin should break.

Chute Clean-Out Tool

The chute clean-out tool is fastened to the top of the auger housing with a mounting clip and a cable tie at the factory. Cut the cable tie before operating the snow thrower.

Tire Pressure (Pneumatic Tires)

The tires are over-inflated for shipping purposes. Check the tire pressure before operating the snow thrower. Refer to the tire side wall for tire manufacturer’s recommended psi and deflate (or inflate) the tires as necessary.

Shave Plate

Lower

Shave

Plate

Raise

Shave

Plate

NOTE: If the tire pressure is not equal in all tires, the unit may pull to one side or the other and the shave plate will not sit level on the ground.

IMPORTANT: Under any circumstance do not exceed manufacturer’s recommended psi. Equal tire pressure should be maintained at all times. Excessive pressure when seating beads may cause tire/rim assembly to burst with force sufficient to cause serious injury. Refer to sidewall of tire for recommended pressure.

Adjustments

Skid Shoes

The snow thrower skid shoes are adjusted upward at the factory for shipping purposes. Adjust them downward prior to operating the snow thrower.

Caution: It is not recommended that you operate this snow thrower on gravel as it can easily pick up and throw loose gravel, causing personal injury or damage to the snow thrower and surrounding property.

For close snow removal on a smooth surface, adjust the skid shoes so that the shave plate on the bottom of the auger housing is just off the ground.

Adjust the skid shoes to a lower position to raise the shave plate off the ground when clearing uneven areas, such as a ribbon type driveway or a gravel driveway

NOTE: If you choose to operate the snow thrower on a gravel surface, keep the skid shoes in position for maximum clearance between the ground and the shave plate.

To adjust the skid shoes:

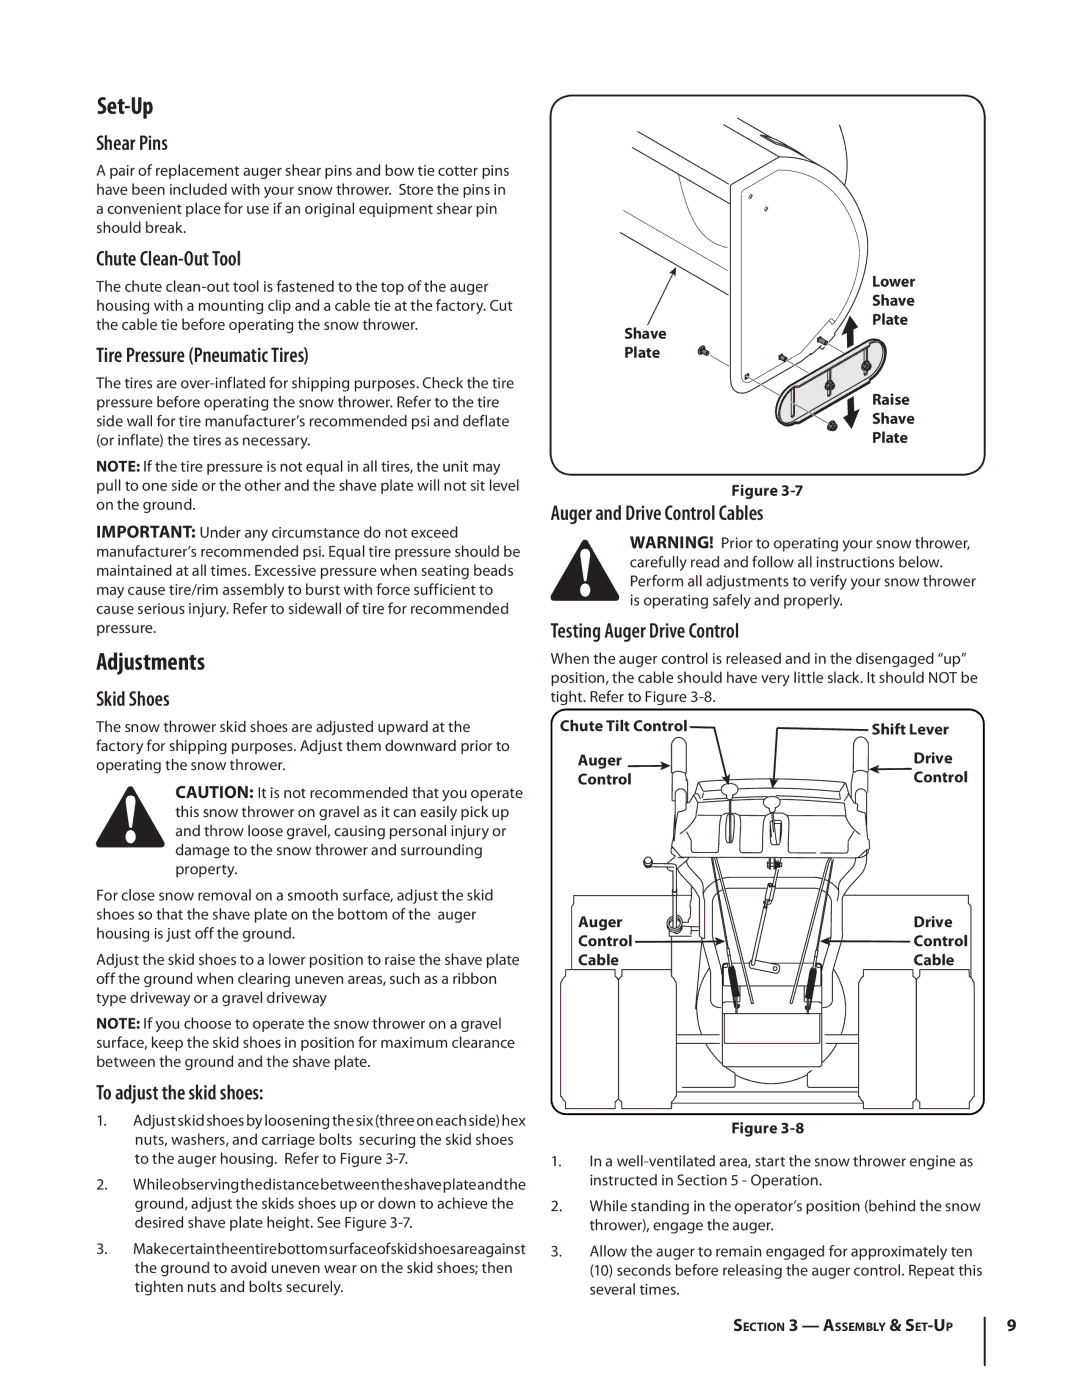
1.Adjust skid shoes by loosening the six (three on each side) hex nuts, washers, and carriage bolts securing the skid shoes to the auger housing. Refer to Figure 3-7.

2.Whileobservingthedistancebetweentheshaveplateandthe ground, adjust the skids shoes up or down to achieve the desired shave plate height. See Figure 3-7.

3.Makecertaintheentirebottomsurfaceofskidshoesareagainst the ground to avoid uneven wear on the skid shoes; then tighten nuts and bolts securely.

Figure 3-7

Auger and Drive Control Cables

Warning! Prior to operating your snow thrower, carefully read and follow all instructions below. Perform all adjustments to verify your snow thrower is operating safely and properly.

Testing Auger Drive Control

When the auger control is released and in the disengaged “up” position, the cable should have very little slack. It should NOT be tight. Refer to Figure 3-8.

Chute Tilt Control

Shift Lever

Auger

Drive

Control

Control

Auger

Drive

Control

Control

Cable

Cable

Figure 3-8

1.In a well-ventilated area, start the snow thrower engine as instructed in Section 5 - Operation.

2.While standing in the operator’s position (behind the snow thrower), engage the auger.

3.Allow the auger to remain engaged for approximately ten

(10) seconds before releasing the auger control. Repeat this several times.

Section 3 — Assembly & Set-Up

9

Page 9
Image 9
Troy-Bilt 4510 warranty Set-Up, Adjustments

4510 specifications

The Troy-Bilt 4510 is a versatile and robust walk-behind mower designed to cater to both residential and small commercial lawn care needs. Known for its durability and efficiency, this mower has several features and technologies that make it a reliable choice for homeowners and professionals alike.

One of the standout features of the Troy-Bilt 4510 is its powerful engine. It is equipped with a robust 160cc engine that offers exceptional performance in various cutting conditions. The engine provides ample power to tackle thick grass and uneven terrain, ensuring a clean and even cut every time. The easy-start mechanism simplifies the ignition process, allowing users to get to mowing quickly without any hassle.

The 4510 also boasts a self-propulsion system with variable speed control, giving users the ability to adjust the pace of the mower according to their preferences and the mowing conditions. This feature is particularly beneficial when navigating tight corners or dealing with steep inclines, providing excellent maneuverability without sacrificing power.

Cutting height adjustment is another key characteristic of the Troy-Bilt 4510. With a simple lever adjustment, users can choose from multiple cutting height settings, allowing for personalized grass length options to suit different seasons or lawn types. This flexibility in cutting height ensures an aesthetically pleasing lawn year-round.

The mower's deck is designed for efficiency, featuring a 21-inch cutting width that allows it to cover more ground in less time while still providing precise cuts. The deck is often made from durable steel, ensuring longevity and resistance to wear and tear. Additionally, the Troy-Bilt 4510 features a mulch, bag, and side discharge capability, offering versatility in grass clipping management.

For user comfort, the mower comes with ergonomically designed handles that reduce fatigue during extended mowing sessions. The folding handle design makes storage easy, allowing the mower to occupy less space when not in use.

In summary, the Troy-Bilt 4510 is a feature-rich walk-behind mower that emphasizes power, ease of use, and adaptability. With its reliable engine, self-propulsion system, adjustable cutting height, and multiple clipping options, it is well-suited for homeowners who take pride in their lawns, as well as for professionals seeking efficient landscaping solutions. Whether tackling residential lawns or small commercial projects, the Troy-Bilt 4510 delivers performance and quality that users have come to expect from the Troy-Bilt brand.