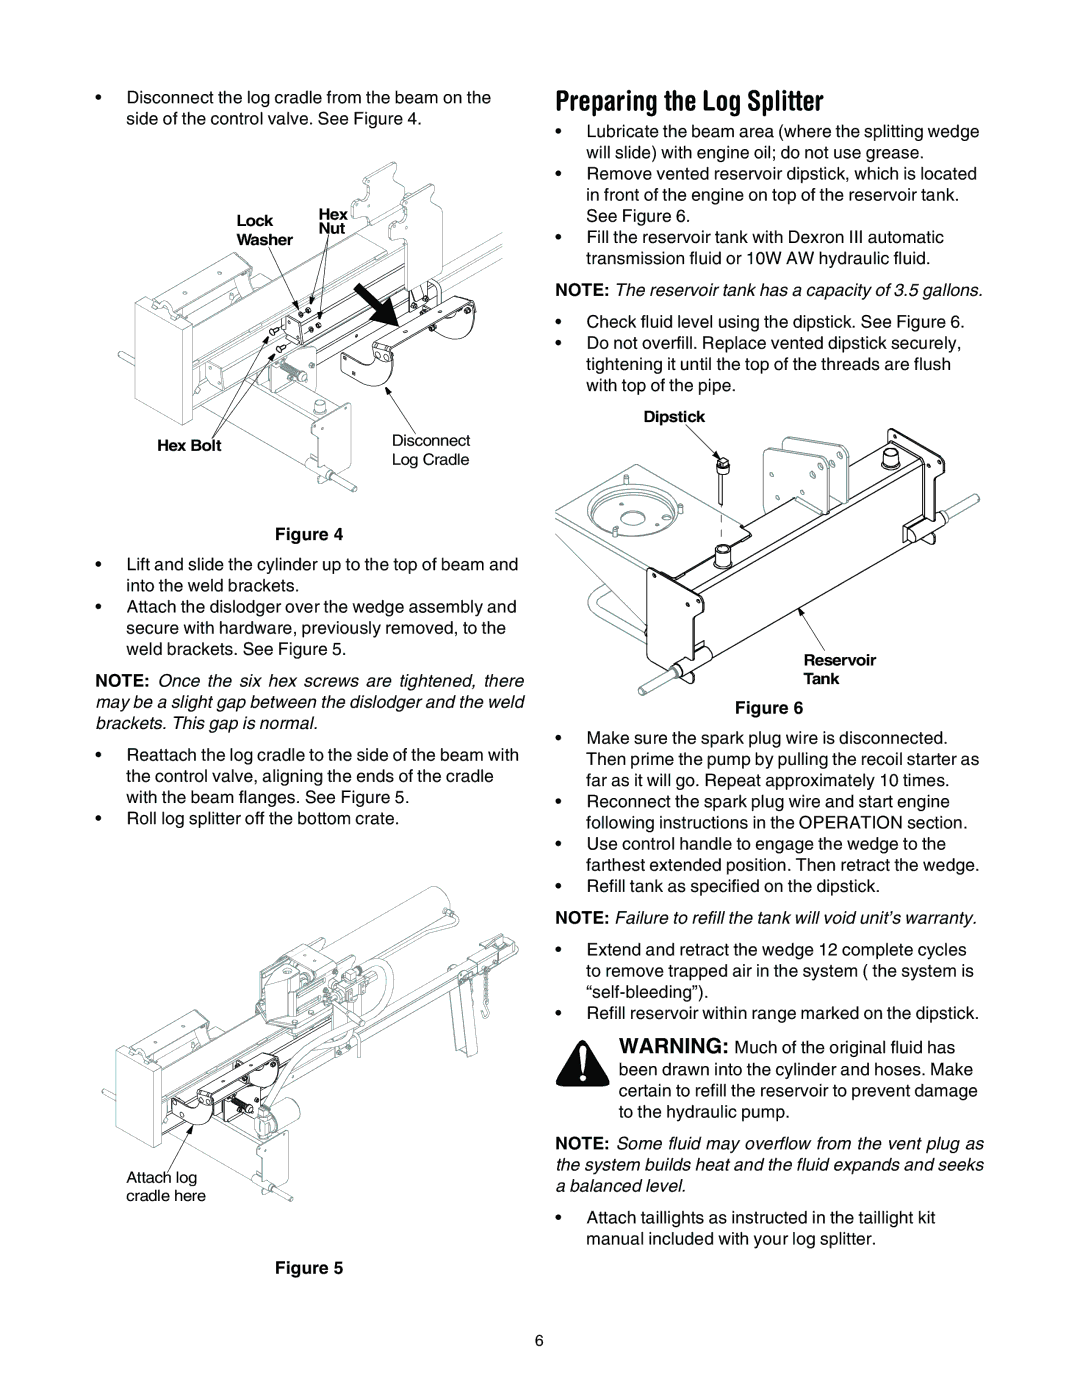
Disconnect the log cradle from the beam on the side of the control valve. See Figure 4.

Lock Hex

Nut

Washer


Disconnect


Hex Bolt


Log Cradle


Figure 4

Lift and slide the cylinder up to the top of beam and into the weld brackets.

Attach the dislodger over the wedge assembly and secure with hardware, previously removed, to the weld brackets. See Figure 5.

NOTE: Once the six hex screws are tightened, there may be a slight gap between the dislodger and the weld brackets. This gap is normal.

Reattach the log cradle to the side of the beam with the control valve, aligning the ends of the cradle with the beam flanges. See Figure 5.

Roll log splitter off the bottom crate.

Attach log cradle here

Figure 5

Preparing the Log Splitter

Lubricate the beam area (where the splitting wedge will slide) with engine oil; do not use grease.

Remove vented reservoir dipstick, which is located in front of the engine on top of the reservoir tank. See Figure 6.

Fill the reservoir tank with Dexron III automatic transmission fluid or 10W AW hydraulic fluid.

NOTE: The reservoir tank has a capacity of 3.5 gallons.

Check fluid level using the dipstick. See Figure 6.

Do not overfill. Replace vented dipstick securely, tightening it until the top of the threads are flush with top of the pipe.

Dipstick

Reservoir

Tank

Figure 6

Make sure the spark plug wire is disconnected. Then prime the pump by pulling the recoil starter as far as it will go. Repeat approximately 10 times.

Reconnect the spark plug wire and start engine following instructions in the OPERATION section.

Use control handle to engage the wedge to the farthest extended position. Then retract the wedge.

Refill tank as specified on the dipstick.

NOTE: Failure to refill the tank will void unit’s warranty.

Extend and retract the wedge 12 complete cycles to remove trapped air in the system ( the system is “self-bleeding”).

Refill reservoir within range marked on the dipstick.

WARNING: Much of the original fluid has been drawn into the cylinder and hoses. Make certain to refill the reservoir to prevent damage to the hydraulic pump.

NOTE: Some fluid may overflow from the vent plug as the system builds heat and the fluid expands and seeks a balanced level.

Attach taillights as instructed in the taillight kit manual included with your log splitter.

6

Page 6
Image 6
Troy-Bilt LS275 manual Preparing the Log Splitter

LS275 specifications

The Troy-Bilt LS275 is a versatile and efficient rear-tine tiller designed to make gardening and landscaping tasks more manageable. This machine is particularly suited for homeowners with larger gardens who require reliable tilling and soil preparation capabilities.

One of the standout features of the LS275 is its powerful engine. Equipped with a 208cc OHV engine, this tiller offers ample power for breaking up tough soil, ensuring that you can tackle even the most challenging garden plots. Its reliable starting system allows users to get to work quickly, minimizing downtime.

A key aspect of the LS275 is its rear-tine design, which provides stability and allows for deeper tilling. This configuration offers improved control and maneuverability, particularly in tight spaces or when working in uneven terrain. The tilling width of 18 inches is ideal for typical garden sizes, while the adjustable tilling depth, ranging from 3 to 7 inches, enables users to customize the tilling process according to specific garden needs.

The Troy-Bilt LS275 is designed with user comfort and convenience in mind. Its adjustable handle can be tailored to suit users of varying heights, reducing strain during extended use. The lightweight construction, combined with the counter-rotating tines, ensures that the tiller can glide through the soil with ease, allowing for efficient operation and less fatigue.

The tines themselves are made from durable materials that are built to withstand the rigors of tough soil conditions. The counter-rotating action of the tines helps to break up hard-packed soil and incorporates organic matter effectively, contributing to healthier garden beds.

Another notable feature of the LS275 is its robust 6-inch rear wheels. These provide excellent traction and stability, making it easier to maneuver across different terrains while maintaining control over tilling depth and width.

Safety is also a priority with the LS275, featuring an easy-access throttle control and a safety guard that helps protect the user from debris.

Overall, the Troy-Bilt LS275 stands out for its power, efficiency, and user-friendly features, making it a great choice for both novice and experienced gardeners looking to optimize their soil preparation efforts. With its combination of reliability and performance, this tiller can help transform any garden into a thriving, productive space.