TYPICALTYPICAL INSTINSTALLAALLATIONTION
|
|
|
|
|
|
|
|
|
|
|
|
|
|
|
|
|
| Figure 1 | |
|
|
|
|
|
|
|
|
|
|
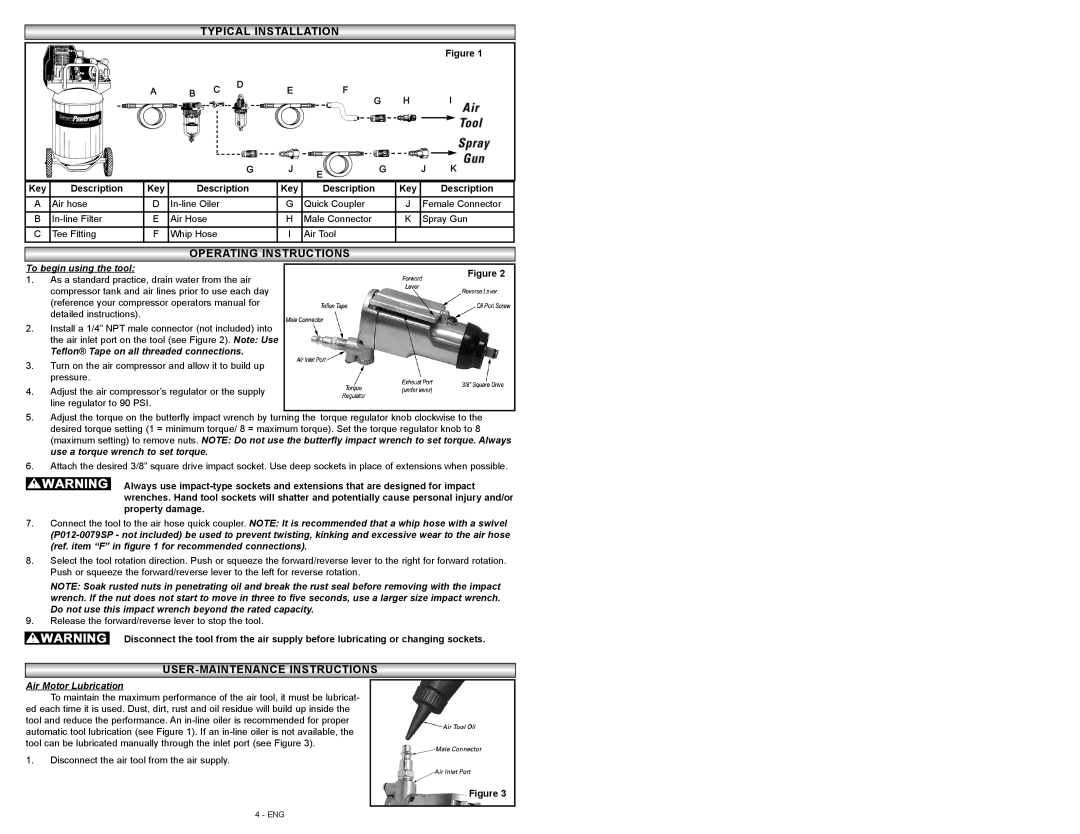
Key | Description | Key | Description | Key | Description | Key | Description | ||
A | Air hose | D | G | Quick Coupler | J | Female Connector | |||
B | E | Air Hose | H | Male Connector | K | Spray Gun | |||
C | Tee Fitting | F | Whip Hose | I | Air Tool |
|
|
|
|
OPERAOPERATINGTING INSTRUCTIONSINSTRUCTIONS
To begin using the tool:
1.As a standard practice, drain water from the air compressor tank and air lines prior to use each day (reference your compressor operators manual for detailed instructions).
2.Install a 1/4” NPT male connector (not included) into the air inlet port on the tool (see Figure 2). Note: Use
Teflon® Tape on all threaded connections.
3.Turn on the air compressor and allow it to build up pressure.
4.Adjust the air compressor’s regulator or the supply line regulator to 90 PSI.
Figure 2
5.Adjust the torque on the butterfly impact wrench by turning the torque regulator knob clockwise to the desired torque setting (1 = minimum torque/ 8 = maximum torque). Set the torque regulator knob to 8 (maximum setting) to remove nuts. NOTE: Do not use the butterfly impact wrench to set torque. Always use a torque wrench to set torque.
6.Attach the desired 3/8” square drive impact socket. Use deep sockets in place of extensions when possible.
Always use
7.Connect the tool to the air hose quick coupler. NOTE: It is recommended that a whip hose with a swivel
8.Select the tool rotation direction. Push or squeeze the forward/reverse lever to the right for forward rotation. Push or squeeze the forward/reverse lever to the left for reverse rotation.
NOTE: Soak rusted nuts in penetrating oil and break the rust seal before removing with the impact wrench. If the nut does not start to move in three to five seconds, use a larger size impact wrench. Do not use this impact wrench beyond the rated capacity.
9.Release the forward/reverse lever to stop the tool.
Disconnect the tool from the air supply before lubricating or changing sockets.
USER-MAINTENANCE INSTRUCTIONSSTRUCTIONS
Air Motor Lubrication
To maintain the maximum performance of the air tool, it must be lubricat- ed each time it is used. Dust, dirt, rust and oil residue will build up inside the tool and reduce the performance. An
1.Disconnect the air tool from the air supply.
Figure 3
4 - ENG