www.magicard.com | QUICKSTART GUIDE |
Tempo and Tempo M Printers | |
|
|
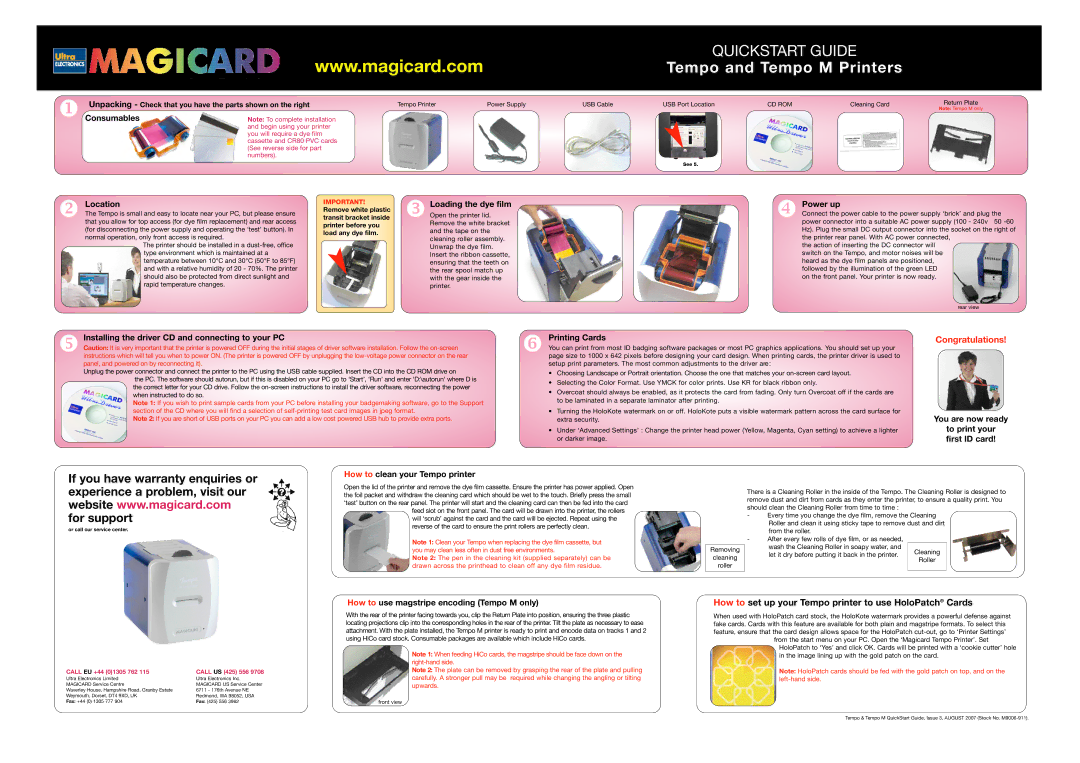
Unpacking - Check that you have the parts shown on the right
Consumables | Note: To complete installation |
| and begin using your printer |
| you will require a dye film |
| cassette and CR80 PVC cards |
| (See reverse side for part |
| numbers). |
Tempo Printer | Power Supply | USB Cable | USB Port Location | CD ROM | Cleaning Card | Return Plate |
|
|
|
|
|
| Note: Tempo M only |
See 5.
Location
The Tempo is small and easy to locate near your PC, but please ensure that you allow for top access (for dye film replacement) and rear access (for disconnecting the power supply and operating the ‘test’ button). In normal operation, only front access is required.
The printer should be installed in a
IMPORTANT!
Remove white plastic transit bracket inside printer before you load any dye film.
Loading the dye filmOpen the printer lid.
Remove the white bracket and the tape on the cleaning roller assembly. Unwrap the dye film. Insert the ribbon cassette, ensuring that the teeth on the rear spool match up with the gear inside the printer.
Power up
Connect the power cable to the power supply ‘brick’ and plug the power connector into a suitable AC power supply (100 - 240v 50
the action of inserting the DC connector will switch on the Tempo, and motor noises will be heard as the dye film panels are positioned, followed by the illumination of the green LED on the front panel. Your printer is now ready.
rear view
Installing the driver CD and connecting to your PC
Caution: It is very important that the printer is powered OFF during the initial stages of driver software installation. Follow the
Unplug the power connector and connect the printer to the PC using the USB cable supplied. Insert the CD into the CD ROM drive on
the PC. The software should autorun, but if this is disabled on your PC go to ‘Start’, ‘Run’ and enter ‘D:\autorun’ where D is the correct letter for your CD drive. Follow the
Note 1: If you wish to print sample cards from your PC before installing your badgemaking software, go to the Support section of the CD where you will find a selection of
Note 2: If you are short of USB ports on your PC you can add a low cost powered USB hub to provide extra ports .
Printing Cards
You can print from most ID badging software packages or most PC graphics applications. You should set up your page size to 1000 x 642 pixels before designing your card design. When printing cards, the printer driver is used to setup print parameters. The most common adjustments to the driver are:
•Choosing Landscape or Portrait orientation. Choose the one that matches your
•Selecting the Color Format. Use YMCK for color prints. Use KR for black ribbon only.
•Overcoat should always be enabled, as it protects the card from fading. Only turn Overcoat off if the cards are to be laminated in a separate laminator after printing.
•Turning the HoloKote watermark on or off. HoloKote puts a visible watermark pattern across the card surface for extra security.
•Under ‘Advanced Settings’ : Change the printer head power (Yellow, Magenta, Cyan setting) to achieve a lighter or darker image.
Congratulations!
You are now ready
to print your first ID card!
If you have warranty enquiries or experience a problem, visit our website www.magicard.com for support
or call our service center.
CALL EU +44 (0)1305 762 115 | CALL US (425) 556 9708 |
Ultra Electronics Limited | Ultra Electronics Inc. |
MAGICARD Service Centre | MAGICARD US Service Center |
Waverley House, Hampshire Road, Granby Estate | 6711 - 176th Avenue NE |
Weymouth, Dorset, DT4 9XD, UK | Redmond, WA 98052, USA |
Fax: +44 (0) 1305 777 904 | Fax: (425) 556 3962 |
How to clean your Tempo printer
Open the lid of the printer and remove the dye film cassette. Ensure the printer has power applied. Open the foil packet and withdraw the cleaning card which should be wet to the touch. Briefly press the small ‘test’ button on the rear panel. The printer will start and the cleaning card can then be fed into the card
feed slot on the front panel. The card will be drawn into the printer, the rollers will ‘scrub’ against the card and the card will be ejected. Repeat using the reverse of the card to ensure the print rollers are perfectly clean.
Note 1: Clean your Tempo when replacing the dye film cassette, but you may clean less often in dust free environments.
Note 2: The pen in the cleaning kit (supplied separately) can be drawn across the printhead to clean off any dye film residue.
How to use magstripe encoding (Tempo M only)
With the rear of the printer facing towards you, clip the Return Plate into position, ensuring the three plastic locating projections clip into the corresponding holes in the rear of the printer. Tilt the plate as necessary to ease attachment. With the plate installed, the Tempo M printer is ready to print and encode data on tracks 1 and 2 using HiCo card stock. Consumable packages are available which include HiCo cards.
Note 1: When feeding HiCo cards, the magstripe should be face down on the
Note 2: The plate can be removed by grasping the rear of the plate and pulling carefully. A stronger pull may be required while changing the angling or tilting upwards.
front view
There is a Cleaning Roller in the inside of the Tempo. The Cleaning Roller is designed to remove dust and dirt from cards as they enter the printer, to ensure a quality print. You should clean the Cleaning Roller from time to time :
- Every time you change the dye film, remove the Cleaning Roller and clean it using sticky tape to remove dust and dirt from the roller.
- After every few rolls of dye film, or as needed,
Removing | wash the Cleaning Roller in soapy water, and | Cleaning | |
let it dry before putting it back in the printer. | |||
cleaning | |||
Roller | |||
| |||
roller |
| ||
|
|
How to set up your Tempo printer to use HoloPatch® Cards
When used with HoloPatch card stock, the HoloKote watermark provides a powerful defense against fake cards. Cards with this feature are available for both plain and magstripe formats. To select this feature, ensure that the card design allows space for the HoloPatch
from the start menu on your PC. Open the ‘Magicard Tempo Printer’. Set HoloPatch to ‘Yes’ and click OK. Cards will be printed with a ‘cookie cutter’ hole in the image lining up with the gold patch on the card.
Note: HoloPatch cards should be fed with the gold patch on top, and on the
Tempo & Tempo M QuickStart Guide, Issue 3, AUGUST 2007 (Stock No.