LD190SS1
Select your language
Plug in the AC power cord, then press
When selecting analog channel
Autoscan will begin
Connection Guide
Necessary cable is
Model
Precautions
FCC Warning
Address
Trademark Information
Introduction
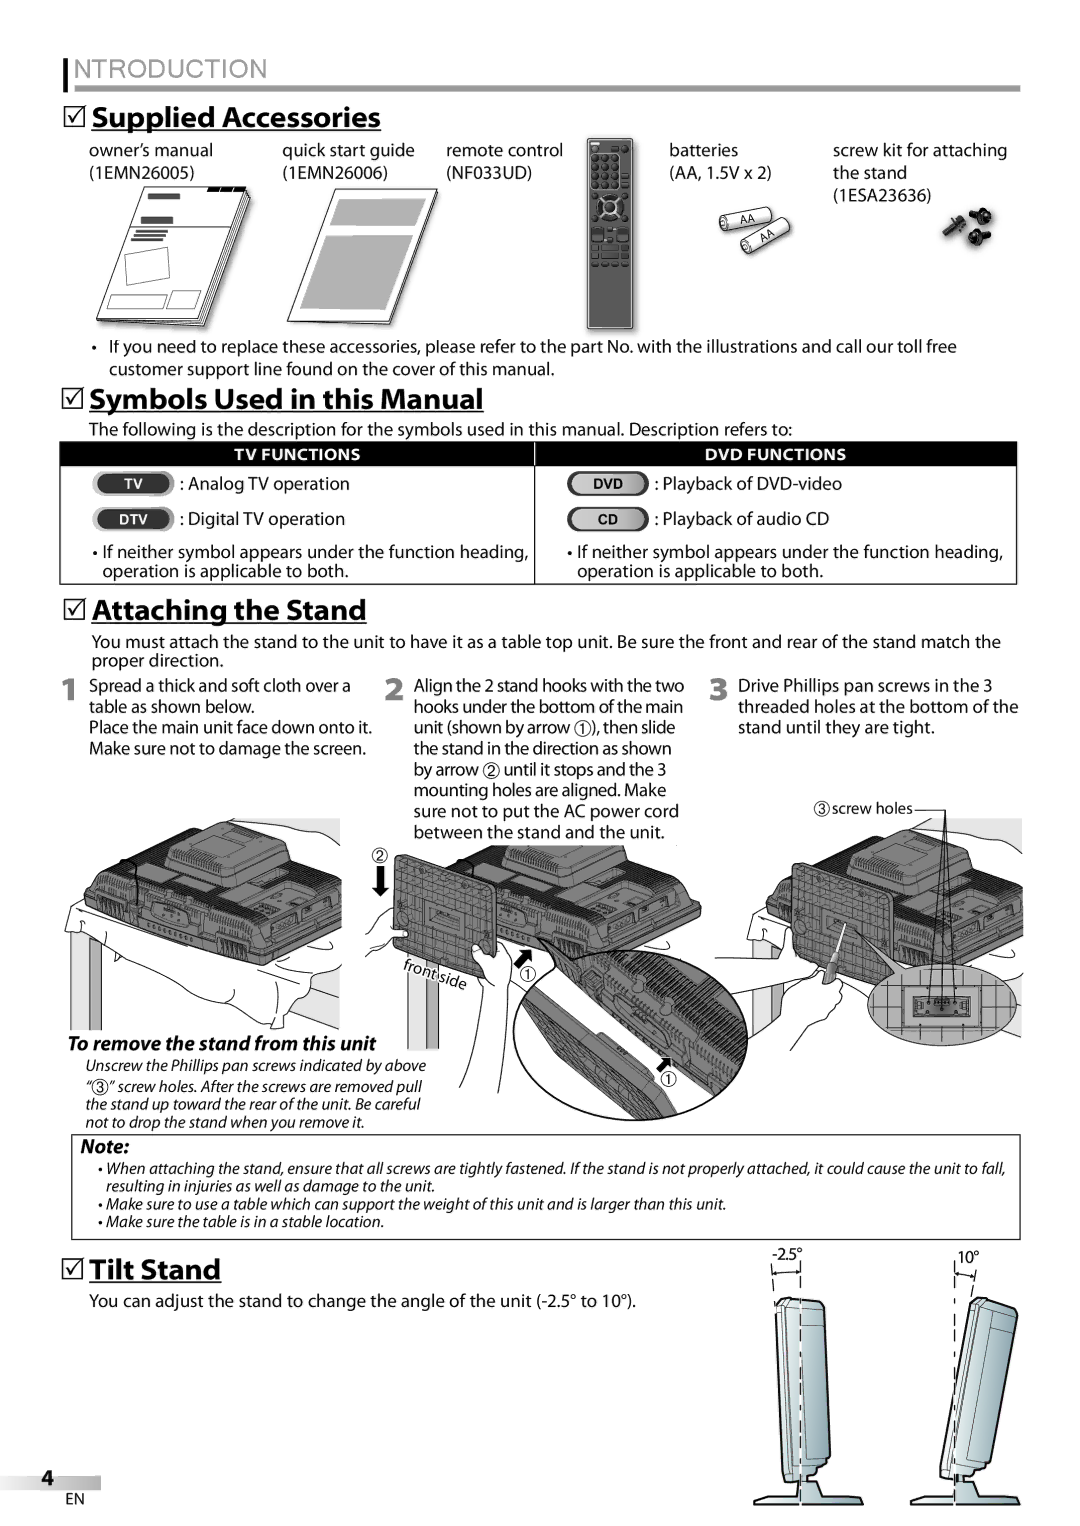
Supplied Accessories
Symbols Used in this Manual
Attaching the Stand
Features
DTV/TV/CATV
Contents
TV Functions DVD Functions
Control Panel
Terminals
Remote Control Function
Installing the Batteries
Battery Precautions
Connection to Cable Receiver or Satellite Box
Preparation
Antenna Connection
Satellite provider
External Device Connection
Hdmi Connection
HDMI-DVI Connection
This unit accepts 480i / 480p / 720p / 1080i video signals
Component video Connection
Video Connection
Information
Plug In the AC Power Cord
Resolution
PC Connection
Before you begin
TV Functions Initial Setup
After an initial setup is completed
Make sure the unit is connected to antenna or cable
Watching TV
Volume Adjustment
Sleep Timer
Channel Selection
Still Mode
Switching Each Input Mode
Switching Audio Mode
Press Info
TV Screen Information
Broadcasting information
Program title Program guide
TV Screen Display Mode
Optional Setting
Main Menu
Autoscan
Using CH K/L
Channel List Manual Register
Use Cursor K/ L to select Antenna, then press
Antenna Confirmation
Language Selection
Antenna
Adjust the picture quality
Picture Adjustment
Picture Mode
Press Setup to exit
Adjust the following items
Sound Adjustment
Sound Mode
TV Speakers
Caption Service
Caption mode
Closed Caption
Digital Caption Service
Use Cursor K/L to select User Setting, then press
Service 1~6
Edge Type
Font Style
Font Size
Font Color
Use Cursor K/L to select Child Lock, then press
Enter password
Child Lock
Childild Lock
Channel Lock
Mpaa Rating
TV Rating
To set the sub ratings
Use Cursor K/L to select TV Rating, then press
New Password
Use Cursor K/L to select New Password, then press Enter
New Password Enter password Confirm password
Clock, Phase
PC Settings
Auto Adjustment
Horizontal Position, Vertical Position
Energy Saving Mode
Location
Current Software Info
Confirm the version of the software currently used
Current Software InfoI
Unplayable Media
Operating DVD
DVD Functions Playable Media
Inches 12 cm
Resume Playback
Playback
Disc Menu
DVD
Fast Forward / Fast Reverse
Slow Forward / Slow Reverse
Zoom
Search Functions
During playback, press Mode repeatedly until / appears
Skip H/ G are not available when playback is stopped
Chapter / Title / Track Search
Time Search
Direct Search
Repeat Playback
Repeat A-B Playback Programmed Playback
Random Playback
You can repeat playback between a and B on a disc
On-screen Display
Special Settings
Random mode Program or
Playback
Camera Angles
Black Level Setting
Press Cursor K/ L to adjust the black level
Audio Language
Stereo Sound Mode
Virtual Surround
Press Setup to display the main menu
DVD Setting
DVD Language Setting
Subtitle *1, *2Default OFF
DVD Audio Setting
Down Sampling
Number buttons to enter the current 4-digit password
Parental Setting
If you have set password already, use
Use the Number buttons to enter the new 4-digit password
Others
You can change the other functions
Reset to the Default Setting Language Code List
Use Cursor s / B to select , then press Enter
Use Cursor K/ L to select YES, then press Enter
Question
Answer
Troubleshooting
Troubleshooting Guide
Symptom Remedy
Tape containing captions Have been read during copying
During playback Angle does not switch
Captions are displayed as a
Make sure the disc is compatible with the unit
Glossary
Maintenance
Information
Ntsc
Other Specifications
General Specifications
Electrical Specification
Catv
Limited Warranty Ninety 90 DAY Labor / ONE 1 Year Parts
Español Français English
LD190SS1
Personne Responsable Funai CORPORATION, Inc
Précautions
Ultérieure
Modèle LD190SS1
Informations Importantes Relatives AU Copyright
Information sur les Marques Commerciales
Consignes DE Sécurité Relatives AU Lecteur Laser
Avis à l’Utilisateur
Montage du Support du Téléviseur
Accessoires Fournis
Symboles Utilisés dans ce Manuel
Pied inclinable
Caractéristiques
Contenu
Fonctions TV
Fonctions DVD
Panneau de Commande
Boutons de la Télécommande
Insérer les Piles
Précautions Concernant les Piles
Préparation
Connexion de l’Antenne
Avant toute connexion
Connexion d’un Appareil Externe
Connexion Hdmi
Connexion HDMI-DVI
Connexion Vidéo à composantes
Connexion S-Vidéo
Connexion Vidéo
Branchez le Cordon d’Alimentation Secteur
Connexion PC
Mise en garde
Préliminaires
Fonctions TV Installation Initiale
Une fois la configuration initiale effectuée
La Autoscan commence
Sélection de Chaîne
Réglage du Volume
Regarder LA Télévision
Minuterie de Sommeil
Parcours des Modes d’Entrée
Changement du Mode Audio
Arrêt sur Image
Stéréo
Appuyez sur Info
Informations sur Écran
Informations de diffusion
Les informations suivantes s’affichent
Mode d’Affichage sur Écran de Télévision
Pour un signal vidéo
Configuration Optionnelle
Menu Principal
Avant de commencer
Enregistrer Manuel
Appuyez sur Setup pour quitter
Liste Chaînes
Liste i chaînes î
Vérification de l’Antenne
Sélection de la Langue
Antenne
Régler la qualité de l’image
Mode Image
Réglage de l’Image
Luminosité, Contraste, Couleur, Teinte, Netteté
Modo Audio
Réglage du Son
Haut-parleurs du téléviseur
Egaliseur
Service Sous-titrage
Mode de Sous-titres
Sous-titres
Service Sous-titrage Num
Couleur Police
Style Police
Taille Police
Opacité Police
Cote TV
Verrouillage
Verrouillage de Chaîne page Cote Mpaa
Nouveau Mot de Passe page
Verrouillage de Chaîne
Sous Catégorie
Cote TV
Pour spécifier les cotes secondaires
CoteTV
Nouveau Mot de Passe
Ajustment auto
Horloge, Phase
Réglages PC
Position Horizontale, Position Verticale
Pour sélectionner
Mode Economie d’Energie
Région
Pour sélectionner le région de
Info Logiciel Actuel
InfoI logiciell i i l actuell
Disques Non Lisibles
Fonctionnement DU Lecteur DE DVD
Fonctions DVD Disques Lisibles
Taille du disque
Reprise de la Lecture
Lecture
Menu Disque
Ex. DVD
Avance Lente / Retour Lent
Pour quitter le mode Zoom, répétez les étapes 1 et
Avance Rapide / Retour Rapide
Touche Enter jusqu’à ce que HF apparaisse
’aide de la touche Skip H / G
Recherche par Durée
Recherche Directe
Répétition de la Lecture
Lecture Aléatoire
Répétition A-B
Lecture Programmée
Skip H/ G pour sélectionner d’autres pistes du programme
’affiche à la place de
Affichage des Menus à l’Écran
Suivante.41
Pendant la lecture, appuyez plusieurs fois sur la touche
Angles de Prise de Vue
Langue Audio
Réglage du Niveau de Noir
Mise en Place d’un Marker
Mode Stéréo
Appuyez sur Curseur K/ L pour sélectionner le volume sonore
Le marker est maintenant défini
Réglage DU DVD
Appuyez sur la touche Setup pour accéder au menu principal
Appuyez sur la touche Setup pour exit
Réglage de la Langue du DVD
Appuyez sur la touche Setup pour accéder au menu
Sous Échantillon
Principal
Niveau Parental
Peuvent être lus Appuyez sur la touche Setup pour exit
Contrôle Parental
Tout Tous les blocages parentaux sont annulés
Autres
Vous pouvez modifier les autres fonctions
Arrêt Auto
Langue
Question Réponse
Foire aux Questions FAQ
Dépannage
Input Select ou en utilisant CH K/ L
Symptôme Solution
Guide de Dépannage
Dernière utilisation de la source considérée
Change Sonore Vous changez de source
’entrée et la taille de l’écran
Change
Glossaire
Entretien
Avec un appareil photo numérique
Spécifications Générales
Spécifications Électriques
QUI EST COUVERT?
Cette garantie limitée ne couvre pas
Français
LD190SS1
Parte Responsable Funai CORPORATION, Inc
Precauciones
Para consultarlos, si los necesita, en el futuro
Modelo LD190SS1
Información sobre Marcas Registradas
Símbolos Utilizados en este Manual
Introducción
Accesorios Suministrados
Conectar el Soporte
Características
Contenido
Funciones del TV Funciones del DVD
Panel de Control
Terminales
Función del Mando a Distancia
Instalación de las Pilas
Precauciones sobre las Pilas
Preparación
Conexión de Antena
Conexión al Receptor de Cable o Caja de Satélite
Conexión de Dispositivo Externo
Conexión Hdmi
Conexión HDMI-DVI
Conexión de Vídeo en componentes
Conexión de S-Video
Esta unidad acepta señales de vídeo de 480i / 480p / 720p
Introducción
Conexión de Vídeo
Precaución
EnchufeelCableAlimentadordeCA
Conexión de PC
Pueden aparecer las siguientes señales
Funciones del TV
Configuración Inicial
Una vez finalizada la configuración inicial…
Antes de comenzar
Selección de Canal
Ajuste de Volumen
Para VER LA Televisión
Temporizador de Apagado
SAP / Mono SAP / Mono
Modo Fijo
Para Cambiar Entre Cada Modo De Entrada
Estéreo
Presione Info
Información de Pantalla
Información de emisión
Se muestra la siguiente información
Modo de Visualización de Pantalla del Televisor
Para señal de vídeo
Ajuste Opcional
Menú Principal
Presione Setup para salir
Lista de Canales
Antena.Video
Confirmación de la Antena
Selección de Idioma
Antena
Ajuste la calidad de imagen
Mode de image
Ajuste de Imagen
Luego presione Cursor s/B para ajustarlo
Modo sonido
Ajuste de Sonido
Altavoces TV
Ecualizador
1 y Texto1
Subtítulo Cerrado
Modo de subtítulos
3 y Texto3
Servicio Digital de Subtítulos
Para seleccionar
Opaco Fuente
Tamaño Fuente
Tipo Borde
Color Fondo
Bloqueo l infantil i il
Bloqueo Infantil
Nuevo código de acceso página
Infantil i il
Categoría
Bloqueo de Canales
Clase de Mpaa
De canales l
Clase de TV
Para ajustar las subcategorías
Nuevo código de acceso
Posición Horizontal, Posición Vertical
Ajustes de PC
Ajuste automático
Reloj, Fase
Puede ajustar el consumo de potencia en ahorrar o no
Modo de Ahorro de Energía
Ubicación
Detallelle
Información sobre el Software Actual
DetalleInformaciónI lle i actuall dell software
Utilización DEL DVD
Funciones del DVD Medios que se Pueden Reproducir
Medios que no se Pueden Reproducir
Reanudación de la Reproducción
Reproducción
Menú del Disco
Ej. DVD
Avance Lento / Retroceso Lento
Avance Rápido / Retroceso Rápido
Que desee
Funciones de Búsqueda
Durante la reproducción, pulse Skip H/ G varias
Puede seleccionar capítulos, títulos o pistas del disco
Búsqueda por Tiempo
Dirija la Búsqueda
Repetición de Reproducción
Se pueden ordenar hasta 99 pistas
Reproducción Programada
Reproducción Aleatoria
Presione Play B para iniciar la reproducción programada
Visualización en Pantalla
Ajustes Especiales
Idioma de Subtítulos
Idioma de Audio
Durante la reproducción, presione Mode
Ángulos de la Cámara
Ajuste del Nivel del Negro
Surround Virtual
Modo de Sonido Estéreo
Puesta de Marcador
Utilice Cursor K/ L para seleccionar el nivel del sonido
Ajuste DE DVD
Ajuste de Idioma en DVD
Puede cambiar el idioma deseado para reproducir el disco
Ajuste de Audio de DVD
SUB Muestreo
Si ya ha puesto la contraseña, utilice
Ajuste Paterno
Nivel Paterno
Un fallo en la alimentación no borrará la contraseña
Cuadro La imagen del modo vista fija tendrá
Otros
Puede cambiar otras funciones
Auto Apagato
Lista de Códigos de Idiomas
Reposición de los Ajustes Predeterminados
Solución DE Problemas
Preguntas Frecuentes
Pregunta Respuesta
Guía de Solución de Problemas
Síntoma Solución
De PC
El volumen
Modos de entrada concretos
La pantalla entera
Información
Glosario
Mantenimiento
Especificaciones Generales
Especificación Eléctrica
Otras Especificaciones
A9DN1UH