Installation - Notes
Port Flanges
Description | part number |
• Allow 1” minimum clearance |
|
|
|
|
|
| Nut - 10mm | (188010200) |
|
|
|
|
|
| |||
around machine for cooling |
|
|
|
|
|
| Washer - 10mm | (194010210) |
|
|
|
|
|
| |||
purposes. |
|
|
|
|
|
|
|
|
|
|
|
|
|
|
|
| |
• The relief valve must be |
|
|
|
|
|
| Flange | (508030207) |
|
|
|
| |||||
|
|
|
| |||||
installed before starting the |
|
|
|
|
|
| Gasket | (526071201) |
|
|
|
|
|
| |||
compressor. Reduce the set |
|
|
|
|
|
| ||
|
|
|
| |||||
|
|
|
|
|
| |||
pressure by 1psi for each 2000 ft. of |
|
|
|
|
|
| Bolt - 10 X 50mm | (128010250) |
|
|
|
|
|
| |||
operating altitude above sea level. |
|
|
|
|
|
| ||
• Mount the relief valve horizontally or |
|
|
|
|
|
|
|
|
|
|
|
|
|
|
|
| |
|
|
|
|
|
|
|
| |
|
|
|
|
|
|
|
| |
pointed down to prevent water ingress. |
|
|
|
|
|
|
|
|
|
|
|
|
|
|
|
| |
wrong | correct |
| ||||||
• Do not exceed recommended drive line |
| |||||||
angle
•Check valve must be mounted after the relief valve.
•Air line size from discharge pipework to manlid must be at
least 1” I.D. for adequate unloading rates. |
| Shaft | |
• Ensure bolt head is placed down into the port recess when | |||
25mm dia. | |||
installing port flanges. |
| ||
| 8mm key | ||
• The compressor can be mounted on any of its 4 |
| ||
|
| ||
mounting faces as shown see Fig 2. | Lockwasher |
| |
|
| ||
| (194010210) |
| |
| Mounting Foot |
| |
| (507003202) | Spacer | |
|
| (516020202) | |
Drive Line Specifications
Do not force end yokes or drive flange onto the compressor or PTO shaft.
Use a tube type balanced PTO drive shaft, parallel with the PTO output shaft axis within 2° to ensure
is 10°.
Be sure
10° max.
Parallel
within 2°
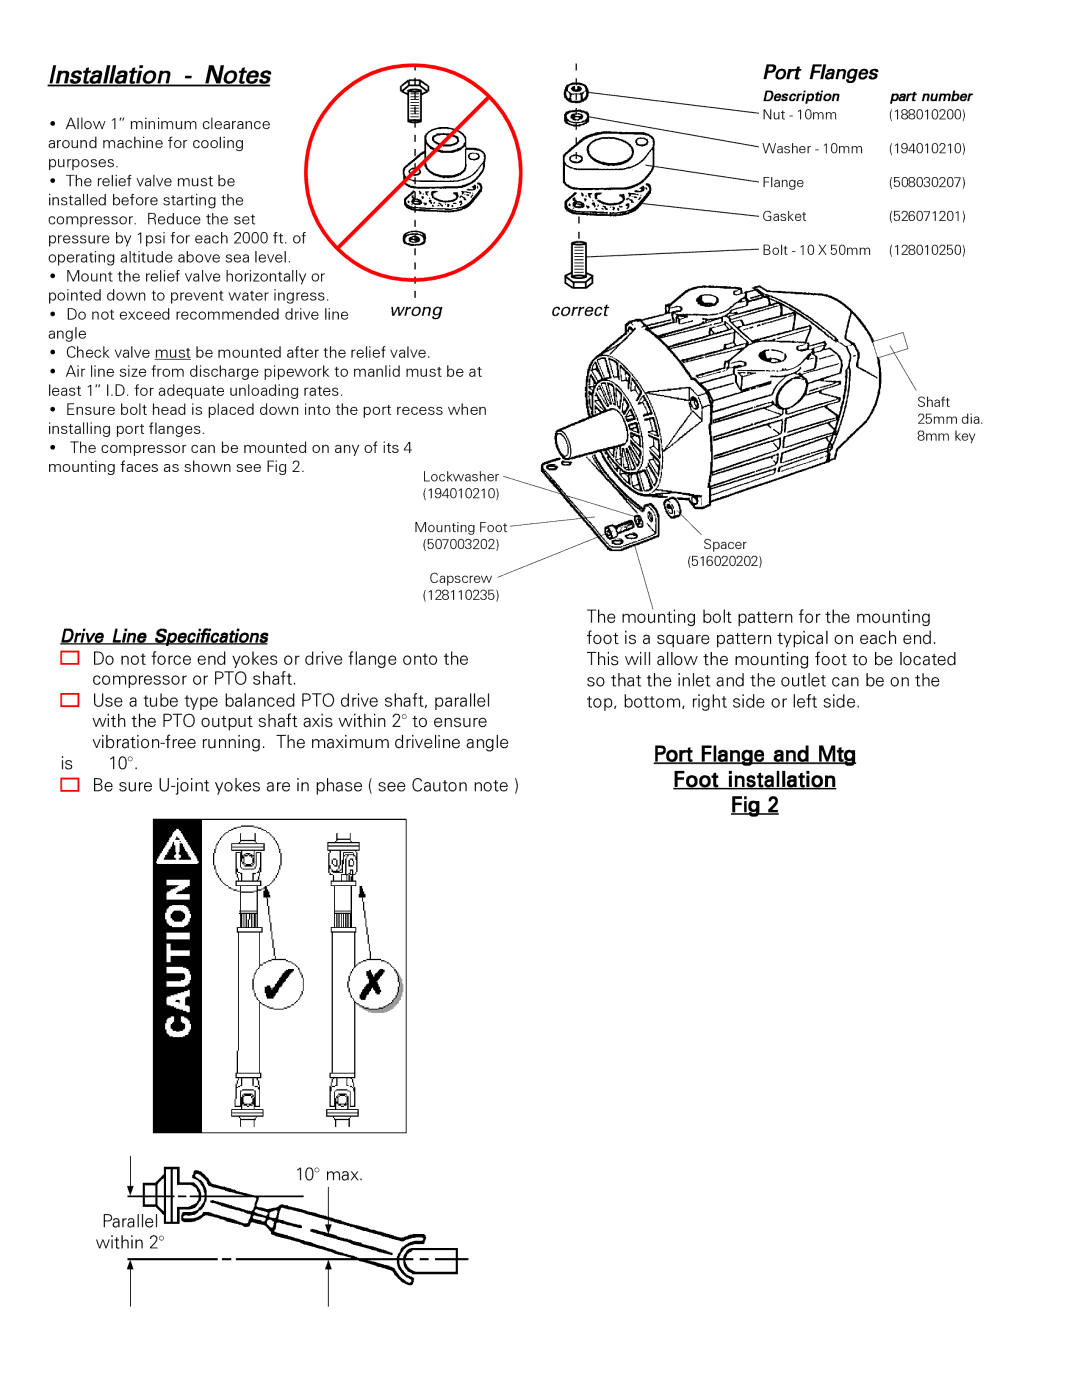
The mounting bolt pattern for the mounting foot is a square pattern typical on each end. This will allow the mounting foot to be located so that the inlet and the outlet can be on the top, bottom, right side or left side.
Port Flange and Mtg
Foot installation
Fig 2
