Niagara® 9100 Quick Start Guide
Congratulations on the purchase of your new Niagara 9100 system.
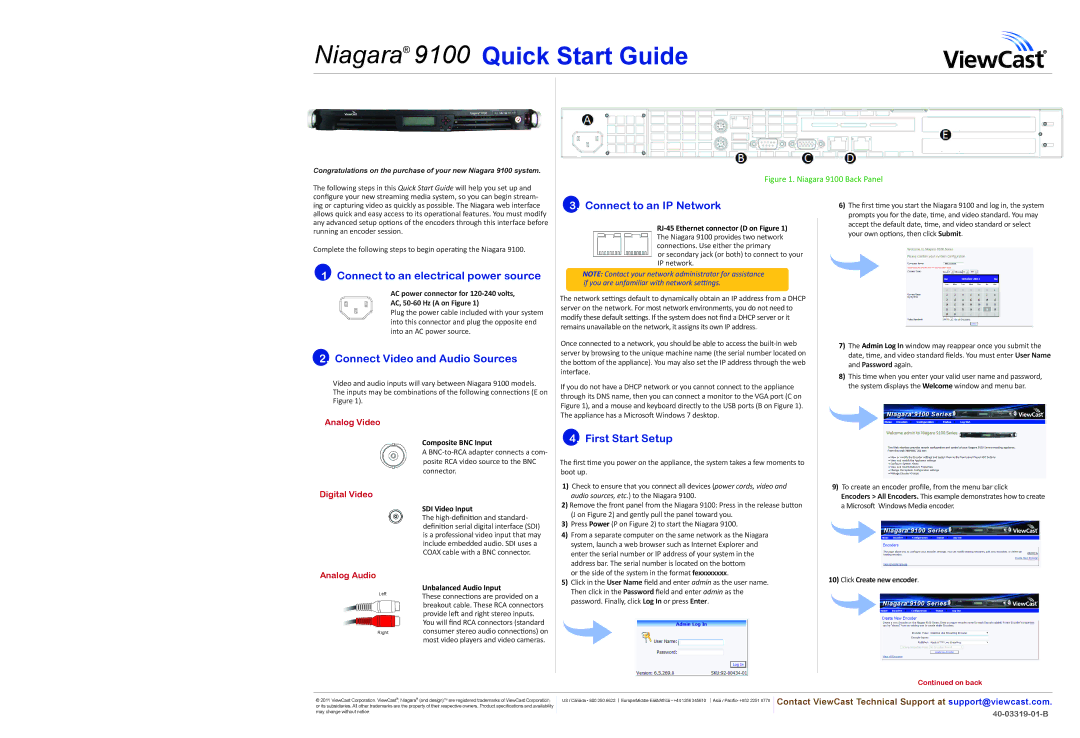
Figure 1. Niagara 9100 Back Panel
The following steps in this Quick Start Guide will help you set up and configure your new streaming media system, so you can begin stream- ing or capturing video as quickly as possible. The Niagara web interface allows quick and easy access to its operational features. You must modify any advanced setup options of the encoders through this interface before running an encoder session.
Complete the following steps to begin operating the Niagara 9100.
1.Connect to an electrical power source
AC power connector for
AC,
Plug the power cable included with your system into this connector and plug the opposite end into an AC power source.
2.Connect Video and Audio Sources
Video and audio inputs will vary between Niagara 9100 models. The inputs may be combinations of the following connections (E on Figure 1).
Analog Video
Composite BNC Input
A
Digital Video
SDI Video Input
The
3.Connect to an IP Network
or secondary jack (or both) to connect to your IP network.
NOTE: Contact your network administrator for assistance if you are unfamiliar with network settings.
The network settings default to dynamically obtain an IP address from a DHCP server on the network. For most network environments, you do not need to modify these default settings. If the system does not find a DHCP server or it remains unavailable on the network, it assigns its own IP address.
Once connected to a network, you should be able to access the
If you do not have a DHCP network or you cannot connect to the appliance through its DNS name, then you can connect a monitor to the VGA port (C on Figure 1), and a mouse and keyboard directly to the USB ports (B on Figure 1). The appliance has a Microsoft Windows 7 desktop.
4.First Start Setup
The first time you power on the appliance, the system takes a few moments to boot up.
1) Check to ensure that you connect all devices (power cords, video and | |
| audio sources, etc.) to the Niagara 9100. |
2) Remove the front panel from the Niagara 9100: Press in the release button | |
| (J on Figure 2) and gently pull the panel toward you. |
3) | Press Power (P on Figure 2) to start the Niagara 9100. |
4) | From a separate computer on the same network as the Niagara |
| system, launch a web browser such as Internet Explorer and |
| enter the serial number or IP address of your system in the |
| address bar. The serial number is located on the bottom |
6)The first time you start the Niagara 9100 and log in, the system prompts you for the date, time, and video standard. You may accept the default date, time, and video standard or select your own options, then click Submit.
7)The Admin Log In window may reappear once you submit the date, time, and video standard fields. You must enter User Name and Password again.
8)This time when you enter your valid user name and password, the system displays the Welcome window and menu bar.
9)To create an encoder profile, from the menu bar click
Encoders > All Encoders. This example demonstrates how to create a Microsoft Windows Media encoder.
Analog Audio
Left
Right
Unbalanced Audio Input
These connections are provided on a breakout cable. These RCA connectors provide left and right stereo inputs. You will find RCA connectors (standard consumer stereo audio connections) on most video players and video cameras.
or the side of the system in the format fexxxxxxxx. |
5) Click in the User Name field and enter admin as the user name. |
Then click in the Password field and enter admin as the |
password. Finally, click Log In or press Enter. |
10)Click Create new encoder.
Continued on back
© 2011 ViewCast Corporation. ViewCast®, Niagara® (and design)TM are registered trademarks of ViewCast Corporation or its subsidiaries. All other trademarks are the property of their respective owners. Product specifications and availability may change without notice.
US / Canada • 800.250.6622 Europe/Middle East/Africa • +44 1256 345610 Asia / Pacific• +852 2251 8778
Contact ViewCast Technical Support at support@viewcast.com.