LX and LT Pool Heaters | Page 9 |
|
|
|
|
2.Remove the factory installed jumper wire and tag from the terminal strip (see Figure 10).
3.Connect the low voltage wires from the time clock auxiliary switch to the two terminals. Use American Wire Gage (AWG) No. 14 gauge stranded copper wire with a temperature rating of 221°F (105°C) or greater (see Figure 11).
LEFT SIDE OF
RACEWAY
REMOVE JUMPER | TERMINAL BLOCK |
WIRE |
Figure 10. Remove Jumper from Terminal Block
Figure 11. Typical Time Clock Wiring.
INDOORCONTROL
If your time clock simply interrupts the high voltage power supply or has a high voltage output, do not connect the power supply of the heater to the output side of the clock. Doing so will prevent the blower from purging the residual heat from the heater when the heater turns off. This situation will damage the heater. The blower must be allowed to run for 45 seconds after the heater shuts off.
2H-4. Remote Operation
(Model LX Only)
The Laars LX pool/spa heater controls can be wired for remote operation. All Waterpik Technologies/Jandy RS Control Systems will permit the heater to be operated by remote control. If you are setting up a new pool or spa system, call your local distributor or the Waterpik Technologies/Jandy Customer Service Department for information on the correct RS Control System to meet your needs.
To connect a Laars LX heater to an existing RS Control System, first determine the revision level the programmed chip in the RS Control System's Power Center Board. To check the revision level of the chip, press and hold the reset button on the side of the indoor control panel for 10 seconds then release it. A number will appear on the display for approximately 5 seconds. This first number can be ignored. After the first number disappears, a second number will appear in the display window. It will consist of 4 digits followed by a revision level ("#### REV _"). If the revision level displayed here is at "H" or higher it will accommodate a Laars LX heater without any modification. If the chip is at a revision "G" or lower the chip will have to be replaced with a newer version. An alternate method for determining the revision level of the programmed chip in your RS control, is described in steps
Do not connect more than two wires to any of the terminals in the RS Control System when connecting
|
| J4 | |
| U1 | W0 | |
|
| ||
JVA Board |
|
| |
1 | 1 | RED | |
2 | BLK | ||
| |||
| 3 | YEL | |
| 4 | GRN |
8
1 5 1
Bezel |
RSCONTROL![]()
![]()
SYSTEM
22GAGE, 4
CONDUCTOR
WIRE
peripheral devices. If connecting the LX heater to the RS Control System creates this situation, then a Multiplexing PCB kit must be used. Call your distributor or Waterpik Technologies to order the kit.
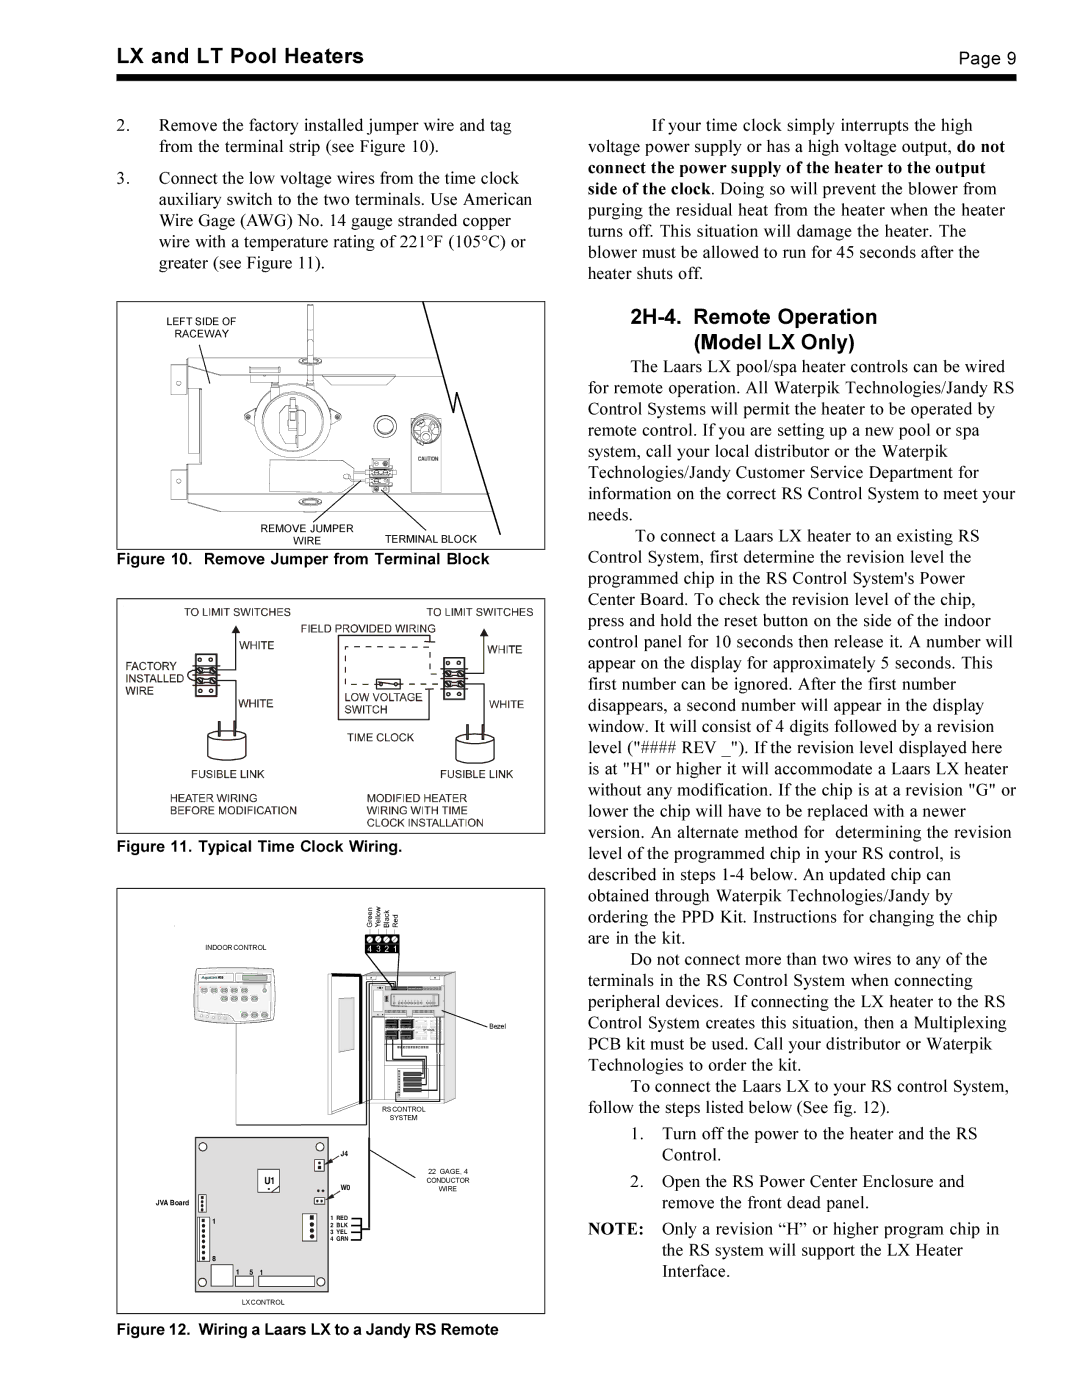
To connect the Laars LX to your RS control System, follow the steps listed below (See fig. 12).
1.Turn off the power to the heater and the RS Control.
2.Open the RS Power Center Enclosure and remove the front dead panel.
NOTE: Only a revision “H” or higher program chip in the RS system will support the LX Heater Interface.
LXCONTROL