3/4” To 7/8”

3/4” To 7/8”


Door edges


Horizontal tracks

20

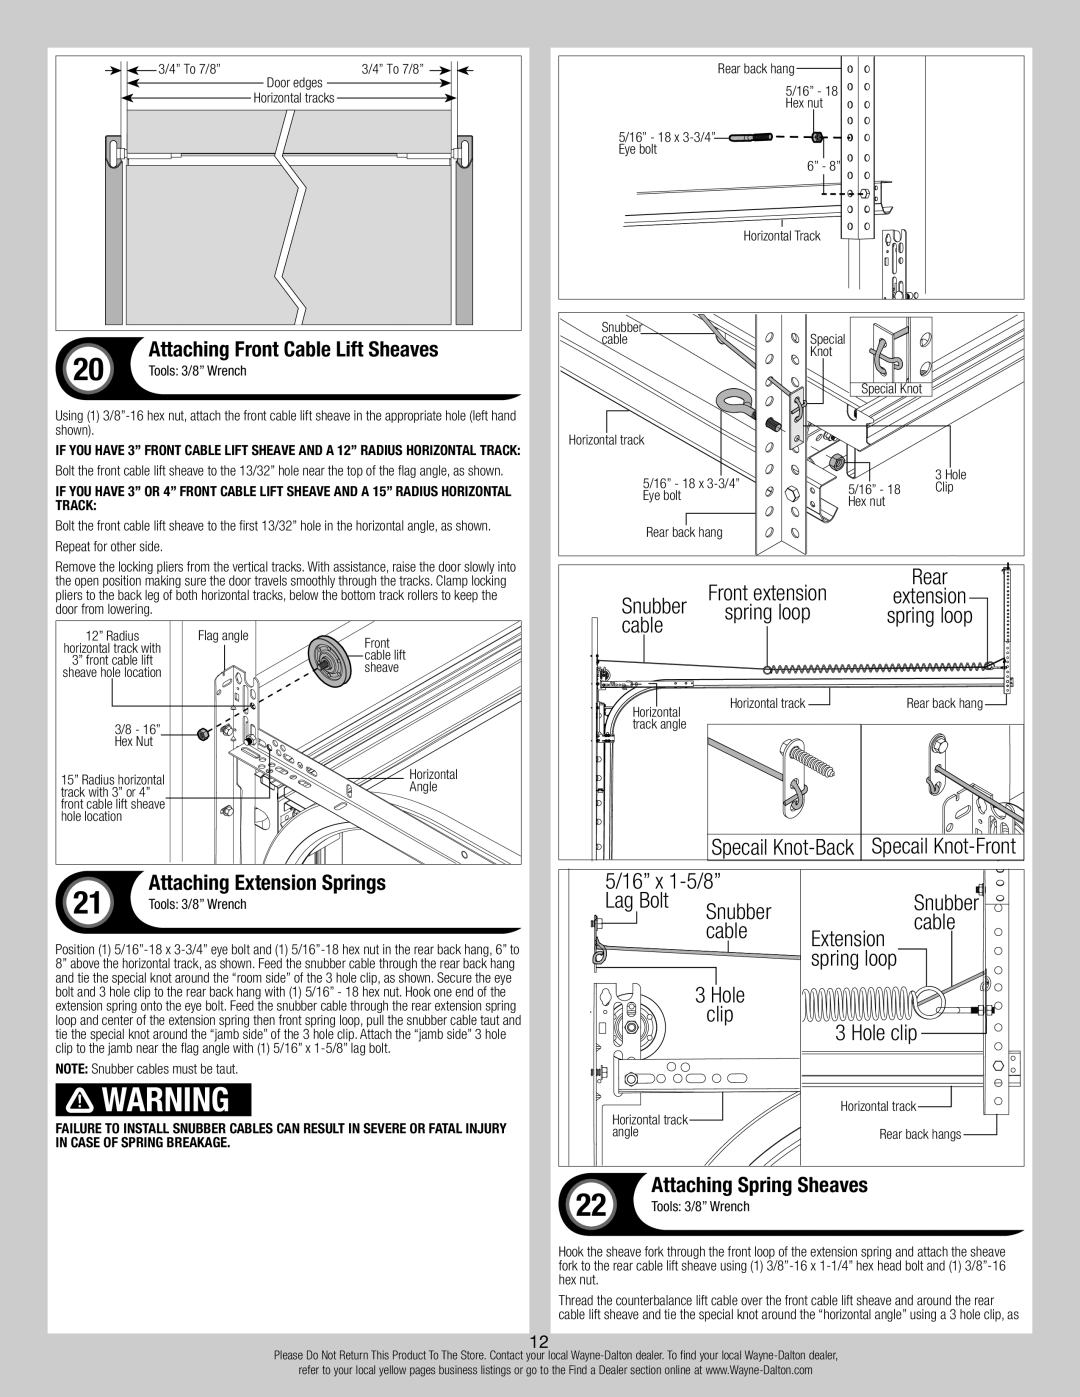
Attaching Front Cable Lift Sheaves

Tools: 3/8” Wrench


Using (1) 3/8”-16 hex nut, attach the front cable lift sheave in the appropriate hole (left hand shown).

If you have 3” Front Cable Lift Sheave and a 12” Radius Horizontal Track:

Bolt the front cable lift sheave to the 13/32” hole near the top of the flag angle, as shown.

If you have 3” or 4” Front Cable Lift Sheave and a 15” Radius Horizontal Track:

Bolt the front cable lift sheave to the first 13/32” hole in the horizontal angle, as shown. Repeat for other side.

Remove the locking pliers from the vertical tracks. With assistance, raise the door slowly into the open position making sure the door travels smoothly through the tracks. Clamp locking pliers to the back leg of both horizontal tracks, below the bottom track rollers to keep the door from lowering.

Rear back hang

5/16” - 18 Hex nut

5/16” - 18 x 3-3/4” Eye bolt

6” - 8”

Horizontal Track

Snubber

cableSpecial Knot

Special Knot

Horizontal track

5/16” - 18 x 3-3/4”


3 Hole

5/16” - 18

Clip

Eye bolt


Hex nut


Rear back hang


Front extension


Rear

Snubber

extension

spring loop

spring loop

cable


12” Radius

Flag angle

horizontal track with


3” front cable lift


sheave hole location


3/8 - 16”


Hex Nut


15” Radius horizontal


track with 3” or 4”


front cable lift sheave


hole location


Front cable lift sheave

Horizontal

Angle

Horizontal

track angle

Horizontal track

Rear back hang

Specail Knot-Back

Specail Knot-Front

21

Attaching Extension Springs

Tools: 3/8” Wrench


Position (1) 5/16”-18 x 3-3/4” eye bolt and (1) 5/16”-18 hex nut in the rear back hang, 6” to 8” above the horizontal track, as shown. Feed the snubber cable through the rear back hang and tie the special knot around the “room side” of the 3 hole clip, as shown. Secure the eye bolt and 3 hole clip to the rear back hang with (1) 5/16” - 18 hex nut. Hook one end of the extension spring onto the eye bolt. Feed the snubber cable through the rear extension spring loop and center of the extension spring then front spring loop, pull the snubber cable taut and tie the special knot around the “jamb side” of the 3 hole clip. Attach the “jamb side” 3 hole clip to the jamb near the flag angle with (1) 5/16” x 1-5/8” lag bolt.

NOTE: Snubber cables must be taut.

WARNING

Failure to install snubber cables can result in severe or fatal injury in case of spring breakage.

5/16” x 1-5/8”


Lag Bolt

Snubber


Snubber


cable


cable

Extension


spring loop


3 Hole


clip

3 Hole clip


Horizontal track


Horizontal track


angle


Rear back hangs


22

Attaching Spring Sheaves

Tools: 3/8” Wrench


Hook the sheave fork through the front loop of the extension spring and attach the sheave fork to the rear cable lift sheave using (1) 3/8”-16 x 1-1/4” hex head bolt and (1) 3/8”-16 hex nut.

Thread the counterbalance lift cable over the front cable lift sheave and around the rear cable lift sheave and tie the special knot around the “horizontal angle” using a 3 hole clip, as

12

Please Do Not Return This Product To The Store. Contact your local Wayne-Dalton dealer. To find your local Wayne-Dalton dealer,

refer to your local yellow pages business listings or go to the Find a Dealer section online at www.Wayne-Dalton.com

Page 12
Image 12
Wayne-Dalton 8700 Spring loop, Attaching Extension Springs, Attaching Spring Sheaves, Tools 3/8 Wrench

8700 specifications

The Wayne-Dalton 8700 is a prominent model in the lineup of sectional overhead doors, designed for both residential and commercial applications. Known for its exceptional build quality and wide range of options, the 8700 series has become a favored choice among homeowners and business owners alike.

One of the main features of the Wayne-Dalton 8700 is its innovative design, which combines an aesthetic appeal with functional performance. The door is available in several attractive styles and colors, allowing customers to customize their entryways according to their preferences. The optional window panels enhance natural light infiltration while adding an elegant touch to the overall appearance.

The 8700 series boasts a robust construction featuring a polystyrene insulation core that provides impressive thermal efficiency. The insulation not only helps in maintaining indoor temperatures but also contributes to energy savings, making it an environmentally friendly choice. The door’s R-value, which measures its thermal resistance, is rated up to 14.0, providing excellent insulation for various climates.

Durability is another hallmark of the Wayne-Dalton 8700. Constructed from heavy-duty steel, this door is built to withstand the elements and resist dents and corrosion. The finish can be selected with a baked-on polyester coating, offering long-lasting protection against wear and tear, ensuring the door retains its appearance over time.

In terms of technology, the Wayne-Dalton 8700 utilizes advanced manufacturing techniques to ensure consistency and quality in each product. The doors are engineered to operate smoothly with minimal maintenance. The torsion spring system provides a reliable and quiet operation, enhancing the user experience when opening or closing the door.

Safety features are also a priority with the Wayne-Dalton 8700. The door comes equipped with various options for safety sensors that detect obstructions, automatically reversing the door’s operation to prevent accidents. Additionally, the design includes pinch-resistant panel edges to protect fingers during operation.

Overall, the Wayne-Dalton 8700 stands out in the market for its balance of aesthetics, performance, and safety. Whether for home use or commercial applications, its combination of style, durability, and advanced technology makes it a top choice for those seeking a quality overhead door solution.