8

Stacking Sections

10

Drawbar Operator Bracket

Tools Required: Power drill, 7/16” Socket driver

Tools Required: Power drill, 7/16” Socket driver


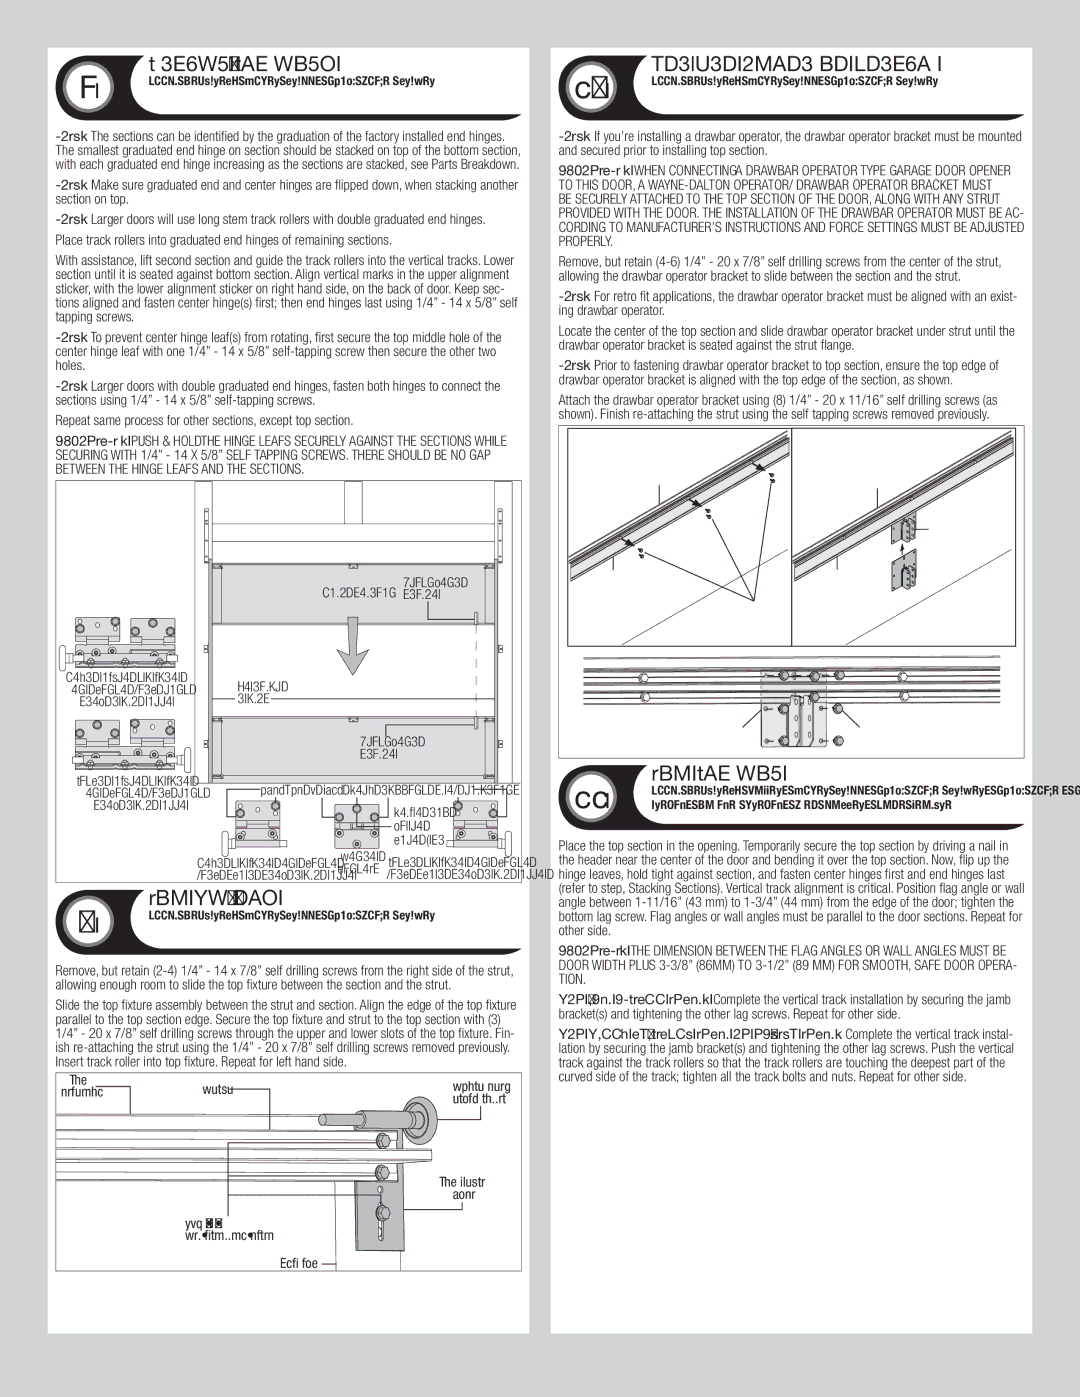
NOTE: The sections can be identified by the graduation of the factory installed end hinges. The smallest graduated end hinge on section should be stacked on top of the bottom section, with each graduated end hinge increasing as the sections are stacked, see Parts Breakdown.

NOTE: Make sure graduated end and center hinges are flipped down, when stacking another section on top.

NOTE: Larger doors will use long stem track rollers with double graduated end hinges. Place track rollers into graduated end hinges of remaining sections.

With assistance, lift second section and guide the track rollers into the vertical tracks. Lower section until it is seated against bottom section. Align vertical marks in the upper alignment sticker, with the lower alignment sticker on right hand side, on the back of door. Keep sec- tions aligned and fasten center hinge(s) first; then end hinges last using 1/4” - 14 x 5/8” self tapping screws.

NOTE: To prevent center hinge leaf(s) from rotating, first secure the top middle hole of the center hinge leaf with one 1/4” - 14 x 5/8” self-tapping screw then secure the other two holes.

NOTE: Larger doors with double graduated end hinges, fasten both hinges to connect the sections using 1/4” - 14 x 5/8” self-tapping screws.

Repeat same process for other sections, except top section.

NOTE: If you’re installing a drawbar operator, the drawbar operator bracket must be mounted and secured prior to installing top section.

IMPORTANT: when connecting a drawbar operator type garage door opener to this door, a Wayne-Dalton operator/ drawbar operator bracket must be securely attached to the top section of the door, along with any strut provided with the door. The installation of the drawbar operator must be ac- cording to manufacturer’s instructions and force settings must be adjusted properly.

Remove, but retain (4-6) 1/4” - 20 x 7/8” self drilling screws from the center of the strut, allowing the drawbar operator bracket to slide between the section and the strut.

NOTE: For retro fit applications, the drawbar operator bracket must be aligned with an exist- ing drawbar operator.

Locate the center of the top section and slide drawbar operator bracket under strut until the drawbar operator bracket is seated against the strut flange.

NOTE: Prior to fastening drawbar operator bracket to top section, ensure the top edge of drawbar operator bracket is aligned with the top edge of the section, as shown.

Attach the drawbar operator bracket using (8) 1/4” - 20 x 11/16” self drilling screws (as shown). Finish re-attaching the strut using the self tapping screws removed previously.

IMPORTANT: Push & hold the hinge leafs securely against the sections while securing with 1/4” - 14 x 5/8” self tapping screws. There should be no gap between the hinge leafs and the sections.

Top section

Top section

Drawbar operator bracket

Left double graduated

end hinge with long

stem track roller


Alignment

Lock section

sticker


Vertical tracks

Strut

1/4” - 20 x 7/8” Self-drilling screws

Strut

Right double graduated

end hinge with long

stem track roller

Alignment sticker

1/4”-14 x 5/8” Self tapping screw locations

Secure top

middle hole first

Left graduated end hinge

Center

Right graduated end hinge

hinge(s)

with short stem track roller

with short stem track roller

Drawbar operator

(8) 1/4” - 20 x 11/16”

bracket in place

Self-drilling screws

under strut


11

Top Section

Tools Required: Hammer, Power drill, 7/16” Socket driver, 7/16” Socket, 7/16”

Wrench, Ratchet wrench, Step ladder, Tape measure

Place the top section in the opening. Temporarily secure the top section by driving a nail in the header near the center of the door and bending it over the top section. Now, flip up the hinge leaves, hold tight against section, and fasten center hinges first and end hinges last

9

Top Fixtures

Tools Required: Power drill, 7/16” Socket driver


Remove, but retain (2-4) 1/4” - 14 x 7/8” self drilling screws from the right side of the strut, allowing enough room to slide the top fixture between the section and the strut.

Slide the top fixture assembly between the strut and section. Align the edge of the top fixture parallel to the top section edge. Secure the top fixture and strut to the top section with (3) 1/4” - 20 x 7/8” self drilling screws through the upper and lower slots of the top fixture. Fin- ish re-attaching the strut using the 1/4” - 20 x 7/8” self drilling screws removed previously. Insert track roller into top fixture. Repeat for left hand side.

Top

Strut

Short stem

section


track roller


Top fixture


base


(3) 1/4”-20 x 7/8”


Self drilling screws


End cap

(refer to step, Stacking Sections). Vertical track alignment is critical. Position flag angle or wall angle between 1-11/16” (43 mm) to 1-3/4” (44 mm) from the edge of the door; tighten the bottom lag screw. Flag angles or wall angles must be parallel to the door sections. Repeat for other side.

Important: the dimension between the flag angles or wall angles must be door width plus 3-3/8” (86mm) to 3-1/2” (89 mm) for smooth, safe door opera- tion.

For Quick Install Track: Complete the vertical track installation by securing the jamb bracket(s) and tightening the other lag screws. Repeat for other side.

For Fully Adjustable track or Riveted Track: Complete the vertical track instal- lation by securing the jamb bracket(s) and tightening the other lag screws. Push the vertical track against the track rollers so that the track rollers are touching the deepest part of the curved side of the track; tighten all the track bolts and nuts. Repeat for other side.

8

Page 8
Image 8
Wayne-Dalton 9800 installation instructions Stacking Sections, Top Section, Top Fixtures, Drawbar Operator Bracket

9800 specifications

Wayne-Dalton is a well-known brand in the garage door industry, offering a wide range of models designed for durability, performance, and aesthetic appeal. Among its most popular series are the 9700, 5000, 8000, 9000, and 9800, each equipped with unique features and advanced technologies to meet diverse customer needs.

The Wayne-Dalton 9700 series is known for its combination of strength and insulation. This garage door is manufactured with a three-layer construction providing robust protection against the elements while offering excellent energy efficiency. The insulated steel construction can help maintain interior temperatures, making it ideal for attached garages.

The 5000 series, on the other hand, is designed for a more traditional look combined with modern performance. Featuring a lightweight design, it is made from durable materials that resist rust and corrosion. The 5000 series can be customized with different colors and styles, allowing homeowners to achieve the perfect aesthetic to enhance their property.

Moving on to the 8000 series, this model is designed for commercial applications and residential use where heavy-duty functions are necessary. It is built to withstand extreme weather conditions while providing optimal security with added strength features. The 8000 series offers smooth operation and minimal maintenance requirements, making it a great choice for those seeking reliability.

The 9000 series stands out with its stylish design and sleek finishes. This series offers advanced insulation options, coupled with numerous panel designs that provide a polished and sophisticated look. The 9000 model emphasizes both aesthetics and energy efficiency, making it a favorite among homeowners looking for a beautiful yet functional garage door.

Lastly, the 9800 series is the premium option within Wayne-Dalton’s offerings. This series is characterized by its high insulation value and thermal efficiency, thanks to its innovative construction techniques. The 9800 doors can be customized with numerous panel options and colors, delivering a luxury look while ensuring excellent performance.

In conclusion, Wayne-Dalton’s 9700, 5000, 8000, 9000, and 9800 series garage doors each feature distinctive characteristics and technologies aimed at enhancing durability, security, and aesthetics. Homeowners can find a reliable option within this range that suits their specific requirements, whether they prioritize insulation, style, or heavy-duty functionality. With Wayne-Dalton’s commitment to quality and innovation, these garage doors stand out in today’s market.