SPECIAL NOTICE: Exposure to vibrations through prolonged use of gasoline powered hand tools could cause blood vessel or nerve damage in the fingers, hands, and joints of people prone to circulation disorders or abnor- mal swellings. Prolonged use in cold weather has been linked to blood vessel damage in otherwise healthy people. If symptoms occur such as numbness, pain, loss of strength, change in skin color or texture, or loss of feel-

ing in the fingers, hands, or joints, discontinue the use of this tool and seek medical attention. An anti-vibration system does not guarantee the avoidance of these problems. Users who operate power tools on a continual and regular basis must monitor closely their physical condition and the condition of this tool.

SAVE THESE INSTRUCTIONS

ASSEMBLY

CARTON CONTENTS

Check carton contents for the following:

SBrushcutter attachment S Handlebar

S Handlebar mounting bracket for 1shaft S Handlebar mounting bracket for 7/8shaft S Bracket cover (2)

S Shoulder strap

S Upper shoulder strap clamp

S Lower shoulder strap clamp (with spacer tabs)

S Handlebar bracket screws (4)

S Shoulder strap clamp screws (2) S Attachment hanger

S Hex wrench

WARNING: If received assembled, re- peat all steps to ensure your unit is properly as- sembled and all fasteners are secure.

Examine parts for damage. Do not use dam- aged parts.

NOTE: If you need assistance or find that parts are missing or damaged, call 1-800-554-6723.

TOOLS REQUIRED

SHex wrench (provided)

INSTALLING BRUSHCUTTER AT- TACHMENT

CAUTION: When removing or installing at- tachments, place the unit on a flat surface for stability.

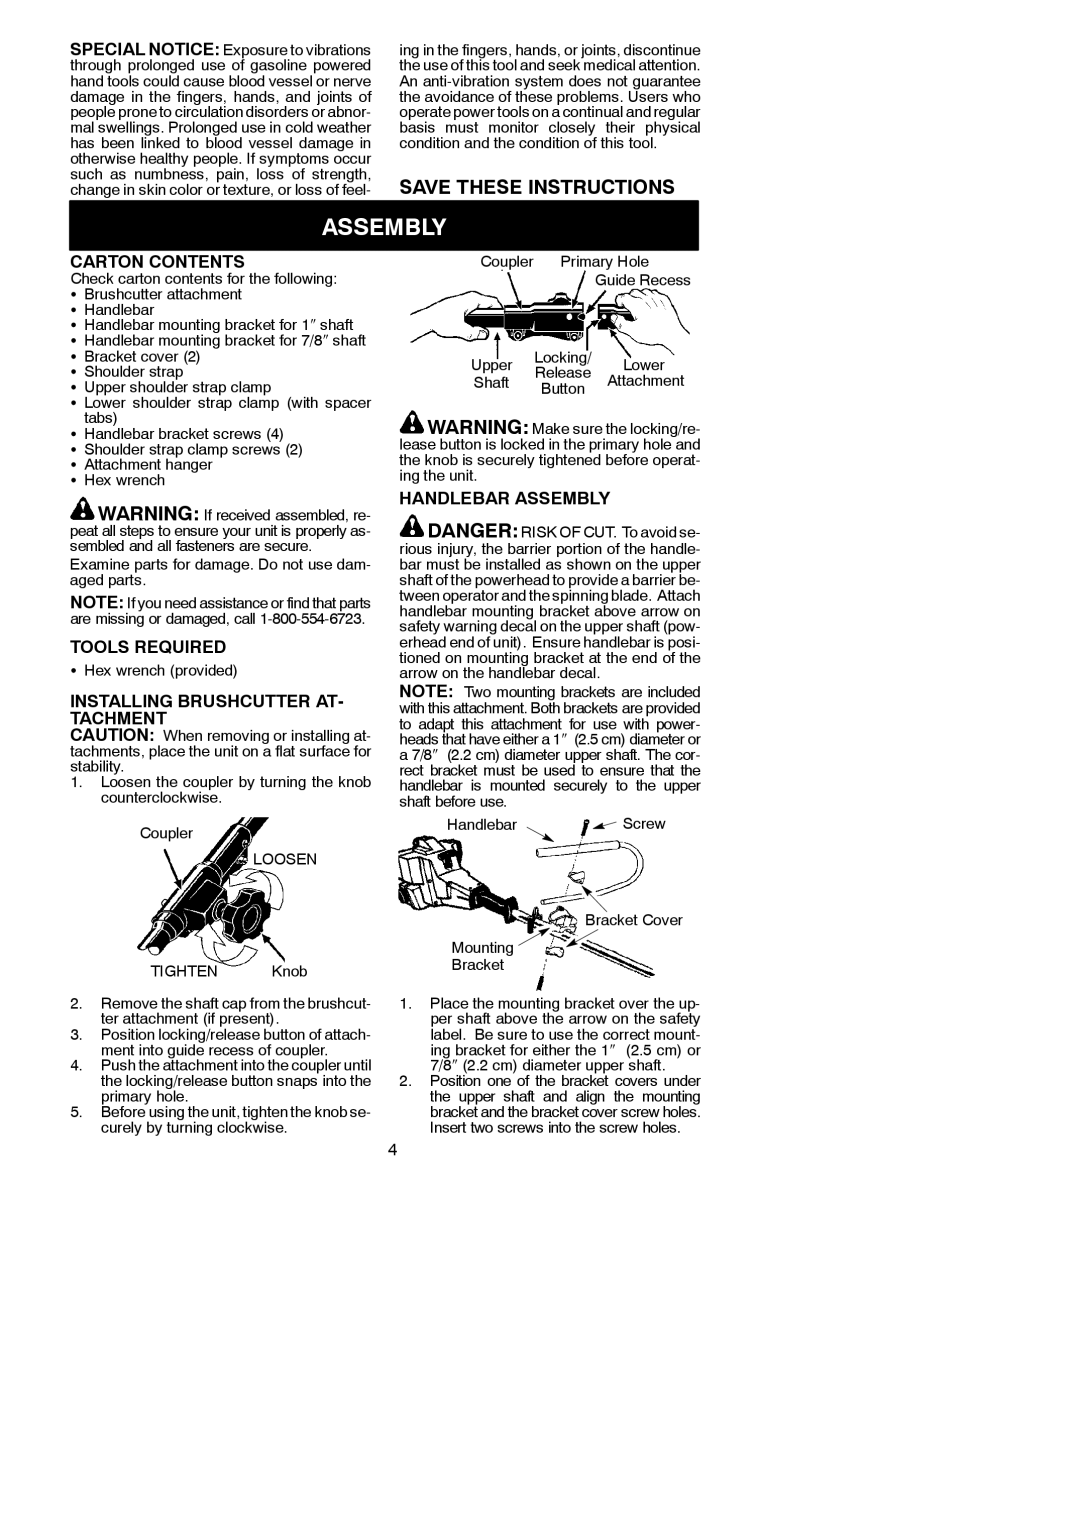
1.Loosen the coupler by turning the knob counterclockwise.

Coupler

LOOSEN

TIGHTEN Knob

2.Remove the shaft cap from the brushcut- ter attachment (if present).

3.Position locking/release button of attach- ment into guide recess of coupler.

4.Push the attachment into the coupler until the locking/release button snaps into the primary hole.

5.Before using the unit, tighten the knob se- curely by turning clockwise.

Coupler

Primary Hole


Guide Recess

Upper

Locking/

Lower

Release

Shaft

Attachment


Button


WARNING: Make sure the locking/re- lease button is locked in the primary hole and the knob is securely tightened before operat- ing the unit.

HANDLEBAR ASSEMBLY

DANGER: RISK OF CUT. To avoid se- rious injury, the barrier portion of the handle- bar must be installed as shown on the upper shaft of the powerhead to provide a barrier be- tween operator and the spinning blade. Attach handlebar mounting bracket above arrow on safety warning decal on the upper shaft (pow- erhead end of unit). Ensure handlebar is posi- tioned on mounting bracket at the end of the arrow on the handlebar decal.

NOTE: Two mounting brackets are included with this attachment. Both brackets are provided to adapt this attachment for use with power- heads that have either a 1(2.5 cm) diameter or a 7/8(2.2 cm) diameter upper shaft. The cor- rect bracket must be used to ensure that the handlebar is mounted securely to the upper shaft before use.

Handlebar Screw

Bracket Cover

Mounting

Bracket

1.Place the mounting bracket over the up- per shaft above the arrow on the safety label. Be sure to use the correct mount- ing bracket for either the 1(2.5 cm) or 7/8(2.2 cm) diameter upper shaft.

2.Position one of the bracket covers under the upper shaft and align the mounting bracket and the bracket cover screw holes. Insert two screws into the screw holes.

4

Page 4
Image 4
Weed Eater 530164835 Carton Contents, Tools Required, Installing Brushcutter AT- Tachment, Handlebar Assembly

530164835 specifications

The Weed Eater 530164835 is a versatile and reliable tool designed to tackle the challenges of maintaining a pristine lawn and garden. This grass trimmer is known for its ease of use, lightweight design, and powerful performance, making it an ideal choice for both homeowners and professional landscapers.

One of the standout features of the Weed Eater 530164835 is its powerful engine, which delivers efficient cutting power to handle a variety of vegetation. The engine is designed to provide consistent performance, allowing users to trim grass, weeds, and overgrown areas with ease. This makes it suitable for a range of applications, from shaping edges around flower beds to clearing thick underbrush.

A key technology employed in the design of the Weed Eater 530164835 is its automatic line feed system. This innovative feature ensures that the trimmer's cutting line is dispensed seamlessly as needed, allowing for uninterrupted operation. This technology eliminates the need for manual adjustments, saving time and enhancing user convenience.

The lightweight construction of the Weed Eater 530164835 further enhances its usability. Weighing in at a manageable level, this trimmer allows users to maneuver it with ease, reducing fatigue even during extended use. The ergonomic handle design also contributes to comfort, providing a secure grip that helps maintain control while trimming.

Another notable characteristic of the Weed Eater 530164835 is its adjustable cutting width. Users can customize the trimmer's cutting path to suit their specific needs, ensuring optimal efficiency for different tasks. This flexibility is particularly beneficial when transitioning from trimming smaller areas to tackling larger, more open spaces.

Durability is also a hallmark of the Weed Eater 530164835. Constructed with high-quality materials, this trimmer is built to withstand the rigors of regular use. Its design incorporates features that protect against wear and tear, ensuring longevity and reliable performance over time.

In conclusion, the Weed Eater 530164835 is a well-rounded grass trimmer that combines power, technology, and user-friendly features. Whether maintaining a small yard or managing larger landscaping projects, this tool offers the performance and reliability needed to achieve a well-groomed outdoor space. With its automatic line feed, adjustable cutting width, and comfortable design, it stands out as a quality choice for anyone looking to keep their garden in top shape.