3.Secure the mounting bracket by tighten- ing the screws with the hex wrench.

4.Locate the decal on the handlebar. This decal includes an arrow. Position the handlebar with the mounting bracket at the end of the arrow.

5.Position the second bracket cover over the handlebar. Align the mounting brack- et and the bracket cover screw holes. Again make sure the handlebar is at the end of the arrow.

6.Insert two screws and hand tighten only. Be sure the handlebar is installed cor- rectly; then, tighten each screw securely with the hex wrench.

SHOULDER STRAP ASSEMBLY

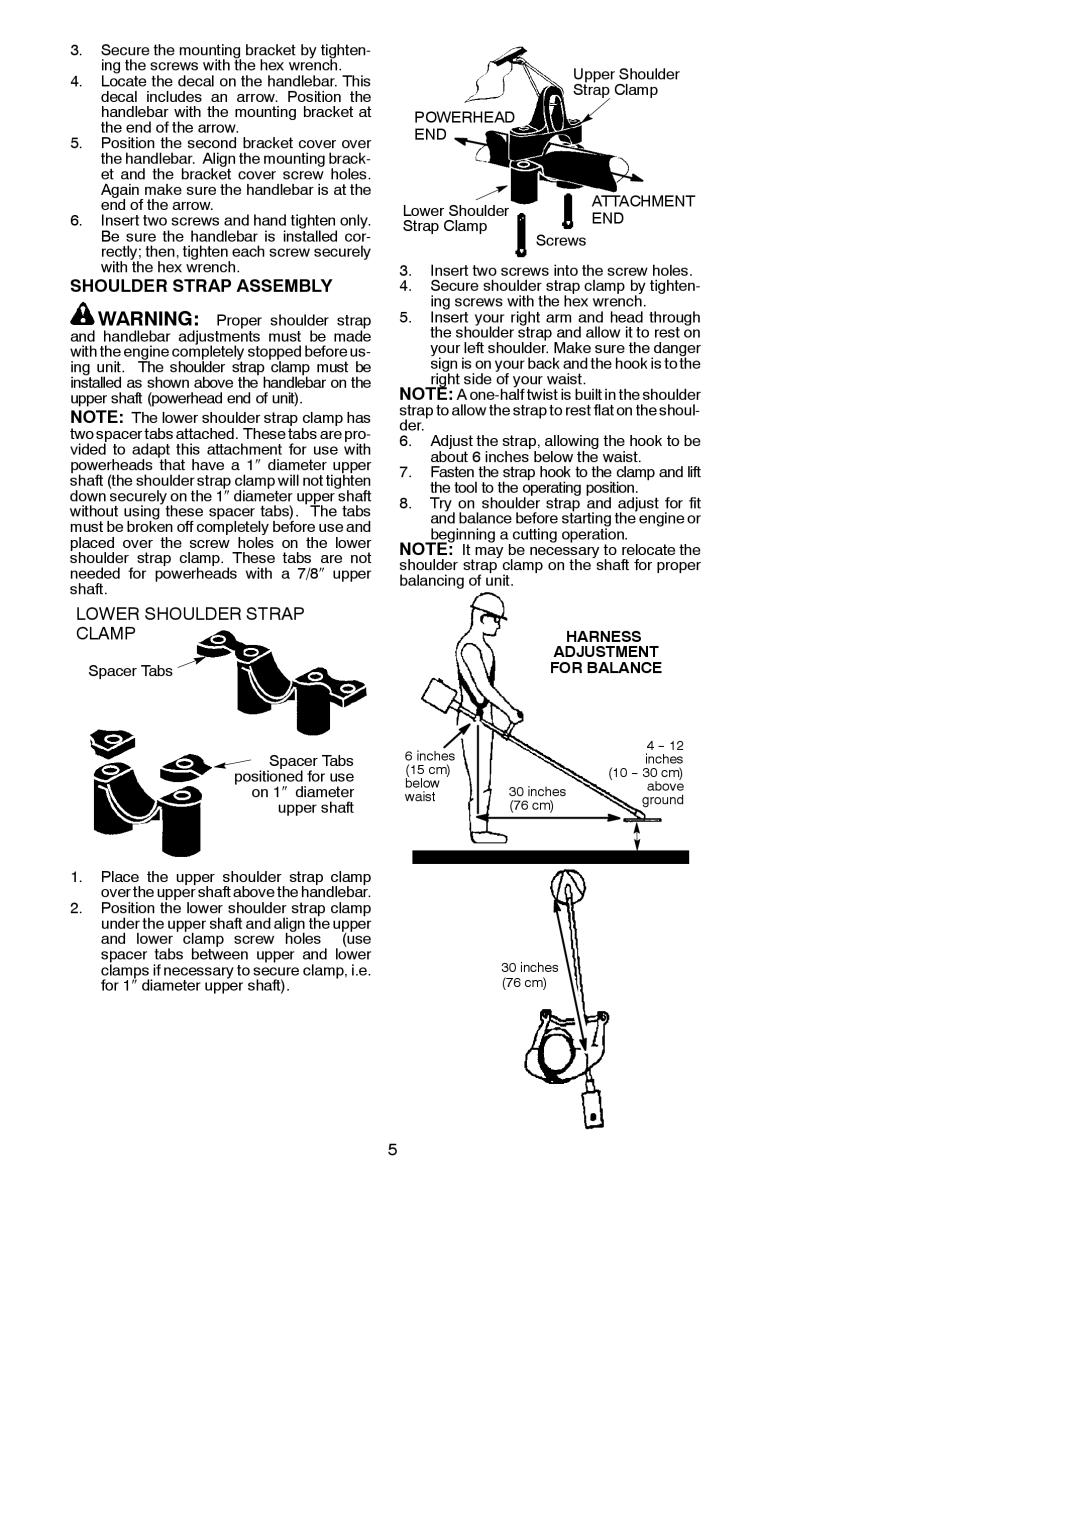
WARNING: Proper shoulder strap and handlebar adjustments must be made with the engine completely stopped before us- ing unit. The shoulder strap clamp must be installed as shown above the handlebar on the upper shaft (powerhead end of unit).

NOTE: The lower shoulder strap clamp has two spacer tabs attached. These tabs are pro- vided to adapt this attachment for use with powerheads that have a 1diameter upper shaft (the shoulder strap clamp will not tighten down securely on the 1diameter upper shaft without using these spacer tabs). The tabs must be broken off completely before use and placed over the screw holes on the lower shoulder strap clamp. These tabs are not needed for powerheads with a 7/8upper shaft.

LOWER SHOULDER STRAP CLAMP

Spacer Tabs

Upper Shoulder

Strap Clamp

POWERHEAD

END

Lower Shoulder

ATTACHMENT

END

Strap Clamp

Screws


3.Insert two screws into the screw holes.

4.Secure shoulder strap clamp by tighten- ing screws with the hex wrench.

5.Insert your right arm and head through the shoulder strap and allow it to rest on your left shoulder. Make sure the danger sign is on your back and the hook is to the

right side of your waist.

NOTE: A one-half twist is built in the shoulder strap to allow the strap to rest flat on the shoul- der.

6.Adjust the strap, allowing the hook to be about 6 inches below the waist.

7.Fasten the strap hook to the clamp and lift the tool to the operating position.

8.Try on shoulder strap and adjust for fit and balance before starting the engine or

beginning a cutting operation.

NOTE: It may be necessary to relocate the shoulder strap clamp on the shaft for proper balancing of unit.

HARNESS

ADJUSTMENT

FOR BALANCE

Spacer Tabs positioned for use on 1diameter upper shaft

1.Place the upper shoulder strap clamp over the upper shaft above the handlebar.

2.Position the lower shoulder strap clamp under the upper shaft and align the upper and lower clamp screw holes (use spacer tabs between upper and lower clamps if necessary to secure clamp, i.e. for 1diameter upper shaft).

6inches (15 cm) below waist


4 -- 12


inches


(10 -- 30 cm)

30 inches


above


ground

(76 cm)


30inches

(76 cm)

5

Page 5
Image 5
Weed Eater 530164835 instruction manual Shoulder Strap Assembly, Powerhead END

530164835 specifications

The Weed Eater 530164835 is a versatile and reliable tool designed to tackle the challenges of maintaining a pristine lawn and garden. This grass trimmer is known for its ease of use, lightweight design, and powerful performance, making it an ideal choice for both homeowners and professional landscapers.

One of the standout features of the Weed Eater 530164835 is its powerful engine, which delivers efficient cutting power to handle a variety of vegetation. The engine is designed to provide consistent performance, allowing users to trim grass, weeds, and overgrown areas with ease. This makes it suitable for a range of applications, from shaping edges around flower beds to clearing thick underbrush.

A key technology employed in the design of the Weed Eater 530164835 is its automatic line feed system. This innovative feature ensures that the trimmer's cutting line is dispensed seamlessly as needed, allowing for uninterrupted operation. This technology eliminates the need for manual adjustments, saving time and enhancing user convenience.

The lightweight construction of the Weed Eater 530164835 further enhances its usability. Weighing in at a manageable level, this trimmer allows users to maneuver it with ease, reducing fatigue even during extended use. The ergonomic handle design also contributes to comfort, providing a secure grip that helps maintain control while trimming.

Another notable characteristic of the Weed Eater 530164835 is its adjustable cutting width. Users can customize the trimmer's cutting path to suit their specific needs, ensuring optimal efficiency for different tasks. This flexibility is particularly beneficial when transitioning from trimming smaller areas to tackling larger, more open spaces.

Durability is also a hallmark of the Weed Eater 530164835. Constructed with high-quality materials, this trimmer is built to withstand the rigors of regular use. Its design incorporates features that protect against wear and tear, ensuring longevity and reliable performance over time.

In conclusion, the Weed Eater 530164835 is a well-rounded grass trimmer that combines power, technology, and user-friendly features. Whether maintaining a small yard or managing larger landscaping projects, this tool offers the performance and reliability needed to achieve a well-groomed outdoor space. With its automatic line feed, adjustable cutting width, and comfortable design, it stands out as a quality choice for anyone looking to keep their garden in top shape.