ASSEMBLY

WARNING: Stop the unit and dis- connect from the power source before opening the inlet cover or attempting to in- sert or remove the inlet restrictor, blower tube, or vacuum tubes. The motor must be stopped and the impeller blades no longer turning to avoid serious injury from the rotating blades.

WARNING: If received assembled, ensure your unit is properly assembled and all fasteners are secure.

SA standard screwdriver is required for as- sembly.

BLOWER ASSEMBLY

NOTE: Assembly instructions for using your unit as a vacuum follow this section.

Attaching the blower tube

If you have already assembled your unit for use as a vacuum, refer to the section

HOW TO CONVERT UNIT FROM VACUUM USE TO BLOWER USE.

To attach blower tube:

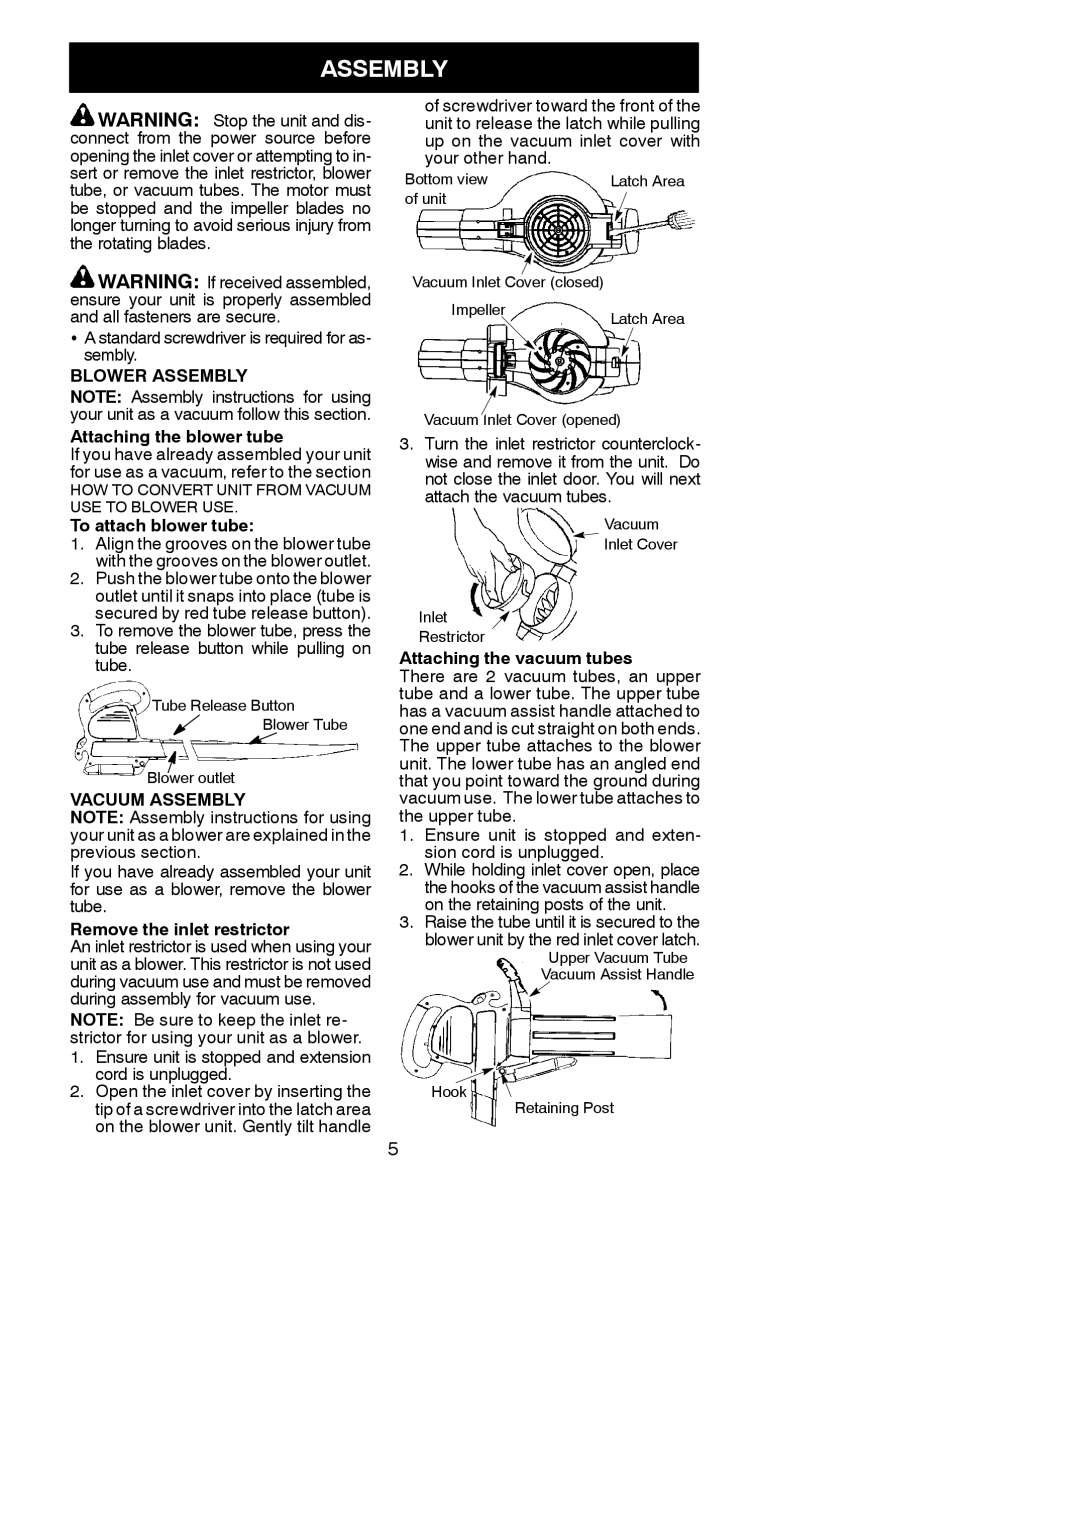
1.Align the grooves on the blower tube with the grooves on the blower outlet.

2.Push the blower tube onto the blower outlet until it snaps into place (tube is secured by red tube release button).

3.To remove the blower tube, press the tube release button while pulling on tube.

Tube Release Button

Blower Tube

Blower outlet

VACUUM ASSEMBLY

NOTE: Assembly instructions for using your unit as a blower are explained in the previous section.

If you have already assembled your unit for use as a blower, remove the blower tube.

Remove the inlet restrictor

An inlet restrictor is used when using your unit as a blower. This restrictor is not used during vacuum use and must be removed during assembly for vacuum use.

NOTE: Be sure to keep the inlet re- strictor for using your unit as a blower.

1.Ensure unit is stopped and extension cord is unplugged.

2.Open the inlet cover by inserting the tip of a screwdriver into the latch area on the blower unit. Gently tilt handle

of screwdriver toward the front of the unit to release the latch while pulling up on the vacuum inlet cover with your other hand.

Bottom view

Latch Area

of unit


Vacuum Inlet Cover (closed)


Impeller

Latch Area


Vacuum Inlet Cover (opened)

3.Turn the inlet restrictor counterclock- wise and remove it from the unit. Do not close the inlet door. You will next attach the vacuum tubes.

Vacuum

Inlet Cover

Inlet

Restrictor

Attaching the vacuum tubes

There are 2 vacuum tubes, an upper tube and a lower tube. The upper tube has a vacuum assist handle attached to one end and is cut straight on both ends. The upper tube attaches to the blower unit. The lower tube has an angled end that you point toward the ground during vacuum use. The lower tube attaches to the upper tube.

1.Ensure unit is stopped and exten- sion cord is unplugged.

2.While holding inlet cover open, place the hooks of the vacuum assist handle on the retaining posts of the unit.

3.Raise the tube until it is secured to the blower unit by the red inlet cover latch.

Upper Vacuum Tube Vacuum Assist Handle

Hook

Retaining Post

5

Page 5
Image 5
Weed Eater 952711474 Standard screwdriver is required for as- sembly, Blower Assembly, Vacuum Assembly

952711474 specifications

The Weed Eater 952711474 is a remarkable tool that has revolutionized lawn maintenance for both homeowners and professional landscapers. Known for its efficiency and innovative features, this string trimmer stands out in the market, making it an essential gardening companion.

One of the main features of the Weed Eater 952711474 is its lightweight design. Weighing just around 10 pounds, this trimmer is easy to maneuver, allowing users to trim grass and weeds effortlessly over large areas without causing fatigue. Its adjustable handle ensures comfort during operation, accommodating users of various heights and preferences.

Equipped with a powerful 25cc gas engine, the Weed Eater 952711474 delivers high performance, ensuring effective cutting through thick grass and overgrown weeds. The engine provides ample power while maintaining fuel efficiency, allowing for extended work time without frequent refueling. This is particularly beneficial for larger lawns or more extensive landscaping projects.

The trimmer also features a dual-line feed system, which allows for a wider cutting path and quicker completion of trimming tasks. The easy-to-load spool makes string replacement a breeze, minimizing downtime and enabling users to get back to work quickly. The automatic line advancement technology further enhances efficiency, ensuring that the cutting line only advances when needed, reducing waste and saving money.

Another significant characteristic of the Weed Eater 952711474 is its versatility. It comes with a variety of compatible attachments, allowing users to convert the trimmer into different gardening tools such as edgers or pruners. This adaptability makes it a valuable investment for maintaining a well-groomed landscape.

The ergonomic design of the Weed Eater 952711474 promotes ease of use, with a comfortable grip and an easily adjustable shaft for reaching tight spaces. Additionally, it has anti-vibration technology that reduces fatigue during prolonged use, enhancing overall user experience.

In summary, the Weed Eater 952711474 is a standout choice for anyone seeking an efficient and user-friendly string trimmer. With a combination of lightweight construction, powerful engine, dual-line feed system, and versatile attachment options, it delivers exceptional performance for all your trimming needs, making lawn care a more enjoyable task.