Avertissement
English Español Français
Advertencia
Weed Eater
Identification of Safety Symbols
Identification of Safety Symbols
Operator Safety
Safety Rules
Starting symbols
Unit / Maintenance Safety
Cutting Safety
Assembly
Fuel Safety
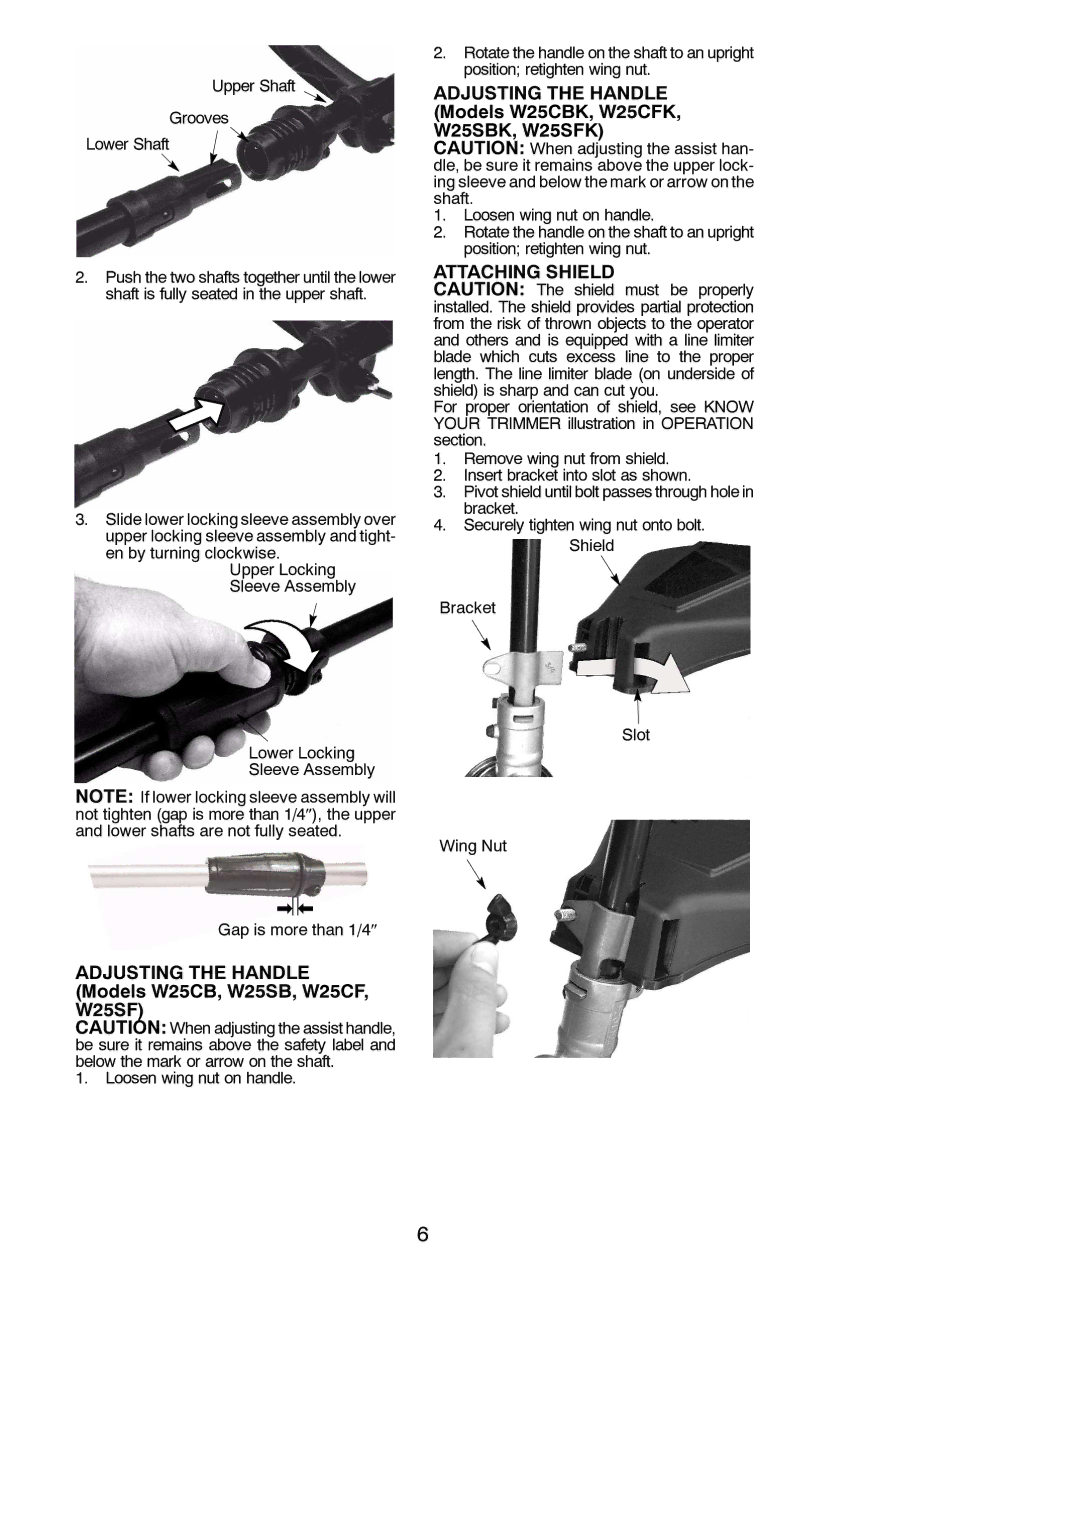
Shaft Assembly Models W25CBK, W25CFK, W25SBK, W25SFK
Adjusting the Handle Models W25CB, W25SB, W25CF, W25SF
Adjusting the Handle Models W25CBK, W25CFK, W25SBK, W25SFK
Attaching Shield
Operation
Helpful TIP
Starting a HOT Engine
HOW to Stop Your Unit
HOW to Start Your Unit
Starting a Flooded Engine
Trimmer Line Advance
Operating Instructions
Operating Positions
Cutting Methods
Maintenance
Check for Loose Fasteners and Parts
Check for Damaged or Worn Parts
Service and Adjustments
Idle Speed Adjustment
Models W25CF, W25SF, W25CFK, W25SFK
Fuel System
Storage
Seasonal Storage
Engine
Limited Warranty
Troubleshooting Table Cause Remedy
Weed Eater
Page
Advertencia
Identificación DE LOS Símbolos DE Seguridad
Identificación DE LOS Símbolos DE Seguridad
Seguridad DEL Usuario
Symboles de arranque
Reglas DE Seguridad
Seguridad DEL Aparato Y EN EL Mantenimiento
Transporte Y Almacenamiento
Seguridad CON EL Combustible
Seguridad AL Cortar
Aviso DE Seguridad El estar expuesto
Ajuste DEL Mango
Montaje
Montaje DEL EJE Modelos W25CBK, W25CFK, W25SBK, W25SFK
Modelos W25CB, W25SB, W25CF, W25SF
Page
USO
Informacion Util
Advertencia El cabezal de
Para Detener EL Motor
Para Poner EN Marcha EL Motor
Modelos W25SB, W25SF, W25SBK, W25SFK
Instrucciones DE USO
Posiciones DE USO
Para Arrancar CON EL Motor Caliente
Metodos DE Corte
Avanzará aproximadamente 5 cm 2 pulga- das
Para Recortar Cm 3 pulga- das del suelo
Mantenimiento
Advertencia Desconecte la
Cambie LA Bujia
Servicio Y Ajustes
Silenciador Y LA Rejilla ANTI- Chispas
Reemplazo DE LA Linea Modelos W25CB, W25SB, W25CBK, W25SBK
Reemplazo DE LA Linea Modelos W25CF, W25SF, W25CFK, W25SFK
Ajuste DE LA Marcha Lenta
Sistema DE Combustible
Almacenaje
Estacional Almacenaje
Interior DEL Motor
Tabla Diagnostica
Limpie o cambie la bujía y calibre
Falta El carburador requiere La separación Potencia o
Garantia Limitada
Matheson Blvd. West Mississauga, Ontario L5V 0B4
Page
800--805--5523, emission.warranty@ HCOP--emission.com
ZAS DE Control DE Emision Garanti
Identification DES Symboles DE Sécurité
Bottes et des gants
Identification DES Symboles DE Sécurité
Avertissement N’employez ja
Régles DE Sécurité
Avertissement Lorsque vous
Sécurité DE L’UTILISATEUR
Sécurité Pendant DE Coupage
Avertissement Inspectez
Sécurité DU Carburant
Transport ET Entreposage
Réglage DU Poignée Models W25CB, W25SB, W25CF, W25SF
Montage
Montage DE L’AXE Modèles W25CBK, W25CFK, W25SBK, W25SFK
Réglage DU Poignée Models W25CBK, W25CFK, W25SBK, W25SFK
Utilisation
FAMILIARISEZ-VOUS Avec Votre Appareil
Renseignements Utiles
Avertissement Avant de
Avertissement Enlevez le ca
Avertissement La tête de
Positions D’UTILISATION
Instructions D’UTILISATION
Démarrage D’UN Moteur Noyé
Démarrage D’UN Moteur Chaud
Avertissement Utilisez la
Avertissement Portez toujours
Avertissement Pour les mod
Avance DU FIL DE Coupe Modèles W25CB, W25SB, W25CBK, W25SBK
Entretien
Avertissement Débranchez
Remplacement DE LA Bougie
Réparations ET Réglages
Silencieux ET Écran DU PARE-ÉTINCELLES
Avertissement Ne laisser per
Réglage DU Ralenti
Enlevez le tournevis
Saisonnière Rangement
Autres Recommandations
Rangement
Système DE Carburant
Tableau DE Dépannage
Problème Cause Remedy
Charge Compression basse
Garantie Limitée
800--554--6723 Au Canada, contactez
Page