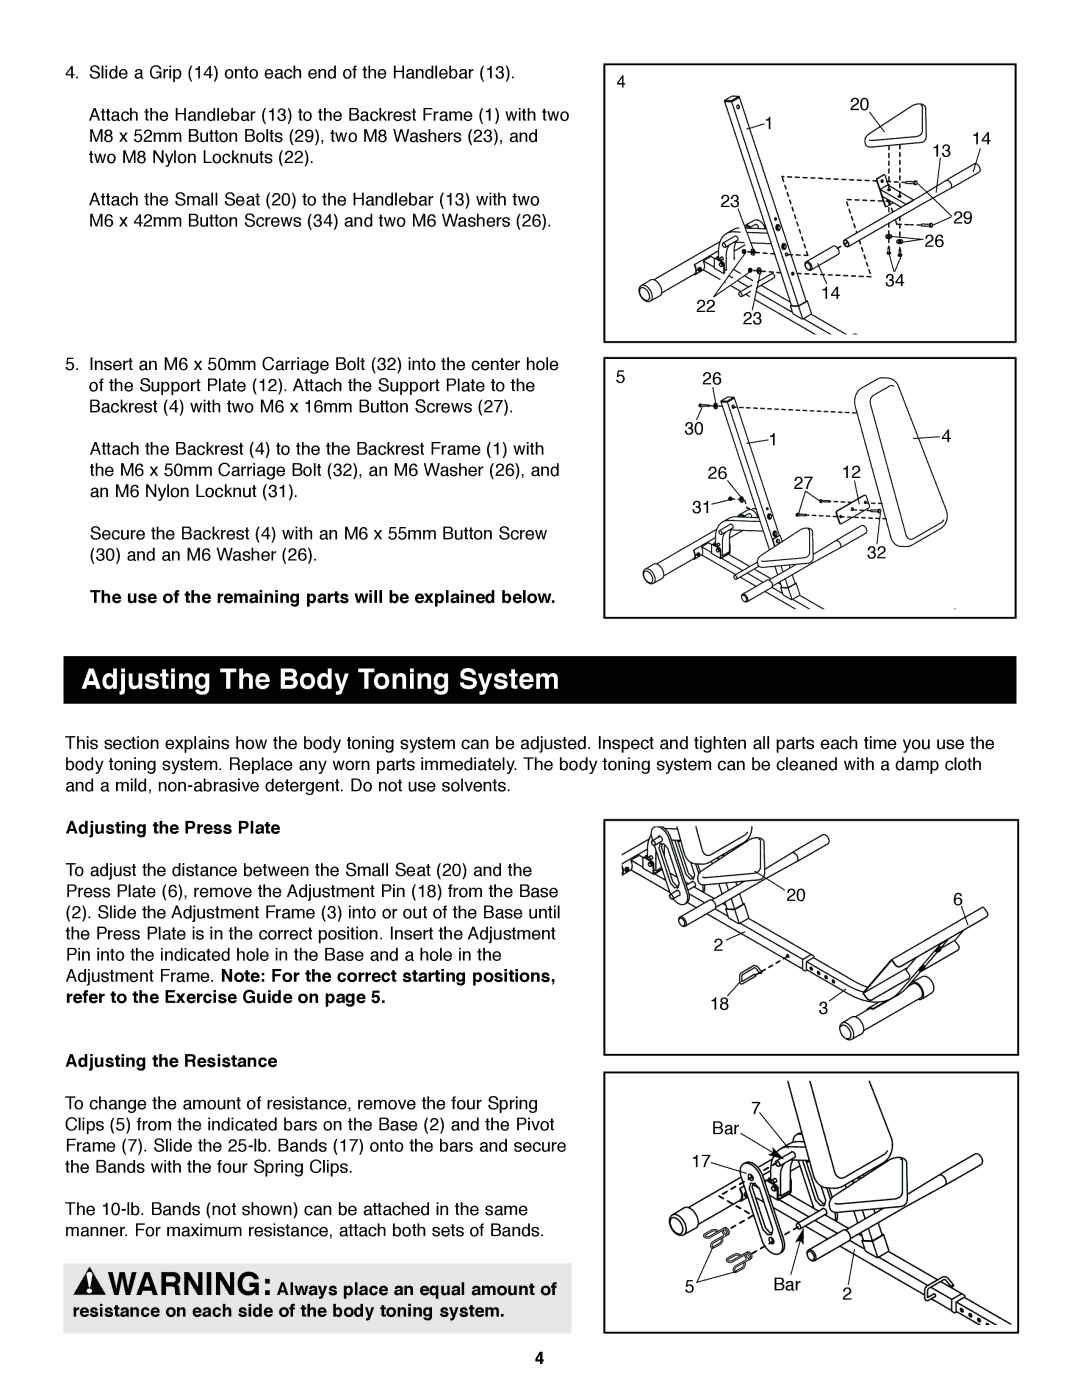
4.Slide a Grip (14) onto each end of the Handlebar (13).
Attach the Handlebar (13) to the Backrest Frame (1) with two M8 x 52mm Button Bolts (29), two M8 Washers (23), and two M8 Nylon Locknuts (22).
Attach the Small Seat (20) to the Handlebar (13) with two M6 x 42mm Button Screws (34) and two M6 Washers (26).
5.Insert an M6 x 50mm Carriage Bolt (32) into the center hole of the Support Plate (12). Attach the Support Plate to the Backrest (4) with two M6 x 16mm Button Screws (27).
Attach the Backrest (4) to the the Backrest Frame (1) with the M6 x 50mm Carriage Bolt (32), an M6 Washer (26), and an M6 Nylon Locknut (31).
Secure the Backrest (4) with an M6 x 55mm Button Screw (30) and an M6 Washer (26).
The use of the remaining parts will be explained below.
4 |
|
|
|
|
|
|
| 1 |
| 20 |
|
|
|
|
| 14 | |
|
|
|
| 13 | |
|
|
|
|
| |
| 23 |
|
|
| 29 |
|
|
|
|
| |
|
|
|
| 26 |
|
|
|
|
| 34 |
|
| 22 |
|
| 14 |
|
| 23 |
|
|
| |
|
|
|
|
| |
5 | 26 |
|
|
|
|
| 30 | 1 |
| 4 |
|
|
|
|
| ||
| 26 |
| 27 | 12 |
|
|
|
|
|
| |
| 31 |
|
|
|
|
|
|
|
| 32 |
|
Adjusting The Body Toning System
This section explains how the body toning system can be adjusted. Inspect and tighten all parts each time you use the body toning system. Replace any worn parts immediately. The body toning system can be cleaned with a damp cloth and a mild,
Adjusting the Press Plate
To adjust the distance between the Small Seat (20) and the Press Plate (6), remove the Adjustment Pin (18) from the Base
(2). Slide the Adjustment Frame (3) into or out of the Base until the Press Plate is in the correct position. Insert the Adjustment Pin into the indicated hole in the Base and a hole in the Adjustment Frame. Note: For the correct starting positions, refer to the Exercise Guide on page 5.
Adjusting the Resistance
To change the amount of resistance, remove the four Spring Clips (5) from the indicated bars on the Base (2) and the Pivot Frame (7). Slide the
The
![]() WARNING: Always place an equal amount of resistance on each side of the body toning system.
WARNING: Always place an equal amount of resistance on each side of the body toning system.
20 | 6 |
2 |
|
18 | 3 |
7 |
|
Bar |
|
17 |
|
5 | Bar | 2 |
|
|
4
