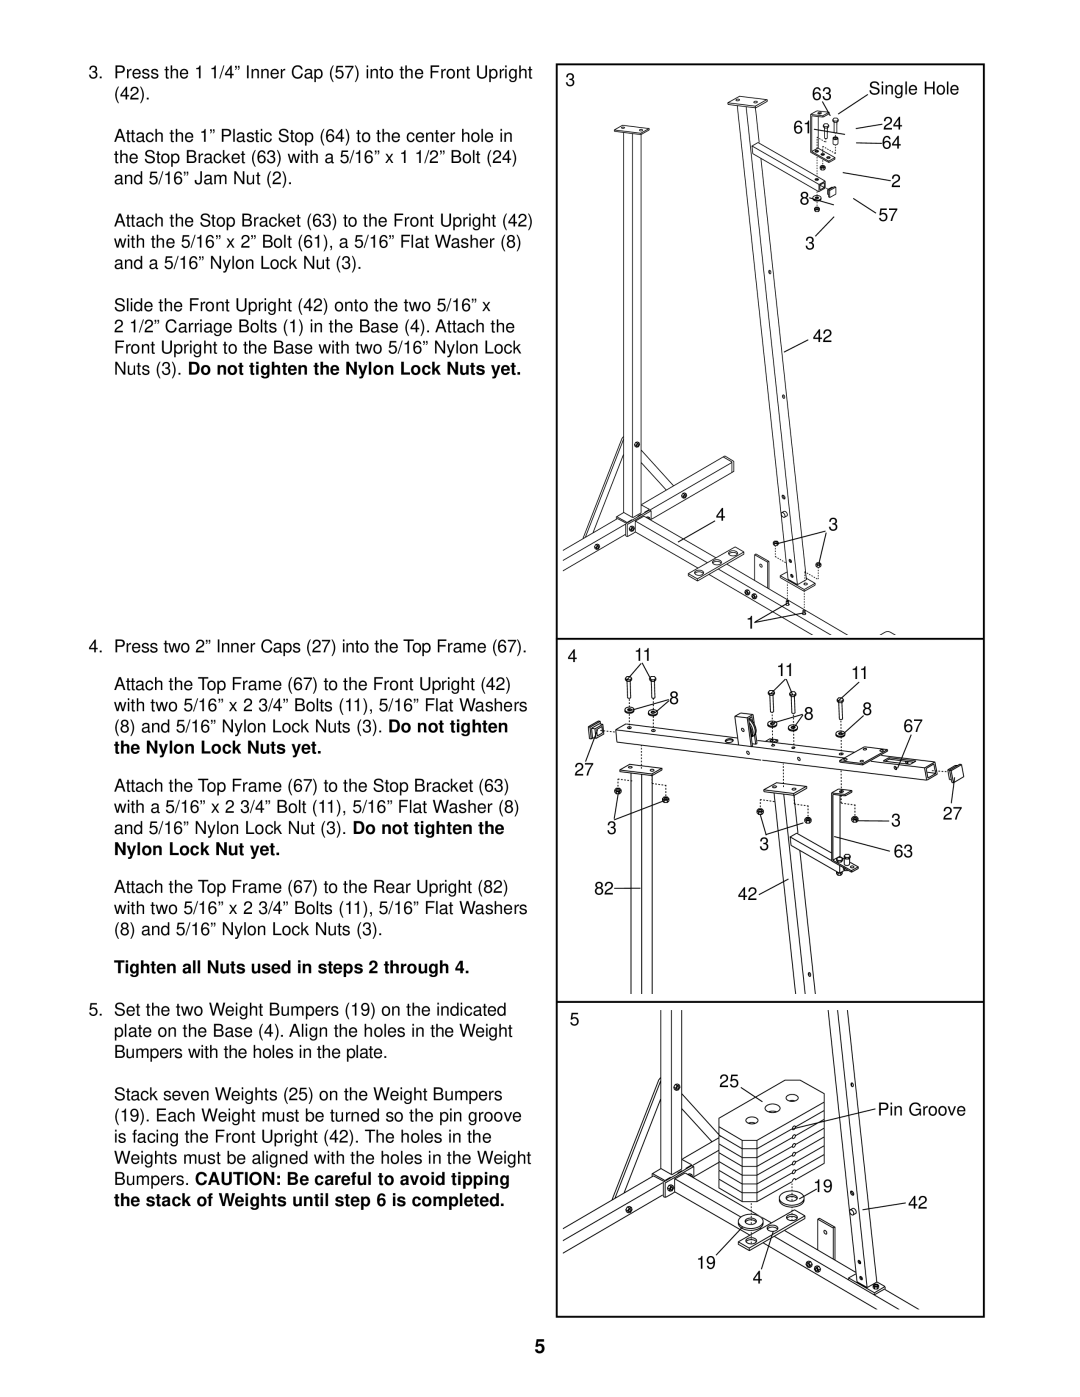
3. Press the 1 1/4” Inner Cap (57) into the Front Upright | 3 |
|
|
| Single Hole |
| |||
(42). |
|
|
|
|
| 63 |
| ||
|
|
|
|
|
|
| |||
Attach the 1” Plastic Stop (64) to the center hole in |
|
|
| 61 | 24 |
| |||
|
|
|
| 64 |
| ||||
the Stop Bracket (63) with a 5/16” x 1 1/2” Bolt (24) |
|
|
|
|
| ||||
|
|
|
|
|
| ||||
and 5/16” Jam Nut (2). |
|
|
|
|
| 8 | 2 |
| |
|
|
|
|
|
|
| 57 |
| |
Attach the Stop Bracket (63) to the Front Upright (42) |
|
|
|
|
| ||||
|
|
|
|
|
| ||||
with the 5/16” x 2” Bolt (61), a 5/16” Flat Washer (8) |
|
|
| 3 |
|
| |||
and a 5/16” Nylon Lock Nut (3). |
|
|
|
|
|
|
|
| |
Slide the Front Upright (42) onto the two 5/16” x |
|
|
|
|
|
| |||
2 1/2” Carriage Bolts (1) in the Base (4). Attach the |
|
|
| 42 |
|
| |||
Front Upright to the Base with two 5/16” Nylon Lock |
|
|
|
|
| ||||
|
|
|
|
|
| ||||
Nuts (3).Do not tighten the Nylon Lock Nuts yet. |
|
|
|
|
|
| |||
|
|
|
|
|
| 4 | 3 |
|
|
|
|
|
|
|
|
|
|
| |
|
|
|
|
|
|
| 1 |
|
|
4. Press two 2” Inner Caps (27) into the Top Frame (67). | 4 |
| 11 |
|
|
| |||
|
|
|
|
| 11 | 11 |
| ||
Attach the Top Frame (67) to the Front Upright (42) |
|
|
|
| |||||
|
| 8 |
|
|
| ||||
with two 5/16” x 2 3/4” Bolts (11), 5/16” Flat Washers |
|
| 8 | 8 |
| ||||
|
|
|
| ||||||
(8) and 5/16” Nylon Lock Nuts (3). | Do not tighten |
|
|
|
| 67 |
| ||
the Nylon Lock Nuts yet. |
|
|
|
|
|
|
|
| |
Attach the Top Frame (67) to the Stop Bracket (63) | 27 |
|
|
|
|
| |||
|
|
|
|
|
| ||||
with a 5/16” x 2 3/4” Bolt (11), 5/16” Flat Washer (8) |
|
|
|
| 3 | 27 | |||
and 5/16” Nylon Lock Nut (3). | Do not tighten the |
|
| 3 |
| ||||
|
|
|
| ||||||
|
| 3 |
|
| |||||
Nylon Lock Nut yet. |
|
|
|
|
| 63 |
| ||
Attach the Top Frame (67) to the Rear Upright (82) |
| 82 |
| 42 |
|
| |||
with two 5/16” x 2 3/4” Bolts (11), 5/16” Flat Washers |
|
|
|
|
| ||||
|
|
|
|
|
| ||||
(8) and 5/16” Nylon Lock Nuts (3). |
|
|
|
|
|
|
| ||
Tighten all Nuts used in steps 2 through 4. |
|
|
|
|
|
|
|
| |
5. Set the two Weight Bumpers (19) on the indicated | 5 |
|
|
|
|
| |||
plate on the Base (4). Align the holes in the Weight |
|
|
|
|
| ||||
|
|
|
|
|
| ||||
Bumpers with the holes in the plate. |
|
|
|
|
|
|
| ||
Stack seven Weights (25) on the Weight Bumpers |
|
| 25 |
|
|
| |||
|
|
|
| Pin Groove |
| ||||
(19). Each Weight must be turned so the pin groove |
|
|
|
|
| ||||
|
|
|
|
|
| ||||
is facing the Front Upright (42). The holes in the |
|
|
|
|
|
| |||
Weights must be aligned with the holes in the Weight |
|
|
|
|
|
| |||
Bumpers. | CAUTION: Be careful to avoid tipping |
|
|
|
| 19 |
|
| |
the stack of Weights until step 6 is completed. |
|
|
|
| 42 |
| |||
|
|
|
|
|
| ||||
|
|
|
|
|
| 19 | 4 |
|
|
|
|
|
|
|
|
|
|
| |
5