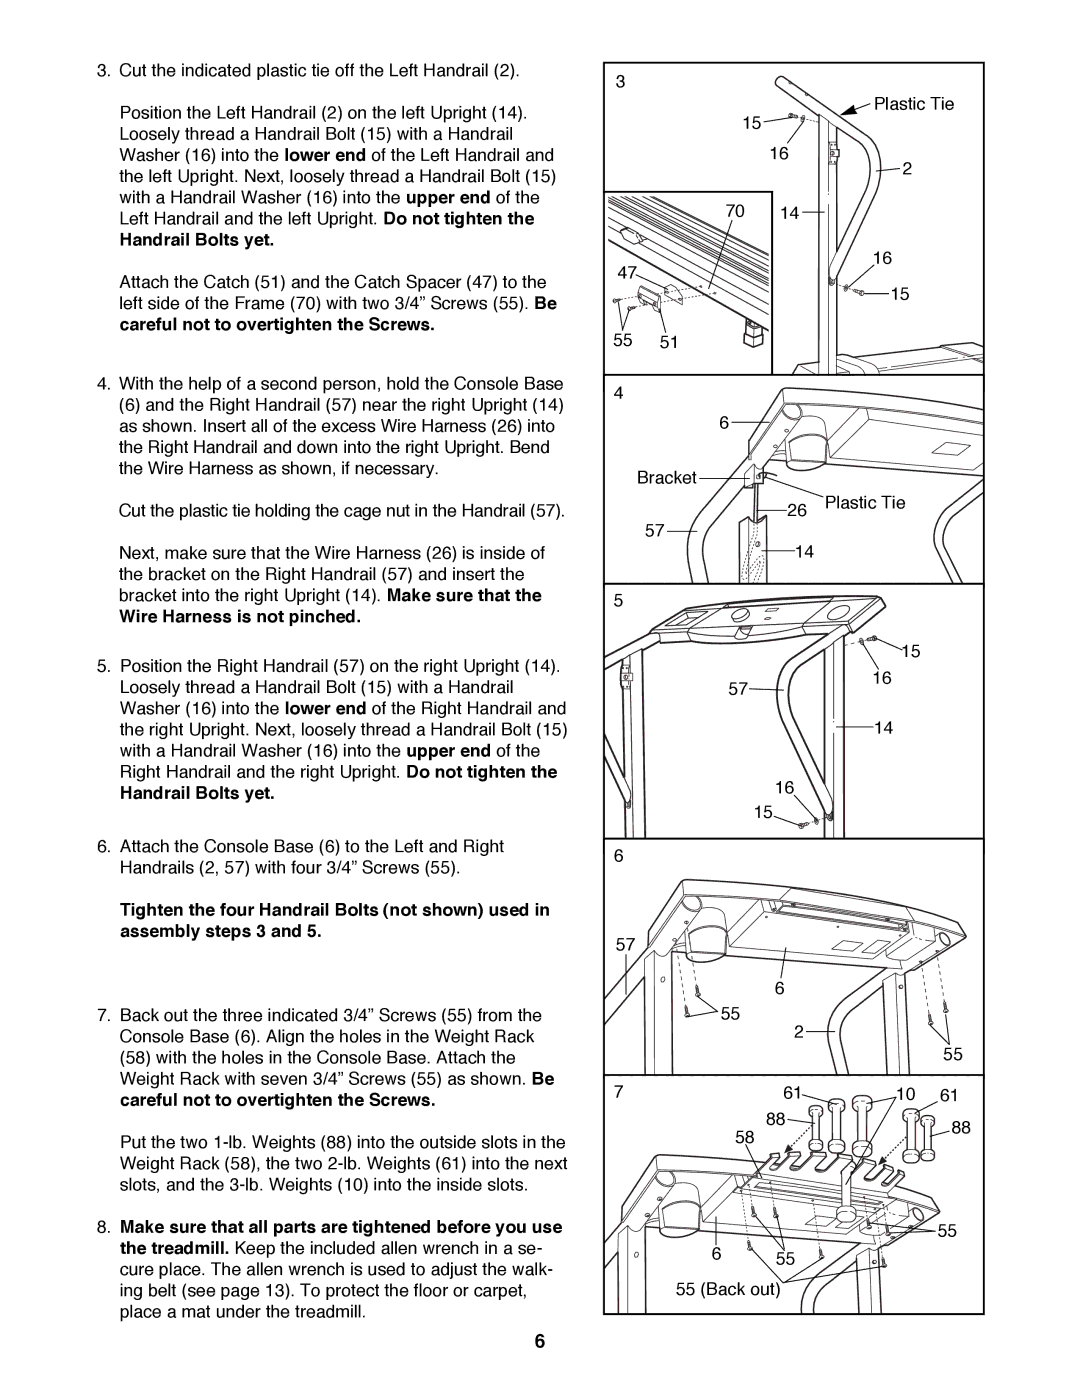
3.Cut the indicated plastic tie off the Left Handrail (2).
Position the Left Handrail (2) on the left Upright (14). Loosely thread a Handrail Bolt (15) with a Handrail Washer (16) into the lower end of the Left Handrail and the left Upright. Next, loosely thread a Handrail Bolt (15) with a Handrail Washer (16) into the upper end of the Left Handrail and the left Upright. Do not tighten the
Handrail Bolts yet.
Attach the Catch (51) and the Catch Spacer (47) to the left side of the Frame (70) with two 3/4Ó Screws (55). Be careful not to overtighten the Screws.
4.With the help of a second person, hold the Console Base
(6) and the Right Handrail (57) near the right Upright (14) as shown. Insert all of the excess Wire Harness (26) into the Right Handrail and down into the right Upright. Bend the Wire Harness as shown, if necessary.
Cut the plastic tie holding the cage nut in the Handrail (57).
Next, make sure that the Wire Harness (26) is inside of the bracket on the Right Handrail (57) and insert the bracket into the right Upright (14). Make sure that the
Wire Harness is not pinched.
5.Position the Right Handrail (57) on the right Upright (14). Loosely thread a Handrail Bolt (15) with a Handrail Washer (16) into the lower end of the Right Handrail and the right Upright. Next, loosely thread a Handrail Bolt (15) with a Handrail Washer (16) into the upper end of the Right Handrail and the right Upright. Do not tighten the
Handrail Bolts yet.
6.Attach the Console Base (6) to the Left and Right Handrails (2, 57) with four 3/4Ó Screws (55).
Tighten the four Handrail Bolts (not shown) used in assembly steps 3 and 5.
7.Back out the three indicated 3/4Ó Screws (55) from the Console Base (6). Align the holes in the Weight Rack (58) with the holes in the Console Base. Attach the Weight Rack with seven 3/4Ó Screws (55) as shown. Be careful not to overtighten the Screws.
Put the two
8.Make sure that all parts are tightened before you use the treadmill. Keep the included allen wrench in a se- cure place. The allen wrench is used to adjust the walk- ing belt (see page 13). To protect the floor or carpet, place a mat under the treadmill.
6
3 |
|
|
|
|
| 15 |
| Plastic Tie | |
|
|
|
| |
|
| 16 | 2 |
|
|
|
|
| |
| 70 | 14 |
|
|
47 |
| 16 |
| |
|
|
| ||
|
|
| 15 |
|
55 | 51 |
|
|
|
4 |
|
|
|
|
| 6 |
|
|
|
| Bracket |
|
|
|
|
| 26 | Plastic Tie |
|
| 57 |
|
|
|
|
| 14 |
|
|
5 |
|
|
|
|
|
|
| 15 |
|
| 57 |
| 16 |
|
|
|
|
| |
|
|
| 14 |
|
|
| 16 |
|
|
| 15 |
|
| |
6 |
|
|
|
|
57 |
|
|
|
|
|
| 6 |
|
|
| 55 | 2 |
|
|
|
|
|
| |
|
|
|
| 55 |
7 |
| 61 | 10 | 61 |
| 58 | 88 |
| 88 |
|
|
| ||
|
|
|
| |
|
|
|
| 55 |
| 6 | 55 |
|
|
|
|
|
| |
| 55 (Back out) |
|
| |