HELPFUL HINTS
. | ALWAYS wash the potato to remove any dirt before putting through the cutter. |
. | Potato can be cut with the skin or without. |
ASSEMBLY INSTRUCTIONS
CAUTION! Use extreme care when handling the Cutting Plates and the Blades! The Blades are extremely SHARP! It is suggested that you wear Kevlar Cut- Resistant Gloves when handling the Cutting Plates.
. If the potato is too big to fit into the French Fry Cutter, simply cut it in half. | |
. | Place a pan or bowl under Cutting Plate to catch the fries as they are cut. |
. | NOTE: Make sure all bolts are tight before using the French Fry Cutter. |
.NOTE: Before using the French Fry Cutter for the first time, thoroughly wash all parts that will contact food with warm, soapy water. Rinse with clean water and dry thoroughly.
.NOTE: Before and After each use, apply a
CHOOSING YOUR POTATO
French Fries are a popular side dish that are quick to prepare and low cost. Not all potatoes will make good french fries. For good fries, potatoes need a high solids content to ensures a distinct, mealy texture and hearty flavor. They also absorb less oil, producing crispier fries. Most russet potatoes will produce good french fries, although you can also
1.Remove French Fry Cutter from the packaging and verify that you have received all of the parts.
2.Remove the protective film covering the Shield.
3.Position the Shield into the French Fry Cutter body. NOTE: Be certain that the Shield is positioned in the notches and pushed the whole way down, so that it rests on top of the Cutting Plate.
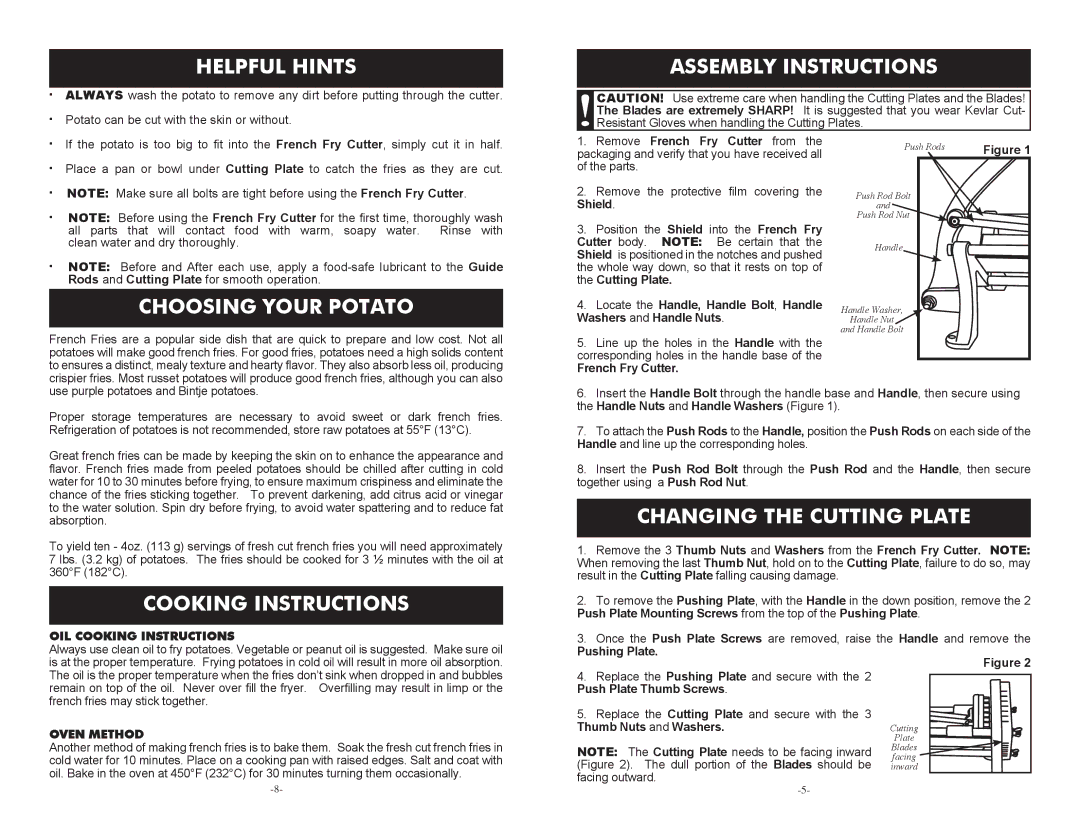
4.Locate the Handle, Handle Bolt, Handle Washers and Handle Nuts.
5.Line up the holes in the Handle with the corresponding holes in the handle base of the
French Fry Cutter.
Push Rods | Figure 1 |
|
Push Rod Bolt
and
Push Rod Nut
Handle
Handle Washer,
Handle Nut
and Handle Bolt
use purple potatoes and Bintje potatoes.
Proper storage temperatures are necessary to avoid sweet or dark french fries. Refrigeration of potatoes is not recommended, store raw potatoes at 55°F (13°C).
Great french fries can be made by keeping the skin on to enhance the appearance and flavor. French fries made from peeled potatoes should be chilled after cutting in cold water for 10 to 30 minutes before frying, to ensure maximum crispiness and eliminate the chance of the fries sticking together. To prevent darkening, add citrus acid or vinegar to the water solution. Spin dry before frying, to avoid water spattering and to reduce fat absorption.
To yield ten - 4oz. (113 g) servings of fresh cut french fries you will need approximately 7 lbs. (3.2 kg) of potatoes. The fries should be cooked for 3 ½ minutes with the oil at 360°F (182°C).
COOKING INSTRUCTIONS
OIL COOKING INSTRUCTIONS
Always use clean oil to fry potatoes. Vegetable or peanut oil is suggested. Make sure oil is at the proper temperature. Frying potatoes in cold oil will result in more oil absorption. The oil is the proper temperature when the fries don’t sink when dropped in and bubbles remain on top of the oil. Never over fill the fryer. Overfilling may result in limp or the french fries may stick together.
OVEN METHOD
Another method of making french fries is to bake them. Soak the fresh cut french fries in cold water for 10 minutes. Place on a cooking pan with raised edges. Salt and coat with oil. Bake in the oven at 450°F (232°C) for 30 minutes turning them occasionally.
6.Insert the Handle Bolt through the handle base and Handle, then secure using the Handle Nuts and Handle Washers (Figure 1).
7.To attach the Push Rods to the Handle, position the Push Rods on each side of the Handle and line up the corresponding holes.
8.Insert the Push Rod Bolt through the Push Rod and the Handle, then secure together using a Push Rod Nut.
CHANGING THE CUTTING PLATE
1. Remove the 3 Thumb Nuts and Washers from the French Fry Cutter. NOTE: When removing the last Thumb Nut, hold on to the Cutting Plate, failure to do so, may result in the Cutting Plate falling causing damage.
2. To remove the Pushing Plate, with the Handle in the down position, remove the 2 Push Plate Mounting Screws from the top of the Pushing Plate.
3. Once the Push Plate Screws are removed, raise the Handle and remove the
Pushing Plate.
Figure 2
4. Replace the Pushing Plate and secure with the 2 Push Plate Thumb Screws.
5. Replace the Cutting Plate and secure with the 3 |
|
Thumb Nuts and Washers. | Cutting |
| Plate |
NOTE: The Cutting Plate needs to be facing inward | Blades |
facing | |
(Figure 2). The dull portion of the Blades should be | inward |
facing outward. |
|