Wharfedale 10.7, 10.2, 10.5, 10.4 Diamond 10 Subwoofers, Introduction, Unpacking your Subwoofer

Models: 10.6 10.1 10.3 10.4 10.5 10.7 10 10.2

1 10
Download 10 pages 5.95 Kb
Page 10
Image 10
Diamond 10 Subwoofers
Screw
Foot
Threaded
Washer

Diamond 10 Subwoofers

Introduction

Wharfedale subwoofers are intended for use with high quality domestic sound systems. They are equally effective in Stereo and Home Cinema applications. Your subwoofer will probably be used in conjunction with Wharfedale loudspeakers though they will partner any audiophile or top-quality home cinema amplification and loudspeakers.

Unpacking your Subwoofer

Open the carton and remove all the top packing pieces. Lift the subwoofer out taking care not to damage the cabinet. When lifting the unit from the carton support it from the bottom. DO NOT attempt to lift the subwoofer out of the carton using the protective bag. The unit is heavy; if you cannot manage it easily, get someone to assist you.

Preparing the Subwoofer

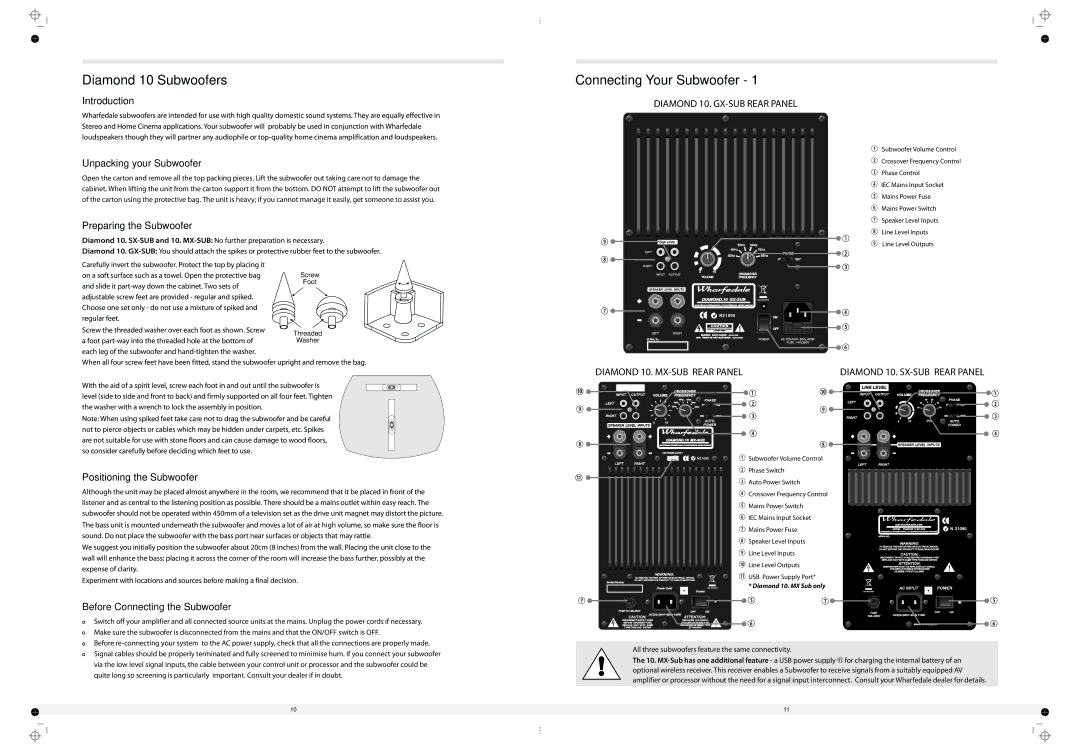
Diamond 10. SX-SUB and 10. MX-SUB:No further preparation is necessary.

Diamond 10. GX-SUB:You should attach the spikes or protective rubber feet to the subwoofer. Carefully invert the subwoofer. Protect the top by placing it

on a soft surface such as a towel. Open the protective bag and slide it part-way down the cabinet. Two sets of

adjustable screw feet are provided - regular and spiked. Choose one set only - do not use a mixture of spiked and

regular feet.

Screw the threaded washer over each foot as shown. Screw

a foot part-way into the threaded hole at the bottom of each leg of the subwoofer and hand-tighten the washer.

When all four screw feet have been fitted, stand the subwoofer upright and remove the bag.

Connecting Your Subwoofer - 1

DIAMOND 10. GX-SUB REAR PANEL


b Subwoofer Volume Control


c Crossover Frequency Control


d Phase Control


e IEC Mains Input Socket


f Mains Power Fuse


g Mains Power Switch


h Speaker Level Inputs


i Line Level Inputs

LINE LEVEL


j Line Level Outputs


55Hz 65Hz

LEFT


45Hz

75Hz


PHASE


35Hz

85Hz


180°

RIGHT


0

10

CROSSOVER


INPUT

OUTPUT

VOLUME


FREQUENCY


SPEAKER LEVEL INPUTS


DIAMOND.10 GX-SUB


WHARFEDALE INTERNATIONAL LTD,HUNTINGDON, UNITED KINGDOM


N21090

ON


OFF


LEFT

RIGHT


SERIAL No:


POWER

AC 220-240V~50Hz 400W


FUSE T4AL250V

With the aid of a spirit level, screw each foot in and out until the subwoofer is level (side to side and front to back) and firmly supported on all four feet. Tighten the washer with a wrench to lock the assembly in position.

Note: When using spiked feet take care not to drag the subwoofer and be careful not to pierce objects or cables which may be hidden under carpets, etc. Spikes are not suitable for use with stone floors and can cause damage to wood floors, so consider carefully before deciding which feet to use.

Positioning the Subwoofer

Although the unit may be placed almost anywhere in the room, we recommend that it be placed in front of the listener and as central to the listening position as possible. There should be a mains outlet within easy reach. The subwoofer should not be operated within 450mm of a television set as the drive unit magnet may distort the picture. The bass unit is mounted underneath the subwoofer and moves a lot of air at high volume, so make sure the floor is sound. Do not place the subwoofer with the bass port near surfaces or objects that may rattle.

We suggest you initially position the subwoofer about 20cm (8 inches) from the wall. Placing the unit close to the wall will enhance the bass; placing it across the corner of the room will increase the bass further, possibly at the expense of clarity.

Experiment with locations and sources before making a final decision.

Before Connecting the Subwoofer

￿ Switch off your amplifier and all connected source units at the mains. Unplug the power cords if necessary.

￿

Make sure the subwoofer is disconnected from the mains and that the ON/OFF switch is OFF.

￿

Before re-connecting your system to the AC power supply, check that all the connections are properly made.

DIAMOND 10. MX-SUB REAR PANEL

b Subwoofer Volume Control

c Phase Switch

d Auto Power Switch

e Crossover Frequency Control

f Mains Power Switch

g IEC Mains Input Socket

h Mains Power Fuse

i Speaker Level Inputs

j Line Level Inputs

1) Line Level Outputs

1! USB Power Supply Port*

* Diamond 10. MX Sub only

DIAMOND 10. SX-SUB REAR PANEL

LINE LEVEL


CROSSOVER


INPUT OUTPUT

VOLUME FREQUENCY


LEFT

55

65

PHASE

45

75


180°


35

85


RIGHT


ON

OFF


(Hz)

AUTO


POWER

SPEAKER LEVEL INPUTS

LEFT RIGHT


SUB-WOOFER AMPLIFIER


MODEL: DIAMOND.10 SX-SUB


N 21090


WHARFEDALE INTERNATIONAL LTD,HUNTINGDON,UNITED KINGDOM


SERIAL NO.:


WARNING:


TO REDUCE THE RISK OF FIRE OR ELECTRICAL SHOCK,


DO NOT EXPOSE THIS PRODUCT TO RAIN OR MOISTURE


CAUTION:


DISCONNECT SUPPLY CORD BEFORE CHANGING FUSE,


REPLACE ONLY WITH SAME TYPE FUSE AND RATING


ATTENTION:


DEBRANCHER AVANT DE REPLACER LE FUSIBLE,


UTILISER UN FUSIBLE DE RECHANGE


DE MEME TYPE ET CALIBRE


AC INPUT

POWER

FUSE

AC220-240V 50Hz 110W

OFF

ON

T2A L250V


MANUFACTURE DATE:

￿ Signal cables should be properly terminated and fully screened to minimise hum. If you connect your subwoofer

via the low level signal inputs, the cable between your control unit or processor and the subwoofer could be

quite long so screening is particularly important. Consult your dealer if in doubt.

All three subwoofers feature the same connectivity.

The 10. MX-Sub has one additional feature - a USB power supply 1! for charging the internal battery of an optional wireless receiver. This receiver enables a Subwoofer to receive signals from a suitably equipped AV amplifier or processor without the need for a signal input interconnect. Consult your Wharfedale dealer for details.


10

11


Page 10
Image 10
Wharfedale 10.7, 10.2, 10.5, 10.4 Diamond 10 Subwoofers, Introduction, Unpacking your Subwoofer, Preparing the Subwoofer