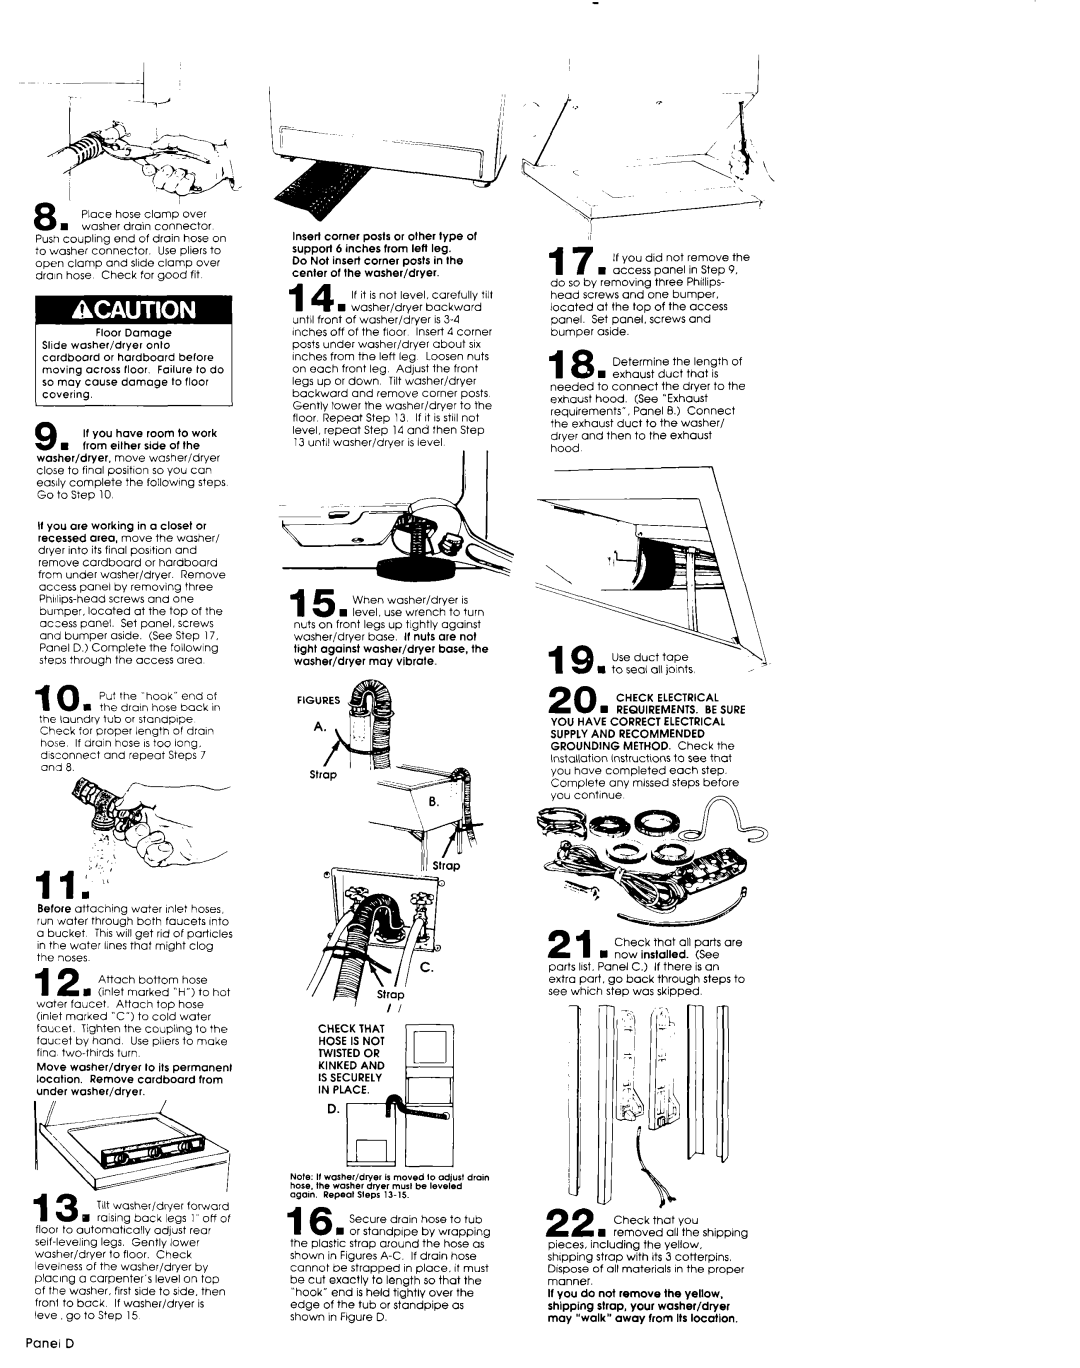
8 n |
| Place | hose | clamp |
|
| over |
| ||||||||
| washer |
| drain |
| connector |
|
| |||||||||
Push | couplrng | end | of | drain |
| hose | on | |||||||||
to | washer |
| connector. |
|
| Use | pliers | to | ||||||||
open |
| clamp |
| and | slrde | clamp |
| over | ||||||||
drain |
| hose |
| Check | for | good |
| fit |
| |||||||
|
|
|
|
| Floor |
| Domoge |
|
|
|
|
| ||||
| Slide | washer/dryer |
|
| onlo |
|
|
|
|
| ||||||
| cordboord |
|
| or | hordboard |
|
| before |
| |||||||
| moving | across |
| floor. |
| Failure |
| to | do | |||||||
| so | may | cause | damage |
| to | floor |
| ||||||||
| covering. |
|
|
|
|
|
|
|
|
|
|
|
|
| ||
9 . |
| If you | have |
| room |
| to | work | ||||||||
| from | either | side | of | the |
| ||||||||||
washer/dryer, |
|
| move |
| washer/dryer |
| ||||||||||
close |
| to | final | positron | so | you |
| can |
| |||||||
easily |
| complete |
| the | followrng |
| steps | |||||||||
Go | to | Step |
| 10 |
|
|
|
|
|
|
|
|
|
| ||
It | you | are |
| working |
| in | a | closet |
| or |
| |||||
recessed |
| area, | move |
| the washer/ |
| ||||||||||
dryer |
| into |
| its | final | positron |
| and |
|
| ||||||
remove |
| cardboard |
| or | hardboard |
| ||||||||||
from |
| under |
| washer/dryer. |
|
| Remove | |||||||||
access | panel |
| by | removing |
|
| three |
| ||||||||
| screws |
| and |
| one |
|
| |||||||||
bumper, | located |
|
| at | the | top |
| of | the | |||||||
access | panel. | Set | panel, |
| screws |
| ||||||||||
and | bumoer | aside. |
| (See |
| Steo | 17. | |||||||||
Panel | D.) | Complete |
| ihe | folIowIng |
| ||||||||||
steos | through |
| the | access |
| area |
| |||||||||
10 |
|
|
| Put the “hook” end ot | ||||||||||||
| m |
| the | dram | hose | back | rn | |||||||||
the | laundry |
| tub |
| or | standprpe |
|
|
| |||||||
Check | for | proper |
| lenath |
| of | dram | |||||||||
hose | If | drain | hose | ISibo |
| long. |
| |||||||||
disconnect |
|
| and | repeat |
| Steps | 7 | |||||||||
and |
| 0. |
|
|
|
|
|
|
|
|
|
|
|
|
| |
Before | attaching |
| water | Inlet | hoses | ||||||||
run | water | through | both | faucets |
| Into | |||||||
a | bucket |
| Thus | will | aet | rid | of | oatircles | |||||
In | the | water |
| lanes | t<at |
| might’clog |
|
| ||||
the |
| noses |
|
|
|
|
|
|
|
|
|
| |
12 m |
| Attach | bottom |
| hose |
| |||||||
| (inlet | marked | “H”) | to | hot | ||||||||
water |
| faucet. | Attach |
| top | hose |
| ||||||
(Inlet |
| marked | “C”) | to | cold | water |
| ||||||
faucet. | Tighten | the | coupling |
| to | the | |||||||
faucet | by |
| hand |
| Use |
| plrers |
| to | make | |||
fina | turn |
|
|
|
|
|
|
| |||||
Move |
| washer/dryer |
|
| to | its | permanent | ||||||
location. |
| Remove | cordboord |
| from | ||||||||
under |
| wosherldrver. |
|
|
|
|
|
|
| ||||
Insert | corner | posts |
| or | other | type |
| of | |||||
support |
| 6 | inches |
| from | left | leg. |
|
|
| |||
Do | Not |
| insert | corner | aosts | in | the |
| |||||
center |
| of | the | washer>drYer |
|
|
|
| |||||
14 n | If | it is | not | level, | carefully | tilt | |||||||
washerldrver |
| backward |
| ||||||||||
until | front | of | washer/dryer |
| is |
| |||||||
Inches |
| off | of | the |
| floor | Insert | 4 | corner | ||||
posts | under |
| washer/dryer |
| about |
| SIX | ||||||
Inches |
| from | the | left | leg | Loosen |
| nuts | |||||
on | each | front | leg |
| Adyst | the |
| front | |||||
legs | up | or | down |
| Tilt | washer/dryer |
|
| |||||
backward |
| and | remove | corner |
| posts | |||||||
Gently |
| lower | the |
| washer/dryer |
| to | the | |||||
floor | Repeat | Step |
| 13 | If It is stall not | ||||||||
level, | repeat | Step |
| 14 | and | then | Step | ||||||
13 | until |
| washeridrver |
|
| is level |
|
|
| ||||
15 n | When | washer/dryer |
| IS | ||
level. | use | wrench | to | turn | ||
nits | on front | legs | up | tightly | against | |
washer/dryer | base. | If nuts | are | not | ||
tight | against | washer/dryer | base, | the | ||
washer/dryer | may | vibrate. |
|
| ||
CHECK THAT rZI=Z
HOSE IS NOT
TWISTED OR
KINKED AND
17 If you did not remove the n access panel in Step 9.
do so by removing three Phrllips- head screws and one bumper.
located at the top of the access
panel. Set panel. screws and
bumper aside.
18 Determine the length of n exhaust duct that is
needed to connect the dryer to the exhaust hood. (See “Exhaust
requirements*, Panel 8.) Connect the exhaust duct to the washer/ &vda and then to the exhaust
\
20 n | CHECK ELECTRICAL | |||
REQUIREMENTS. | BE SURE | |||
YOU | HAVE | CORRECT | ELECTRICAL | |
SUPPLY AND RECOMMENDED |
| |||
GROUNDING | METHOD. | Check | the | |
Installation | lnstructrons | to see | that | |
YOU | have | CornDIeted | each | step. |
Complete | any mrssed | steps | before | |
you | continue |
|
|
|
21 Check that all parts are
n now installed. (See parts Ikst. Panel C.) If there is an
extra part. QO back through steps to see which step was skipped.
13 E |
| Tilt | washer/dryer | forward | |||||
ralsrng | back | legs | I” | off of | |||||
floor | to | automatrcallv | adjust | rear | |||||
| legs. | Gently | lower |
| |||||
washerldrver |
| to | floor. | Check |
|
| |||
levelness | of | the | washer/dryer | bv | |||||
placrng |
| a | carpenter’s | level | on | top | |||
Of the |
| washer, |
| first side | to stde. | then | |||
froni | to | back |
| If | washer/drver.is |
|
| ||
leve | QO to | Step | 15 |
|
|
| |||
Note: If washer/dryer is moved lo odiurl drain hose. the washer dryer musl be leveled
agan. Pepear srepr
16 Secure drain hose to tub
n or standoroe bv wraobina the plastic strap arou’nd the hose as- shown in Figures
cannot be strapped
edge of the tub or standpipe as shown In Frgure D.
11
22 |
| Check | that | you |
| |||
n | removed |
| all | the | shlpprng | |||
pieces, |
| including | the | yellow. |
| |||
shipping | Strap | with | Its | 3 | Cotterpins. | |||
Drspose | of all | materials |
| rn the | proper | |||
manner. |
|
|
|
|
|
|
| |
If You | do | not | remove |
| the | Yellow, | ||
shipping | strap, | Your | washer/dryer |
| ||||
may | “walk” | away | from | Its location. | ||||
Panel D