|
|
| Take | CI few | minutes |
| to |
| |||||
17 n read the “Ice maker |
|
| |||||||||||
operation” |
|
| section, | Panel | C, | and | the | ||||||
Use | and | Core | Guide |
| to | fully |
|
|
| ||||
understand |
|
| your | new | ice | maker. |
| ||||||
18 n | Open | rce | maker |
| door. |
| |||||||
Wash | out | the | interior |
| of | ||||||||
the | bin | wtth |
| CI solution |
| of | two |
|
| ||||
tablespoons |
|
| of | baking |
| soda | and | one | |||||
quart | of | water. |
| Rinse | the | bin |
|
| |||||
thoroughly |
|
| with | water. |
|
|
|
|
|
| |||
19 . |
| If | Ice | maker |
| is | rnstolled |
| |||||
| above | 2,DBfeet |
|
|
|
| |||||||
altitude, | the |
| bin | and |
| evaporator |
|
| |||||
thermostats |
| will | need | odjusttng. |
|
| |||||||
Remove | the |
| thermostats |
|
| and | follow | ||||||
the | drrections |
| for turning |
| the |
| altitude | ||||||
adjustment |
|
| screws | OS shown |
| on |
| ||||||
each | of | the |
| thermostat |
| labels. |
|
| |||||
Relnstoll | the |
| thermostats |
|
| in | the ice | ||||||
maker. |
|
|
|
|
|
|
|
|
|
|
|
| |
20 | w |
| Replace | the | access |
| grrlle. | ||||||
|
|
|
|
|
|
|
|
|
|
|
| ||
21 n |
| Turn | on | the |
| water |
| supply | |||||
and | check |
| for | leaks | Then | ||||||||
turn | on | the |
| electrical |
| supply |
|
|
| ||||
|
|
|
| Turn | the | ice | maker | control | |||||
22. knob to the right to the
“CLEAN” position. Check that the
pump motor is operating correctly
23Turn the control knob to
. the ‘ON’ position. Check
that the condenser fan is revolving.
Important:
Ice maker must run for three hours before you may expecl ice.
24 n | Let | the ice | maker | run | for | ||
three | hours | When | water | ||||
flows | over | the | freezing | plate, | check | ||
that | it is flowing | evenly | If it | IS not, | the | ||
ice maker | IS not | level | and | Step |
| 15 | |
should | be | repeated. |
|
|
|
| |
Important:
Do Not adjust the thickness setting until Ice maker has run for 24 hours.
25 n | Continue |
| to | let the ice | ||||
maker | run | for | 24 | hours. | ||||
Check | to | see | if cubes |
| are | the |
| |
desrred | thickness | and, | if | necessary. | ||||
odiust | the | thickness | control. |
| ||||
26 W | If | tnstalling |
| decorative | ||||
wood | panels | on | the | |||||
door | and | lower |
| panel, |
| follow | the “To | |
change | the bin | door |
| and | lower | |||
panel- | instructlons. |
|
|
|
|
| ||
\Congratulations! J
wKeep lnstallutlon lnstructlons
Before running your rce maker for the frrst time, you should note the followinQ
*Water enters only durrng the defrost cycle, so the first harvest
| cycle |
| ~111 be | completed |
| without |
| ||||||||
| water |
| in | the | system. |
|
|
|
|
|
| ||||
l | Water |
| WIII | not | enter | the | pump |
|
| ||||||
| pan | until | the | freezing | plate | gets |
| ||||||||
| cold | and | the | ice | maker |
| begIns | o | |||||||
| harvest | cycle |
|
|
|
|
|
|
|
|
| ||||
l | A normal | harvest | cycle |
| takes |
|
| ||||||||
| between |
| 60 | to | 120 | seconds |
| to |
| ||||||
| complete. |
| However, | do |
| not |
|
| |||||||
| expect | Ice | until |
| the | ice |
| maker |
|
| |||||
| hds |
| been |
| operating | for |
| at | least |
| |||||
| three |
| hours |
|
|
|
|
|
|
|
|
|
| ||
- | The |
| evaporator |
|
| thermostat |
|
| opens |
| |||||
| when |
| the |
| evaporator | reaches |
|
| |||||||
| the |
| preset |
| temperature |
|
|
|
|
|
| ||||
| (+lo” |
| to | depending |
|
| on | the |
| ||||||
| thickness | of | the |
| ice) | The | hot | was | |||||||
| solenord | and | the | water |
| valve |
|
| |||||||
| solenoid |
| are | energized |
| at | this |
| |||||||
| time, |
| so | the | pump |
| motor |
|
| and | fan | ||||
| motor |
| wrll | shut | down. | The | motors |
| |||||||
| will | reman |
| off | and | the | solenoids |
| |||||||
| wrll | remain |
| charged | until |
| the |
|
| ||||||
| evaporator |
|
| reaches | 38°F | &2”F) |
| ||||||||
| ago,“. |
|
|
|
|
|
|
|
|
|
|
|
| ||
l | As | the | temperature |
| of | the | room |
| |||||||
| and | water |
| varies, | so will |
| the |
|
| ||||||
| amount |
| of | Ice | produced. |
|
| Hrgher |
| ||||||
| operating |
| temperatures |
| will | result | |||||||||
| in | less | ice |
| made |
| To make | the |
| ||||||
| most |
| ice. | set | the | thickness |
| control |
| ||||||
| to | produce |
|
| l/2’ |
| to | 510’ |
| cubes |
|
| |||
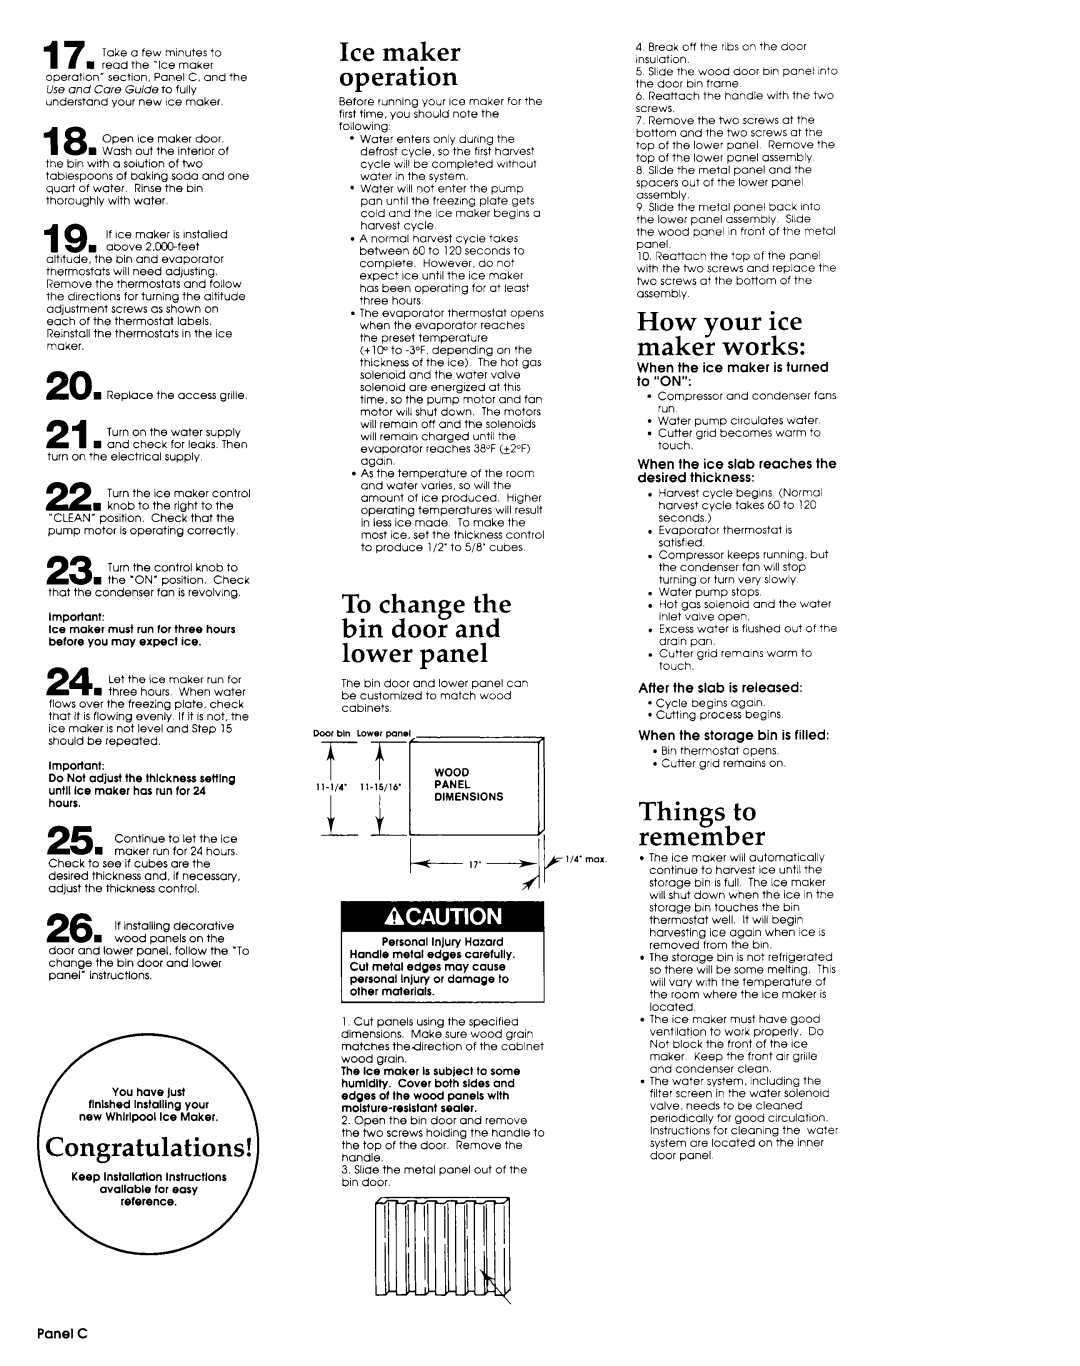
To change the bin door and lower panel
The bin door and lower panel con
be customized to match wood cabrnets.
Personal InJury Hazard Handle metal edges carefully. Cut metal edges may cause personal ln]ury or damage to other materials.
1 Cut panels | using | the | specified |
| |
dimensions. |
| Make | sure | wood | groin |
matches | thedrrectlon |
| of the | coblnet | |
wood grain.
The Ice maker Is subject to some humldlty. Cover both sides and edges of the wood panels with
2. | Open | the bin door | and remove |
| ||
the | two | screws | holding | the | handle | to |
the | top | of the | door. | Remove | the |
|
handle.
3.Slrde the metal panel out of the brn door.
4 Break off the ribs on the door insulation.
5 Slide the wood door brn panel Into the door brn frame
6. Reattach the handle with the two
screws.
7.Remove the two screws at the
bottom and the two screws at the
top of the lower panel Remove the top of the lower panel assembly
8Slide the metal panel and the spacers out of the lower panel assembly.
9Slrde the metal panel back Into
the lower panel assembly Slide
the wood panel in front of the metal panel.
10.Reattach the tow of the pore
with the two screws’and replace the
two screws at the bottom of the assembly.
How your ice maker works:
When the ice maker is turned to “ON”:- Compressor and condenser fans run
l Water pump crrculates water
- Cutter grad becomes worm to touch.
When the ice slab reaches the desired thickness:. Harvest cycle begins (Normal harvest cycle takes 60 to 120 seconds.)
l Evaporator thermostat IS satisfied.
. Compressor keeps running. but
the condenser fan will stop turning or turn very slowly
. Water pump stops
. Hot QOS solenoid and the water inlet valve open.
. Excess water IS flushed out of the drain pan.
. Cutter grid remalns worm to touch.
After the slab is released:* | Cycle | begins | oQaIn. |
l | Cuthng | process | begins |
l | Bin thermostat | opens. |
| |
. | Cutter | grid | remains | on. |
Things |
|
|
| to |
|
|
|
|
|
| |||||
remember |
|
|
|
|
|
|
| ||||||||
l | The | ice |
| maker |
| will | automatically |
|
| ||||||
| continue |
| to | harvest |
| Ice | until | the |
| ||||||
| storage |
| bin | IS full | The | Ice | maker |
| |||||||
| wrll | shut |
| down |
| when |
| the |
| ice | I” | the | |||
| storage |
| bin | touches |
| the |
| bin |
|
| |||||
| thermostat |
|
| well. |
| It |
| will | begin |
|
| ||||
| harvesting |
|
| ice |
| agoln | when |
| Ice | IS | |||||
| removed |
| from |
| the |
| brn. |
|
|
|
|
| |||
l | The | storage | bin |
| is not | refrigerated |
| ||||||||
| so there |
| will | be |
| some | melting. |
| This | ||||||
| will | vary |
| with | the | temperature |
| of | |||||||
| the | room | where |
| the | Ice | maker | is | |||||||
| located |
|
|
|
|
|
|
|
|
|
|
|
|
| |
l | The | ice |
| maker |
| must |
| have | good |
| |||||
| ventllatron |
|
| to | work |
| properly. | Do | |||||||
| Not | block | the |
| front |
| of | the | Ice |
| |||||
| maker |
| Keep | the | front |
| air grille |
| |||||||
| and | condenser |
|
| clean. |
|
|
|
|
| |||||
- | The | water | system. | Including |
| the |
| ||||||||
| filter | screen | in |
| the | water |
| solenord |
| ||||||
| valve, | needs |
| to | be |
| cleaned |
|
| ||||||
| perrodrcally |
| for |
| good | circulatrOn. |
| ||||||||
| lnstructrons |
| for |
| cleaning |
| the | water | |||||||
| system | are | located |
| on |
| the | inner |
| ||||||
| door | panel |
|
|
|
|
|
|
|
|
|
|
| ||