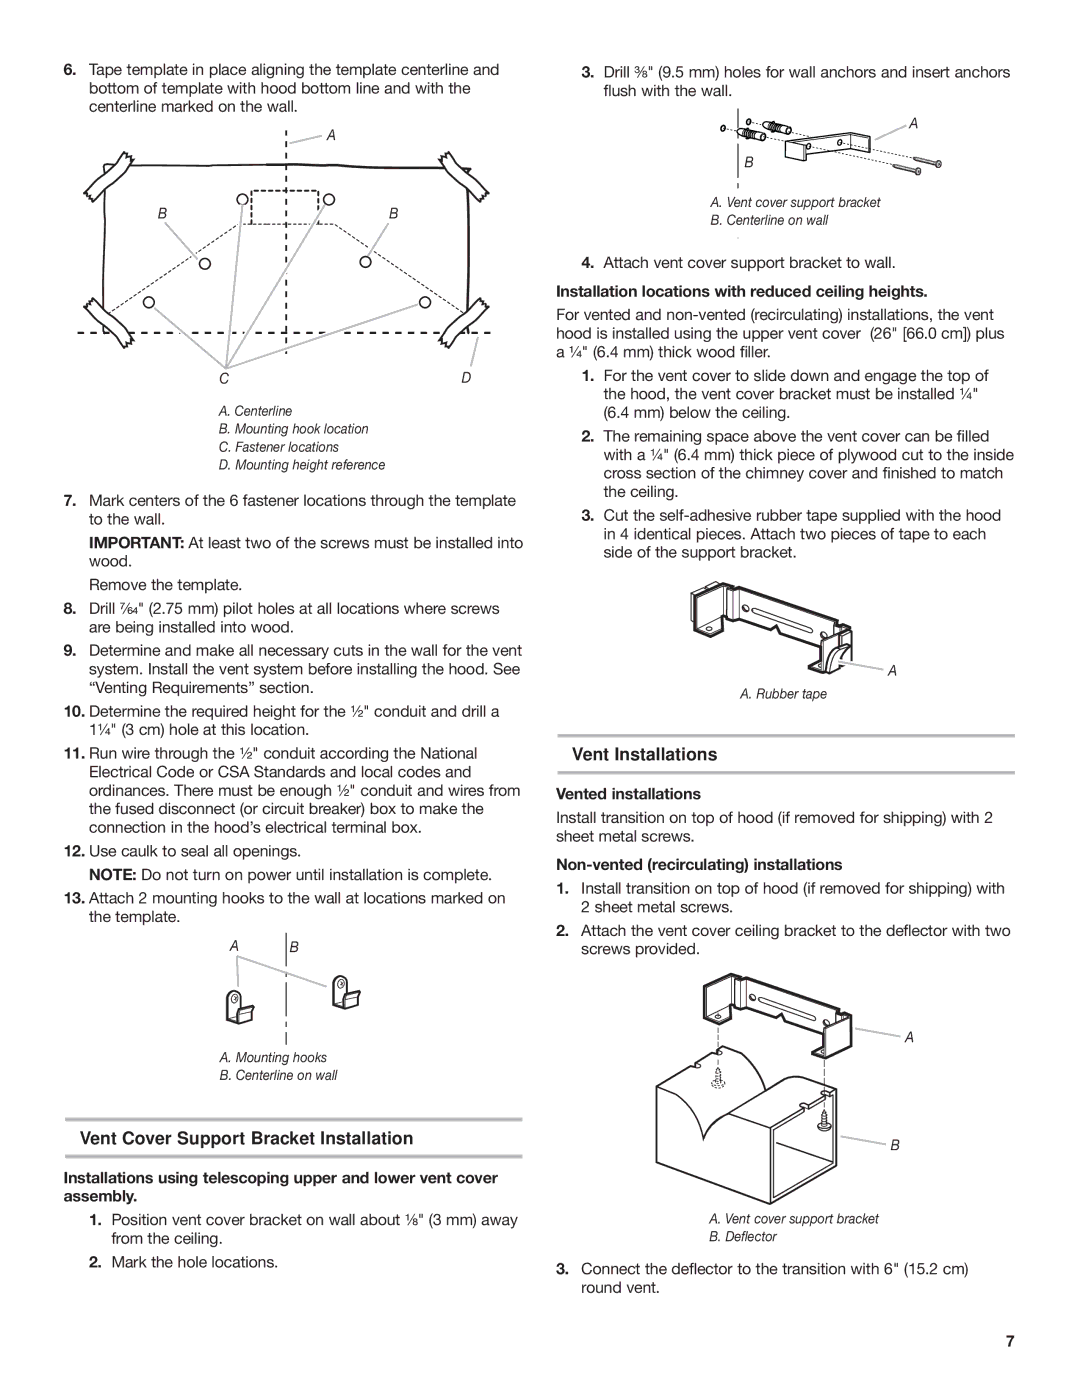
6.Tape template in place aligning the template centerline and bottom of template with hood bottom line and with the centerline marked on the wall.

A

BB

CD

A.Centerline

B.Mounting hook location

C.Fastener locations

D.Mounting height reference

7.Mark centers of the 6 fastener locations through the template to the wall.

IMPORTANT: At least two of the screws must be installed into wood.

Remove the template.

8.Drill ⁷⁄₆₄" (2.75 mm) pilot holes at all locations where screws are being installed into wood.

9.Determine and make all necessary cuts in the wall for the vent system. Install the vent system before installing the hood. See “Venting Requirements” section.

10.Determine the required height for the ¹⁄₂" conduit and drill a 1¹⁄₄" (3 cm) hole at this location.

11.Run wire through the ¹⁄₂" conduit according the National Electrical Code or CSA Standards and local codes and ordinances. There must be enough ¹⁄₂" conduit and wires from the fused disconnect (or circuit breaker) box to make the connection in the hood’s electrical terminal box.

12.Use caulk to seal all openings.

NOTE: Do not turn on power until installation is complete.

13.Attach 2 mounting hooks to the wall at locations marked on the template.

AB

A.Mounting hooks

B.Centerline on wall

Vent Cover Support Bracket Installation

Installations using telescoping upper and lower vent cover assembly.

1.Position vent cover bracket on wall about ¹⁄₈" (3 mm) away from the ceiling.

2.Mark the hole locations.

3.Drill ³⁄₈" (9.5 mm) holes for wall anchors and insert anchors flush with the wall.

A

B

A. Vent cover support bracket

B. Centerline on wall

4.Attach vent cover support bracket to wall.

Installation locations with reduced ceiling heights.

For vented and non-vented (recirculating) installations, the vent hood is installed using the upper vent cover (26" [66.0 cm]) plus a ¹⁄₄" (6.4 mm) thick wood filler.

1.For the vent cover to slide down and engage the top of the hood, the vent cover bracket must be installed ¹⁄₄"

(6.4 mm) below the ceiling.

2.The remaining space above the vent cover can be filled with a ¹⁄₄" (6.4 mm) thick piece of plywood cut to the inside cross section of the chimney cover and finished to match the ceiling.

3.Cut the self-adhesive rubber tape supplied with the hood in 4 identical pieces. Attach two pieces of tape to each side of the support bracket.

A

A. Rubber tape

Vent Installations

Vented installations

Install transition on top of hood (if removed for shipping) with 2 sheet metal screws.

Non-vented (recirculating) installations

1.Install transition on top of hood (if removed for shipping) with 2 sheet metal screws.

2.Attach the vent cover ceiling bracket to the deflector with two screws provided.

A

B

A. Vent cover support bracket

B.Deflector

3.Connect the deflector to the transition with 6" (15.2 cm) round vent.

7

Page 7
Image 7
Whirlpool 9760266 Vent Cover Support Bracket Installation, Vent Installations, Vented installations

9760266 specifications

The Whirlpool 9760266 is a sophisticated appliance designed to enhance the cooking experience in modern kitchens. This versatile microwave oven combines advanced technology with user-friendly features, making it an essential tool for any culinary enthusiast.

One of the standout features of the 9760266 is its sleek design, which seamlessly blends into any kitchen décor. With a stainless-steel finish, it not only offers durability but also adds a touch of elegance to the workspace. The compact size allows for easy installation while still providing ample interior capacity for various cooking tasks.

Equipped with innovative technology, the Whirlpool 9760266 utilizes Sensor Cooking. This feature intuitively adjusts cooking times based on the food's moisture level, ensuring perfect results every time. Whether you are reheating leftovers or cooking a meal from scratch, Sensor Cooking takes the guesswork out of the process, delivering optimal heating.

The microwave also boasts a powerful wattage, which facilitates quick and efficient cooking. With multiple power levels, users can customize the cooking intensity based on their specific needs, from gentle warming to rapid boiling. This flexibility makes the appliance ideal for a range of cooking techniques, including defrosting, steaming, and baking.

Another impressive feature is the combination of convection cooking and microwave capabilities. This dual functionality allows users to achieve not only speedy cooking but also the delicious, even browning associated with traditional ovens. The convection mode circulates hot air, enabling food to cook evenly, making it perfect for baking desserts or roasting meats.

The Whirlpool 9760266 also includes a variety of pre-programmed cooking options, allowing for simple one-touch operation. These presets take the uncertainty out of cooking times and temperatures for various dishes, ranging from popcorn to casseroles.

In terms of user convenience, the appliance has an easy-to-read digital display and intuitive buttons that guide users through the cooking process. The interior is designed for easy cleaning, with a non-stick coating that prevents food residue from sticking.

Safety features are also a priority with the Whirlpool 9760266. It includes a child lock option to prevent accidental usage, making it ideal for families with young children.

In summary, the Whirlpool 9760266 microwave oven combines style, power, and technology. Its efficient cooking capabilities, user-friendly interface, and advanced features make it a valuable addition to any kitchen, elevating the cooking experience to new heights.